SMART on FHIR (OAuth 2.0)
*
*
*
*
*
SMART on FHIR Launch URL
Document not found
That document wasn't found. It may have moved or require you to log in to view.
open.epic Terms of Use
open.epic Terms of Use
Last updated: October 31, 2025
(Added Section 7 under terms “For Developers” to address data collection requirements of Insights Condition and Maintenance of Certification, 45 CFR 170.407)
Before using this website or any Materials, read these terms of use so you understand your responsibilities and Epic’s. You are accepting these terms by using this website or any Materials. Epic may change these terms from time to time - for example, to reflect changes in the Materials we offer or for legal, regulatory, or security reasons. Check back periodically for updates. By continuing to use this website or any Materials after an update, you are accepting the updated terms.
Introduction
Open.epic enables Epic Community Members and developers to use the open.epic Components and certain interfaces and other Epic-developed technologies to connect and interact with Epic Community Members’ Epic software. This website includes Materials to use as you develop, test, market, offer, deploy, and support products or services that interact with the technology available through open.epic.
The sections below describe the terms of use for the Materials and this website that apply specifically to Epic Community Members, those that apply specifically to developers, and those that apply to everyone. Capitalized words or phrases used in these terms are defined in the “Definitions” section below.
The interfaces, application programming interfaces (APIs), and other technologies available through open.epic represent a subset of the interoperability technology that Epic offers to support the access, exchange, and use of electronic health information and other data. Other APIs, technologies, and services may be available under different terms through different processes and programs.
For Epic Community Members
If you are an Epic Community Member, your use of Materials related to the open.epic Components is subject to the open.epic API Subscription Agreement.
You may use other Materials available through open.epic at your own discretion, subject to the terms “For Everyone” below and any applicable terms of your agreement(s) with Epic. You are solely responsible for how you use these Materials and this website to interoperate with products and services.
For Developers
If you are not an Epic Community Member, the following terms, and the terms “For Everyone” below, apply to your use of the Materials and this website.
- This website is the source of truth for current versions of the Materials. You can keep copies of the Materials for yourself. You may distribute them only by linking others directly to the Materials on the website.
- Epic provides the Materials for your use, and you decide how to use them to interoperate with Epic software and provide your products and services to Epic Community Members and end users. With this freedom comes the responsibility to make sure your products and services are behaving appropriately. Accordingly, as between you and Epic, you are solely responsible for your products and services, including how they interact with Epic Community Members’ systems, and for all liability and consequences (e.g., Claims by or on behalf of patients or related to patient harm; data corruption; mapping or saving data to patient records incorrectly; fraudulent or other unethical conduct, such as inappropriately prescribing narcotics or zeroing out a balance due; degraded system response time, performance, and availability; privacy breaches; and security vulnerabilities) that arise from or relate to the use of or inability to use your products or services, or that arise from or relate to data made available to or from your products or services or direct or indirect use of that data. You are also responsible for complying with all applicable laws, including not infringing on Epic’s or others’ intellectual property rights.
-
You agree to indemnify, hold harmless and defend Epic, its subsidiaries, and all of its and their employees, officers, directors, contractors, and other personnel from and against any Claim that in any way arises out of or relates to the use of or inability to use any of your products or services. This obligation covers, for example, any Claim arising out of or related to:
- the accuracy, completeness, integrity, or compliance of your products and services; or
- any data made available to or from your products or services, or the direct or indirect use of that data in Epic Community Members’ Epic or downstream systems.
- Some interoperability technology made available through open.epic requires an Epic Community Member to have a license to other functionality or build additional workflows. Where possible, help our mutual customers avoid surprises by working closely with them and directing them to Epic with any questions related to Epic software.
- If you want to use open.epic or Epic's name or other trademarks, you may do so only in accordance with our Trademark Usage Guidelines. These terms of use do not authorize you to use an Epic Community Member’s logo or other intellectual property.
- Direct access to Epic’s software (including an Epic Community Member’s system) is not needed to develop, test, deploy, or support your product or service. You can test your product or service through the open.epic sandbox or by working with a particular Epic Community Member. Direct access to Epic’s software can be granted only with approval from both an Epic Community Member and Epic.
-
Under the Insights Condition and Maintenance of Certification requirement at 45 CFR 170.407 (https://www.ecfr.gov/current/title-45/section-170.407), Epic must measure and report information about applications that connect to our certified software to demonstrate how our software supports the application ecosystem. This includes details such as:
- the names of connected applications;
- their developers;
- their intended purposes and intended users; and
- whether the connected applications are actively used.
In connection with Epic’s obligations under the ONC Health IT Certification Program or other regulatory or legal requirements, Epic may collect data about you and your use of the Materials, including how your products or services interact with the Materials, and may disclose this data to third parties. If any of this data becomes public (e.g., through publication by the Assistant Secretary for Technology Policy/Office of the National Coordinator for Health Information Technology or by Epic as required under applicable regulatory or legal requirements), Epic reserves the right to further use the data at its discretion.
Refer to the Privacy Policy for additional information about how Epic collects and uses information you provide when creating an account with or otherwise accessing open.epic.com or fhir.epic.com.
For Everyone
The following additional terms apply to all users of the Materials and of this website, except that a Community Member’s use of any Materials related to the open.epic Components is instead governed by the open.epic API Subscription Agreement.
- THE MATERIALS AND THIS WEBSITE MAY INCLUDE INACCURACIES AND ERRORS, AND YOU USE THEM AT YOUR OWN RISK. THE MATERIALS AND THIS WEBSITE ARE PROVIDED AS IS WITHOUT ANY WARRANTY, EXPRESS OR IMPLIED. FOR EXAMPLE, WE DO NOT MAKE ANY PROMISES ABOUT THE CONTENT OR FEATURES OF THE MATERIALS OR THIS WEBSITE, INCLUDING THEIR ACCURACY, RELIABILITY, AVAILABILITY, OR ABILITY TO MEET YOUR NEEDS.
- You own what you develop using the Materials. Epic owns the Materials, as well as any Epic-provided improvements to the Materials or learnings based on the Materials, such as enhancements made by Epic to testing tools or documentation. We want to encourage a vibrant developer environment. If you suggest a way to improve the Materials, you are granting Epic the right to use your suggestion in any manner, including as part of the Materials for others to use, and without any obligation or notice to you.
- The testing sandbox made available through open.epic is meant to simulate an electronic health record environment and is for testing purposes only. The testing sandbox should be populated only with sample or synthetic data. You agree not to put individually identifiable information in any Epic-provided sandboxes. You acknowledge that Epic may wipe or otherwise remove data from those sandboxes in its sole discretion, including any individually identifiable data discovered in a sandbox.
- This website and the Materials are not intended and should not be used for performance, scalability, or security testing. Even so, if you identify an actual or potential security vulnerability with Epic software or the open.epic Components, you will inform Epic about such vulnerability as soon as possible so that Epic can address the issue.
- Wisconsin law will govern all disputes arising out of or relating to these terms of use, regardless of conflict of laws rules. These disputes will be resolved exclusively in the federal or state courts of Dane County, Wisconsin, and you and Epic consent to personal jurisdiction in those courts.
- These terms of use will be severable so that if a provision is not enforceable, it and related terms will be interpreted to best accomplish the essential purpose of that unenforceable provision. However, severability will not apply if it significantly changes the benefit of these terms to you or Epic.
- If these terms of use terminate (e.g., because Epic stops offering the Materials or this website), these terms “For Everyone” and clauses 2 and 3 under the terms ”For Developers” above will survive.
- In these terms, the word “include” and its variants are not words of limitation, and examples are for illustration and not limitation.
Definitions
- Claim means all claims, demands, investigations, inquiries, and actions, and all liabilities, damages, fines, and expenses arising out of or relating thereto, including settlement costs and attorneys’ fees.
- Epic Community Member means a healthcare organization that has a license and support agreement with Epic to use Epic software. For purposes of these terms of use, an Epic Community Member’s affiliated healthcare organizations that use Epic software under its license and support agreement with Epic are considered part of the Epic Community Member.
- Materials means resources made available on open.epic to support your use of the open.epic Components and other interoperability technology described on open.epic, including testing sandboxes, documentation, specifications, and other information related to Epic’s implementation of various interfaces and APIs.
- open.epic Components means the designated application programming interfaces listed here and other functionality licensed directly by Epic Community Members from Epic under the open.epic API Subscription Agreement to facilitate interoperability.
App Creation & Request Process Step-by-Step
Table of Contents
- Overview
- Creating, Activating, and Licensing an App
- Registering an App / Provisioning Client IDs
- Recommendations for Creating your App Listing
- Facilitating Epic Community Member Downloads
- Provisioning Client Secrets
- Requesting an App
Overview
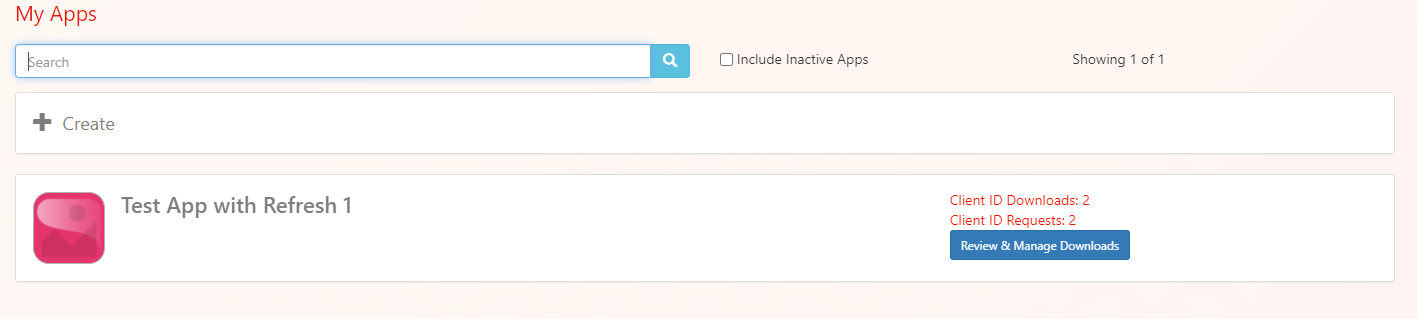
Epic on FHIR enables Epic community members to download client records for applications registered on the Epic on FHIR website. In order to download client records, each Epic community member must have someone with the "Able to Purchase Apps?" security point to download an app's client record on behalf of the organization.
The steps below walk through the process of:
- The app registration, creation, and activation process.
- An Epic community member signing the open.epic API Subscription Agreement.
- The community member downloading an Epic on FHIR app.
Creating, Activating, and Licensing an App
Registering an App / Provisioning Client IDs
When a developer registers an app, the website creates an app record in the Epic database and assigns the app production and non-production client IDs. The steps for a user to register an app are:
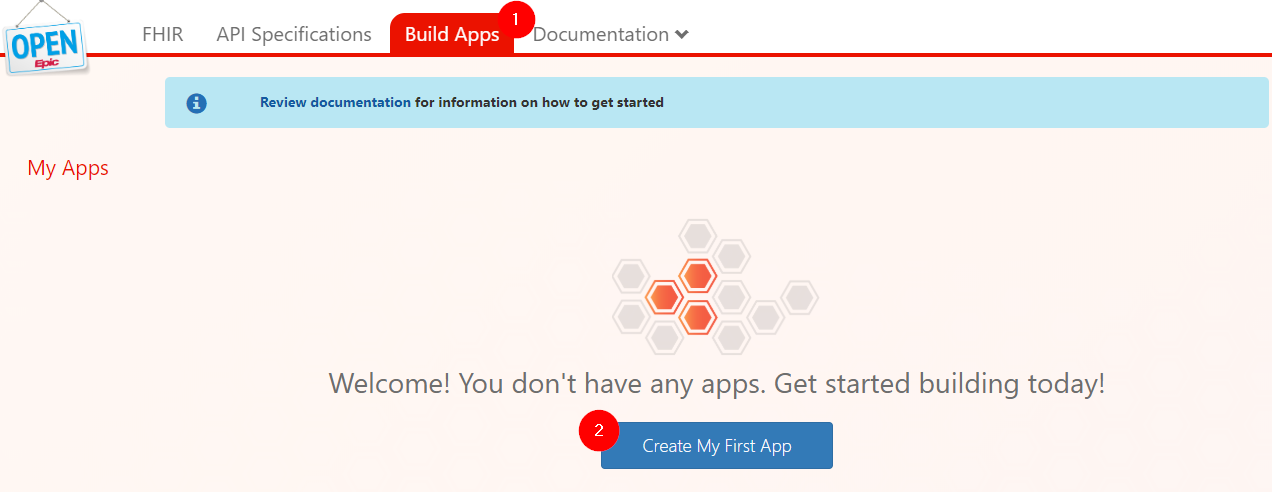
- Navigate to the Build Apps page
- Select "Create My First App”
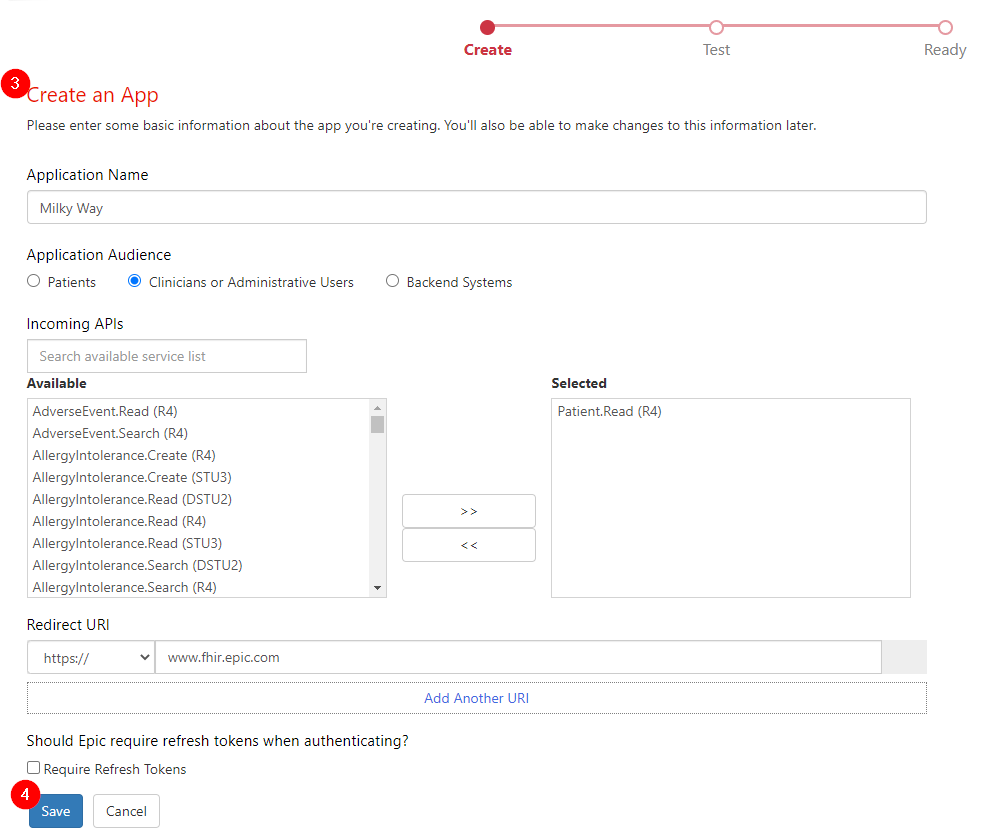
- Complete the Create an App form
- Save
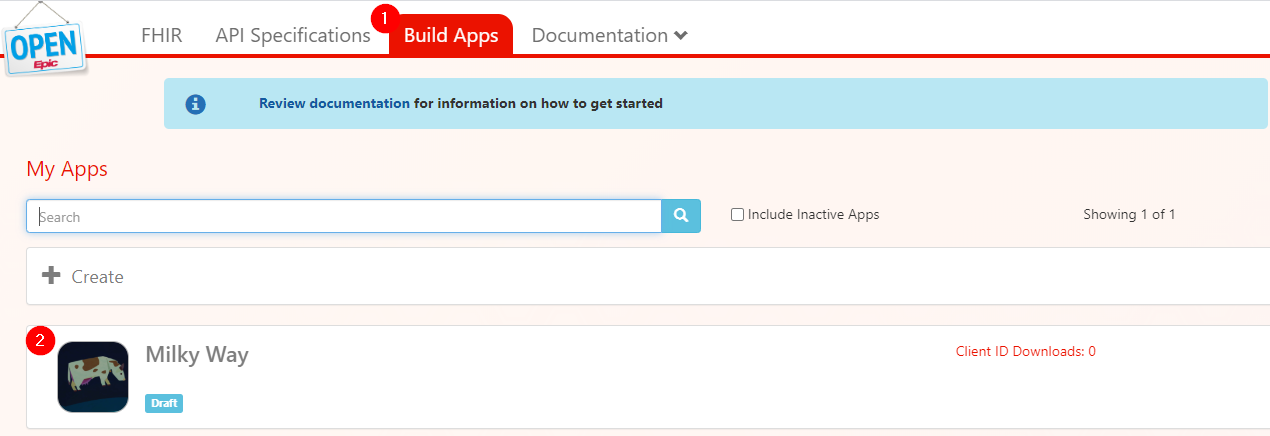
After the app has been Saved and Marked Ready for Sandbox, it will be in a Draft status. When a new draft app is made or changes are made to the app on the website, the changes may take up to 1 hour to sync with the Sandbox. Within about an hour, it will be ready to for app developers to test by making API Calls Against the Sandbox using Sandbox Test Data. For any issues that arise in testing, refer to our Troubleshooting tutorial.
After the developer has completed development and testing, they can mark their app ready for production use. The app cannot be used in any community member environments, either production or non-production, until the app has been marked ready for production. The steps for a user to activate an app are:
- Navigate to the Build Apps page
- Select the app that will be activated
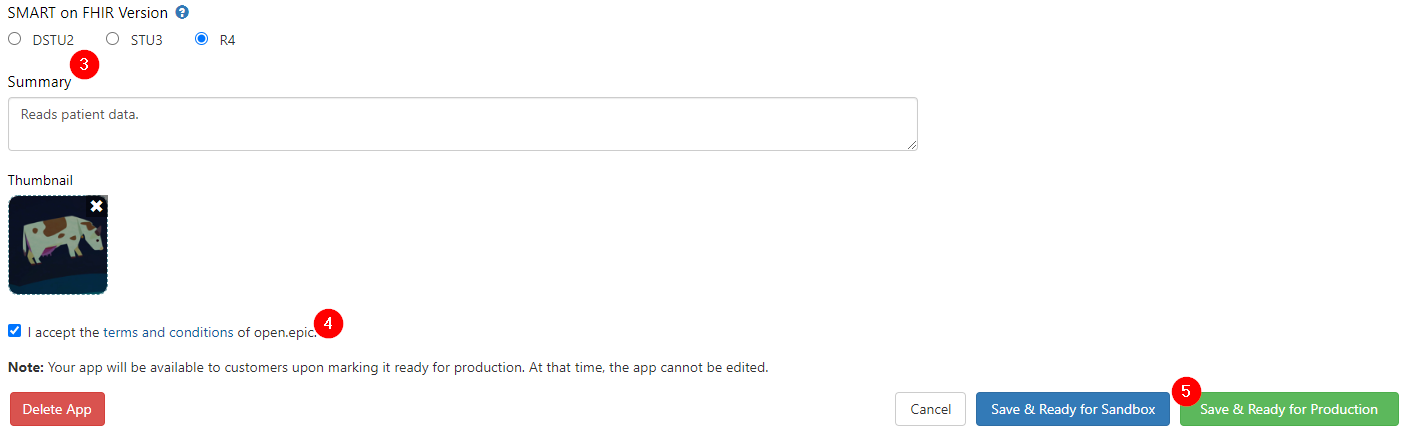
- Finalize details about the app
- Check the box to confirm compliance with the Terms and Conditions
- Save and mark ready
Whether or not an app will auto-sync depends on whether it meets all auto-sync criteria. Apps that need to register client secrets or public keys that otherwise meet the auto-sync criteria will sync after a client secret or public key is provisioned to that organization via the "Review & Manage Downloads" button on the Build Apps tab.
The developer cannot update an app record once it has been marked ready for production. If the developer needs to make changes, they must register a new app record.
Recommendations for Creating your App Listing
When you first create your app, customers can search for the app by client ID on the Epic on FHIR Download page and view your application name, summary, and thumbnail. If you choose to list your app on Connection Hub once you have your first live customer, there will be additional marketing fields that you may choose to fill out, which are described below.
Application Name
This is the name of your product. Keep your app name consistent throughout your app listing. Don’t include “Epic” in your app name. Don’t include any trademarks from other organizations without permission.
Public Documentation URL
This should be a public web page about your product. If you mention Epic in your public documentation, be sure to follow our Trademark Usage Guidelines.
Summary
The best summaries are 2-3 sentences and provide a high-level explanation of the product. The summary is meant to catch the reader’s interest, so avoid including too much detail here. You can go into more detail in the description.
The summary can be no longer than 500 characters, including spaces.
Description
The description should give the reader a clear understanding of what the product does and how it integrates with Epic. The best descriptions follow a Why, What, How format – Why a customer should want to use this product, What the product does, and How the product integrates with Epic. Consider splitting your description into multiple short paragraphs or using bullet points to improve readability.
The description can be no longer than 1,998 characters (including spaces).
Data Use Questionnaire
We highly encourage developers to fill out the Data Use Questionnaire if the app is Patient-facing to benefit mutual Customers of Developers and Epic. The answers you provide to the Data Use Questionnaire are displayed to a patient during the app authorization flow, The questionnaire responses can help the patient make an informed decision about whether they want to grant your app access to their data based on the data use practices of the app. Failure to answer the DUQ will result in a warning being shown to the patient when they are prompted to authorize your app.Thumbnail
This should be the logo for your organization or product. The recommended image dimensions are 500 x 300.
Screenshots
This is your opportunity to show viewers what your app looks like and how it works. Consider adding captions to your images to explain the main purpose of the image. If your product does not have a user interface, consider including a data flow diagram describing your integration.
The screenshot height is 1080 pixels, and the recommended dimensions are 1920 x 1080. You can include up to 10 screenshots.
Facilitating Epic Community Member Downloads
To allow an Epic community member to download an app, simply provide them with the Production or Non-Production Client ID from the app’s detail page.

If your app uses backend OAuth 2.0 or is a confidential client, you must also upload production and non-production public keys, JWK Set URLs, or client secrets. App developers will need to provide this information when the download request is made by navigating to Build Apps page and selecting "Review & Manage Downloads" for the appropriate app. Each public key or client secret should be different for each customer and for each environment. Public keys should be exported to a base64 encoded X.509 certificate before being uploaded. Follow the steps in Provisioning Client Secrets to add a client secret when a community member requests the app.
Provisioning Client Secrets
For apps that use refresh tokens, each instance of the application must be assigned a client secret. For apps that qualify for auto-synchronization functionality, a client secret must be set before the app can sync to the Epic community member's environment. For apps that do not meet auto-sync criteria, a client secret can be added once the community member has requested the app.
Epic recommends that you use a unique client secret for each community member and for production versus non-production.
After marking an auto-sync app as Ready for Production or after a download request for an app that does not auto-sync, follow these steps to assign a client secret for a community member:
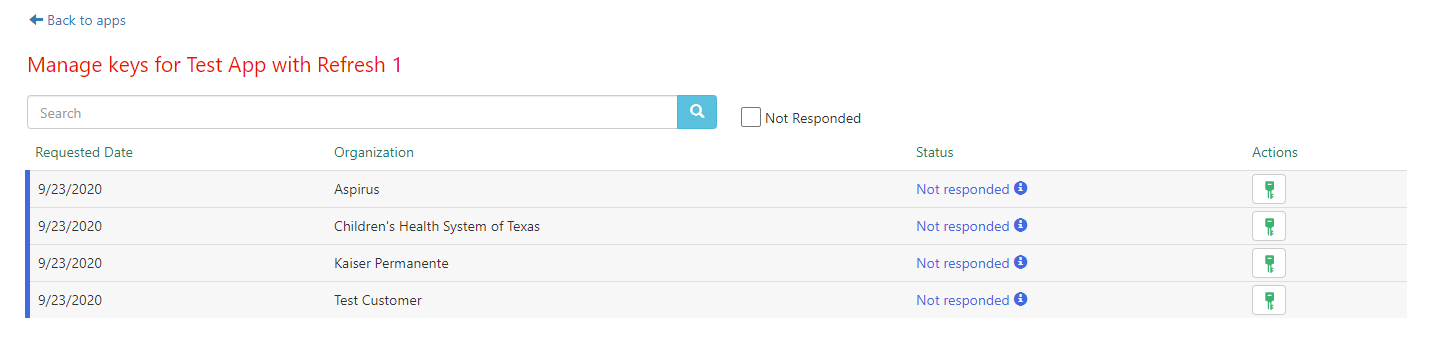
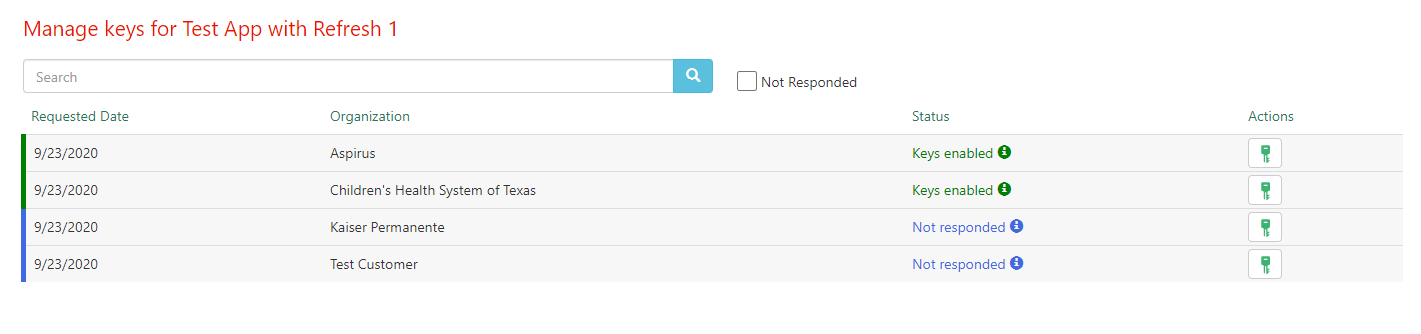
- Go to your Build Apps page and locate the app for which you want to assign a client secret. On that app, select "Review & Manage Downloads"
- You should see a list of app requests with a status of "Not responded" indicating that action is needed before the app can be downloaded to the community member's environments. Select the key icon next to the organization for which you'd like to set a client secret.
- Note that these app requests may not appear immediately after an app is marked as Ready for Production. These requests typically appear within 5 minutes, but please allow an hour for these requests to appear as a high volume of web traffic may increase the normal response times.
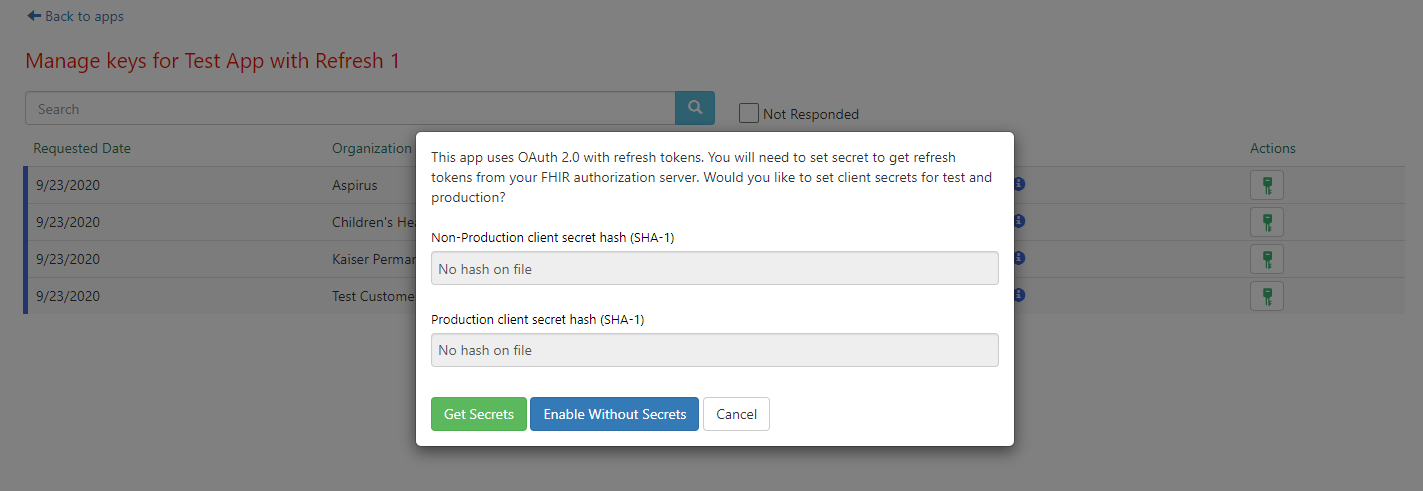
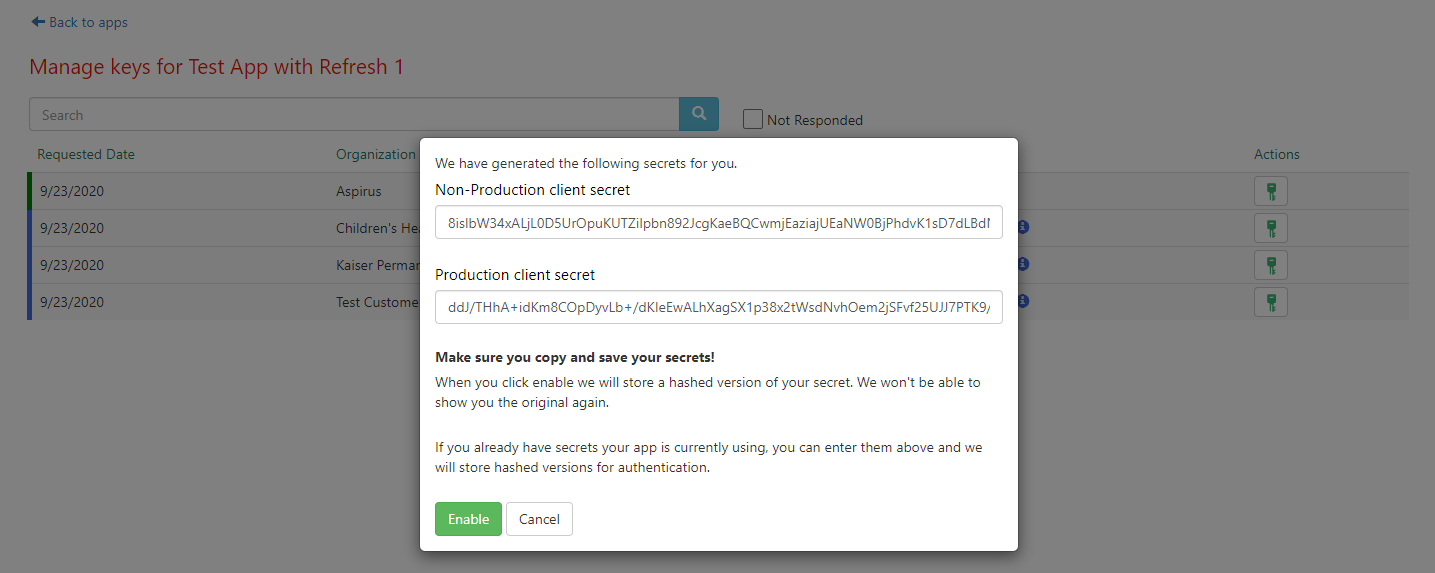
- You will see two options: you can either set a client secret, or choose to enable the app without client secrets. If you decide to forgo adding client secrets, refresh tokens will be unavailable for that organization. Select "Get Secrets". Suggested client secrets for use with this organization are generated. If you'd like to use the auto-generated secrets, save these client secrets off in a secure location. Alternately, you can enter your own client secrets.
- Once you have your client secrets saved off, click "Enable."
- You will be returned to the app management window, where the status for that organization will now show as "Keys enabled."
Customer-specific Endpoint URIs
If your app uses clinician- or patient-facing OAuth 2.0, you also have the option of specifying customer specific endpoint/redirect URIs when managing a download request. If you don't want to use the default URIs listed on your app, simply uncheck "Use app-level endpoint URIs" and enter the customer-specific URIs your app needs.
Requesting An App
Before Starting the Request Process
Epic community members should do the following prior to the request process:
- Work closely with their Epic technical coordinator (TC) to research available integrations.
- Ensure the right Epic products and interfaces are in place to install an app.
- Evaluate potential costs of the app up front. In addition to developer's fees, consider other third-party software, hardware, and content costs, new interfaces, and additional license or subscription volume that may be triggered by the application.
When an Epic community member has committed to moving forward with an app registered on the Epic on FHIR website, they or the developer should organize a kickoff call to align key stakeholders on the goals, scope, processes, milestones, and timeline of the project. Key stakeholders include representatives from all three organizations: the developer, the Epic community member (e.g., operational sponsor, project manager, analyst, ECSA, network engineer), and Epic (e.g., the technical coordinator, TS who support affected applications, and, if applicable, the EDI representative). If you are not sure who from Epic to include, ask your Epic representative for assistance.
Including the right stakeholders from each organization at the start of the project enhances communication, sets the right expectations upfront, and helps identify and avoid potential issues before they impact the success of the project.
Epic does not endorse, certify, or verify the integrity, safety, performance, or practices of the developers who use Epic on FHIR or their software.
Obtaining the open.epic API Subscription Agreement
Community members who wish to use FHIR APIs with a third-party application registered on the Epic on FHIR website must sign the open.epic API Subscription Agreement. This agreement applies to the organization, not to individual apps, so this step is only required for organizations who have not previously integrated with an application that uses technology licensed under this agreement.
Downloading Client Records
To be able to download a client record, the following steps must have been completed:
- The developer has created an account on the Epic on FHIR website,
- The developer has registered their product on the Epic on FHIR website,
- The developer has marked their product ready for production use ("Active" status), and
- The community member has signed the open.epic API Subscription Agreement.
From the Downloads page, community members can see apps which their organization has previously downloaded from the Epic on FHIR website. To download client records for additional apps, the community member's staff with the "Purchase Apps" security point can search using the app’s client ID, which must be obtained from the developer. Either the Production or Non-Production Client ID can be used.
The website will provide details about the app associated with the client ID and give the option to proceed with the download. If the app uses refresh tokens, the duration of the refresh token can also be specified at this time.
Any apps using backend OAuth 2.0 or that are set as confidential clients will need a JWT public key and/or a client secret uploaded to the website after you request a client ID download. This information is provided and uploaded by the app developer.
Confirm the Client ID was Downloaded
To confirm the client ID was successfully downloaded, return to the Downloads page on the Epic on FHIR website. The application should now appear on this page along with a request status. Apps using the Confidential Client profile or backend OAuth 2.0 will require app developer action. All other applications should have their download approved automatically. This download syncs the app's client record to your organization's environments, allowing APIs listed on that client to be authorized by your server.
See the "Notes for Epic Customers" section at the top of the page for details on how to verify that a client record now exists in your Epic environments.
Vaccine Credentials
Epic's support for vaccine credentials using the SMART Health Cards specification is evolving. The content on this page might change without notice.
- What's a "Vaccine Credential?
- What's a SMART Health Card?
- Open Source Libraries & References
What's a "Vaccine Credential"?
A vaccine credential binds an individual's demographic information with information about their lab tests or vaccine history into a package that is machine-readable and digitally signed by the issuer. Unlike a paper vaccine card, a vaccine credential is verifiable and therefore much more difficult to tamper with or counterfeit.
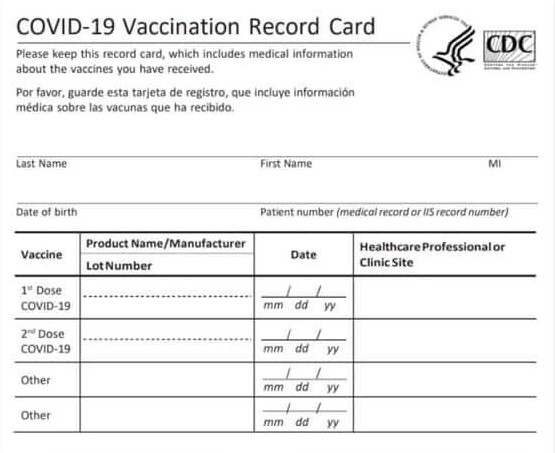
A CDC vaccine card, widely issued in the United States to patients when they receive a COVID-19 vaccination.
Related Terms & Definitions
- Vaccine or immunity passport. Passports are issued by governments. An immunity passport asserts immunity. In contrast, a vaccine credential is just an alternative way of representing information documented about a patient--specifically, their vaccination or lab history.
- Health Wallet. An app available for install and use on a consumer's device that aggregates and stores vaccine credentials from different sources. A health wallet is a convenient way to store multiple credentials, but is not strictly required.
- Pass App. An app available for install and use on a consumer's device that reads one or more vaccine credentials to determine if the user meets entry criteria for a specific venue or building, for example. might also perform some form of identity verification and might also commonly have health wallet-type functionality. A pass app might be useful in creating "fast lanes" in which a consumer's identity would not need to be re-verified, but a verifier should not require the patient to have a pass app.
- Verifier. A consumer of a SMART Health Card.
Audience and Intent
This document was designed to support health wallets, pass apps, and verifiers, in designing apps and technologies that can consume a patient-provided SMART Health Card. We note particularly that any developer creating a pass app should also consider how verifiers using that pass app will interact with patients who do not have access to technology and present only with their ID and a printed SMART Health Card. Any verifier that requires patients to download a specific type of pass app (and thus, cannot read and interact with printed SMART Health Cards) is disadvantaging individuals without technology. SMART Health Cards were specifically designed to provide patient access regardless of technological ability or sophistication.
In other words, if you require an individual to download and present a certain type of app to enter your venue, you have not implemented the specification correctly.
What's a SMART Health Card?
A SMART Health Card is a standard for representing a vaccine credential. The SMART Health Cards standard is open, interoperable, and built on top of HL7 FHIR and compatible with W3C's Verifiable Credentials. It's designed to be:
- Open – The standard is open source.
- Interoperable – It's built on top of FHIR.
- Privacy-preserving – Clinical content is embedded within SMART Health Cards, ensuring that a patient can't be tracked based upon where they use their vaccine credential.
- Equitable – It can be represented entirely on paper.
A SMART Health Card contains very limited patient demographics, and either information about the patient's COVID-19 immunization or COVID-19 lab result.
Technically, a SMART Health Card is a JSON object containing a JWS of compressed JSON, consisting of a FHIR Patient and either one or two FHIR Immunizations; or a FHIR Observation resource. The card can be represented as a file ending in the .smart-health-card extension, or as a QR code printed on paper or displayed digitally.
You can learn more about SMART Health Cards by visiting the following websites:
- https://vci.org/
- https://smarthealth.cards/
- http://build.fhir.org/ig/dvci/vaccine-credential-ig/branches/main/
Accessing Epic-Generated SMART Health Cards
Epic generates SMART Health Cards in two different ways and via a few different workflows:
- Patients can access SMART Health Cards as either a QR code displayed in or a file downloaded from the MyChart website or the MyChart mobile apps.
- Health systems using Epic can generate and print a QR code containing a patient's SMART Health Card in the clinician-facing interface, Hyperspace. Typically, this workflow would be used to provide SMART Health Cards to patients without access to MyChart.
Patients can share QR codes either directly from a mobile device or from a piece of paper. You should test and validate that your app can consume the QR code from both a mobile device and from a piece of paper.
A patient can download their SMART Health Card from MyChart onto their device. If you're developing an app that can run on a patient's device, alongside MyChart, you should associate your app with the .smart-health-card filename extension.
Reading SMART Health Cards
QR codes
Every SMART Health Card can be represented as a QR code. Typical QR scanner apps expect the QR code to contain a URL that can be navigated to in a browser, but a SMART Health Card's QR code does not contain an http:// URL. Rather, the content begins with an shc:/ prefix, followed by a series of numbers and optionally forward slashes (/).
For example, a SMART Health Card QR code could contain this example content after it is scanned:
shc:/567629595326546034602925407728043360287028647167452228092864456652064567322455425662713655612967382737094440447142272560543945364126252454415527384355065405373633654575390303603122290952432060346029243740446057360106413733531270742335036958065345203372766522453157257438663242742309774531624034227003622673375938313137693259503100426236772203355605036403580035610300766508583058374270060532535258081003347207250832110567524430725820265707614406667441643124353569754355376170447732541065607642436956282976307276247374426657326827736143256004577460541121230968766729300406344232537345706367327527360526620626030777047434662721590753712525295755717157712404305365553050007570070626252762326973342068033331323970433259453532396071684011083877646011585542067525276750403569746574042500432127583065602700296834605068374126617637383032031153273532295552400564655669374044767208283743690777676126004361576025612868262976107611767042442744504570773124097729726134647000600635240740664475562634400569324229237641072230287177047474320721676355073560542058377743647371335212506320077300352940590840740926502974284434626571632106437507760408126227344173035234272224650859284424550330072738216709675476296859290842564163266200100030407726503740243343666063287100680677296841286766396657316871405227413263621127776161647443056825046903656367560042552754107309332612290435433150635250555600416734505731035241562857000866406707250066585029295368623020723771290300716970507307715829230409632369722208220022421235364507226273407623637673266125102552327255034322275824010800676966507066627420335210701037520576422230612371756123652765287762007444002131666470397727224500564164325437330542095250237703346428534576030771757133406430361224385420
The numbers following the shc:/ prefix are the content of the SMART Health Card and must be numerically decoded.
Numerical Decoding
SMART Health Cards' QR codes represent characters as their ASCII code. The SMART Health Cards specification defines a simple algorithm to represent each character from the JWS as a two-digit number. Following the prefix, each pair of digits is converted into a single character by adding 45 to determine the encoded letter that the integer represents.
For example, the first pair of digits in the numerically encoded SMART Health Card example above is 56. By adding our offset constant 45 to 56, the value translates to ASCII's lower-case e (Chr(101) = "e"). The constant 45 was chosen because 45 is the ASCII value for "-", which is the lowest character that can exist in our Base64-URL encoded content.
Decoding the string proceeds as follows:
56 + 45 = e
76 + 45 = y
29 + 45 = J
Etc.
When parsing is complete, the above shc:/ string resolves to the following JWS:
eyJhbGciOiJFUzI1NiIsImtpZCI6ImZoa3ZpMEdWektQdjJpSHR6YUYtWHFicTZQVGFEcVdHSXd3c2RQNnZxT00iLCJ6aXAiOiJERUYifQ.3VRNb9swDP0rg3bZANuynCZLfFwSoMWwD6zZLkUOCs0kGvRhSLLRrMh_L-WkQzC0Pe20m0g-Pj0-yn5gKgRWs32Mbag570Ou4F5M82paYKugAGf4jY3owVmLEPPrxXdRjsYzMc7niyWXreIJyKuyEvwWofMqHvjXFi1fwic8BD6qypJK13OWMbvZslpMxHQ2Gk3G04z1wOoHBh4btFFJfdttftE1KbndK_-xs43GFHkMrvOAq0NLMTsXMhZPMTitqU85Szmi8gdW3xFHp_UPrwnw1F-XBHgKniH-JqOi_qRVGjyRSKM08bHPMJdaU2mnerRUYyu5IRXr4zpjG-XjfiFjIqGJy7y8ysWYHY_ZszLE6zJujOms-i3PE4UoYxeGOU2rMWJDyV4CKItz1wwM4Bpld4PicAgRzXmvtNa9_lA4v-PJUh5Uw6G_JwIYOkntlB3Xx4y159kHOVv0aOHCEn5hIYEd0K4HSBp6pcyJqhJ5WeVlGk-7-KUzG_RUENXoilIt-q3zJqVIpoTofLqtUaHVMlk8HzjjmwX2qF1r0nlpe-WdHc7v6NG9J1PXL_la_de-VpO_fL0aVeIf-5oUp4F-og_JJbqkKAuRtJ0-trs_v4tgJD16lDruC5C-CW9PQZ4CkvUyDlyvGjF7FaMud0XCHgE.5-pro_sokwANa7s7Ra2yWCKjDtxjDnHnIzk-wY-BLomsTzHCZ-eVmMcRN2W6a_Dz0OmIbZy04txtNUmKQ9EScA
See the SMART Health Cards specification for an alternate explanation of numerical encoding.
Chunked QR Codes
In some cases, the underlying demographic and clinical data stored in a SMART Health Card QR code might simply be too large for a single QR code. If so, the SMART Health Card is "chunked" -- split across multiple QR codes that must be scanned and reassembled before any data can be accessed. In this case, the shc:/ prefix is appended with two additional values, delimited by forward slashes ("/"). The first value defines the order of the current QR code for reassembly and the second is the total number of QR codes required to reassemble the data.
For example, a SMART Health Card of 3500 characters is split across three distinct QR codes. The prefix of the first QR code will be: shc:/1/3/, the second: shc:/2/3/ and the third: shc:/3/3/. The contents of all three QR codes (following the final forward slash) must be concatenated in order before inflation.
Requiring multiple QR codes to receive a single SMART Health Card is undesirable and likely confusing to consumers. Epic will rarely place so much information in a single SMART Health Card such that chunking the data across multiple QR codes is necessary. However, apps consuming these QR codes must be prepared to scan and assemble multiple QR codes.
.smart-health-card Files
In addition to presenting a QR code to a scanner, a consumer can also download a file to share a SMART Health Card. In this case, there's no QR code, no numeric encoding, and no chunking. The SMART Health Card is represented as a JWS wrapped in a simple JSON array. The filename extension of this file will always be ".smart-health-card".
Here's an example of a .smart-health-card file containing a single SMART Health Card:
{
  "verifiableCredential": [
"eyJhbGciOiJFUzI1NiIsImtpZCI6ImZoa3ZpMEdWektQdjJpSHR6YUYtWHFicTZQVGFEcVdHSXd3c2RQNnZxT00iLCJ6aXAiOiJERUYifQ.3VRNb9swDP0rg3bZANuynCZLfFwSoMWwD6zZLkUOCs0kGvRhSLLRrMh_L-WkQzC0Pe20m0g-Pj0-yn5gKgRWs32Mbag570Ou4F5M82paYKugAGf4jY3owVmLEPPrxXdRjsYzMc7niyWXreIJyKuyEvwWofMqHvjXFi1fwic8BD6qypJK13OWMbvZslpMxHQ2Gk3G04z1wOoHBh4btFFJfdttftE1KbndK_-xs43GFHkMrvOAq0NLMTsXMhZPMTitqU85Szmi8gdW3xFHp_UPrwnw1F-XBHgKniH-JqOi_qRVGjyRSKM08bHPMJdaU2mnerRUYyu5IRXr4zpjG-XjfiFjIqGJy7y8ysWYHY_ZszLE6zJujOms-i3PE4UoYxeGOU2rMWJDyV4CKItz1wwM4Bpld4PicAgRzXmvtNa9_lA4v-PJUh5Uw6G_JwIYOkntlB3Xx4y159kHOVv0aOHCEn5hIYEd0K4HSBp6pcyJqhJ5WeVlGk-7-KUzG_RUENXoilIt-q3zJqVIpoTofLqtUaHVMlk8HzjjmwX2qF1r0nlpe-WdHc7v6NG9J1PXL_la_de-VpO_fL0aVeIf-5oUp4F-og_JJbqkKAuRtJ0-trs_v4tgJD16lDruC5C-CW9PQZ4CkvUyDlyvGjF7FaMud0XCHgE.5-pro_sokwANa7s7Ra2yWCKjDtxjDnHnIzk-wY-BLomsTzHCZ-eVmMcRN2W6a_Dz0OmIbZy04txtNUmKQ9EScA"
  ]
}
The .smart-health-card files downloaded from MyChart web or mobile will contain one or two entries in the verifiableCredential JSON array. Each array entry is a self-contained SMART Health Card.
Consuming SMART Health Cards
Regardless of how a SMART Health Card is received -- a QR code scan or a file download, the same steps are used to verify and access the information contained within it.
A JWS, including our SMART Health Card JWS, is made up of three, Base64-encoded parts: JOSE header, a payload, and a signature. Per RFC 7515, these three parts are concatenated together with periods.
JOSE Header
The JOSE (Javascript Object Signing and Encryption) Header identifies the algorithms used to sign and compress the payload and a unique identifier of the public key to be used to verify the signature.
For example, the JOSE header from the above JWS is:
eyJhbGciOiJFUzI1NiIsImtpZCI6ImZoa3ZpMEdWektQdjJpSHR6YUYtWHFicTZQVGFEcVdHSXd3c2RQNnZxT00iLCJ6aXAiOiJERUYifQ
Upon Base64-decoding it (and formatting for readability):
{
"alg": "ES256",
"kid": "fhkvi0GVzKPv2iHtzaF-Xqbq6PTaDqWGIwwsdP6vqOM",
"zip": "DEF"
}
alg– the algorithm used to sign the JWS.kid– a "key identifier" which is used to find the public key for validating the signature.zip– the compression algorithm used to deflate the payload. Note that the JWS standard does not define the zip header; the SMART Health Card uses borrows it from the closely related JWT standard.
In the SMART Health Card standard, the alg header will always be "ES256" and the zip header will always be "DEF". In Epic's implementation of the standard, only the kid header will change, as it uniquely identifies the public key used by the healthcare delivery organization that issued the SMART Health Card. The public key may be rotated periodically.
Payload
The payload of a SMART Health Card JWS (that is, the second of the three period-delimited pieces in the JWS) is base64-encoded, compressed JSON. The JSON is compressed with the DEFLATE algorithm.
Inflation
The DEFLATE algorithm is open source and has significant library support. DEFLATE is the same compression algorithm used by gzip but doesn't make use of the gzip header and footer. See RFC 1951 for more information about this compression algorithm.
As an example, starting with this JWS payload from our example above,
3VRNb9swDP0rg3bZANuynCZLfFwSoMWwD6zZLkUOCs0kGvRhSLLRrMh_L-WkQzC0Pe20m0g-Pj0-yn5gKgRWs32Mbag570Ou4F5M82paYKugAGf4jY3owVmLEPPrxXdRjsYzMc7niyWXreIJyKuyEvwWofMqHvjXFi1fwic8BD6qypJK13OWMbvZslpMxHQ2Gk3G04z1wOoHBh4btFFJfdttftE1KbndK_-xs43GFHkMrvOAq0NLMTsXMhZPMTitqU85Szmi8gdW3xFHp_UPrwnw1F-XBHgKniH-JqOi_qRVGjyRSKM08bHPMJdaU2mnerRUYyu5IRXr4zpjG-XjfiFjIqGJy7y8ysWYHY_ZszLE6zJujOms-i3PE4UoYxeGOU2rMWJDyV4CKItz1wwM4Bpld4PicAgRzXmvtNa9_lA4v-PJUh5Uw6G_JwIYOkntlB3Xx4y159kHOVv0aOHCEn5hIYEd0K4HSBp6pcyJqhJ5WeVlGk-7-KUzG_RUENXoilIt-q3zJqVIpoTofLqtUaHVMlk8HzjjmwX2qF1r0nlpe-WdHc7v6NG9J1PXL_la_de-VpO_fL0aVeIf-5oUp4F-og_JJbqkKAuRtJ0-trs_v4tgJD16lDruC5C-CW9PQZ4CkvUyDlyvGjF7FaMud0XCHgE
we Base64 URL-decode and inflate to arrive at the actual JSON content. The JSON of a SMART Health Card is made up of a header and a few FHIR resources.
SMART Health Card Header
A SMART Health Card's header elements identify if the card contains immunization or lab result information, a unique url for the organization that issued the card and the time at which the card was issued.
iss– Append /.well-known/jwks.json to this url to access the JSON Wek Key Set containing a public key for verification of the JWS signature. See SMART Health Cards & Trust for additional information.nbf– The time at which the SMART Health Card was issued (per RFC 7519). Epic generates SMART Health Cards on-demand, so this timestamp will correspond to the time at which the card was accessed by the patient.type– Identifies the SMART Health Card as containing either COVID-19 vaccination or lab result. Epic-generated SMART Health Cards will always be one of the following:- ["https://smarthealth.cards#health-card", "https://smarthealth.cards#covid19", "https://smarthealth.cards#immunization"]
- ["https://smarthealth.cards#health-card", "https://smarthealth.cards#covid19", "https://smarthealth.cards#laboratory"]
credentialSubject– Contains a FHIR Bundle of a Patient resource, either one or two FHIR Immunization resources, or an Observation resource representing a lab result.
This is an example of the SMART Health Card header describing an immunization card, issued on April 20, 2021.
{
	"iss": "https://vs-icx18-28.epic.com/Interconnect-HDR1035915-CDE/api/epic/2021/Security/Open/EcKeys/32001/SHC",
	"nbf": 1618933658,
	"type": ["https://smarthealth.cards#health-card", "https://smarthealth.cards#covid19", "https://smarthealth.cards#immunization"],
	"vc": {
  "credentialSubject": {
      //payload removed for readability
		}
	}
}
FHIR Bundle
The credentialSubject element from the SMART Health Card header defines the version of FHIR and contains a Bundle of FHIR resources.
fhirVersion– Version of FHIR resources contained in this SMART Health Card. Epic generated SMART Cards will always use FHIR R4 resources, represented in this field as “4.0.1”.fhirBundle– A Bundle of type collection containing two to three FHIR resources. Each entry in the Bundle is a distinct FHIR resource.
Here's an example of a credentialSubject containing a fhirBundle:
{
	"credentialSubject": {
		"fhirVersion": "4.0.1",
		"fhirBundle": {
			"resourceType": "Bundle",
			"type": "collection",
			"entry": [
        { //FHIR resource },
				{ //FHIR resource #2 },
				{ //another FHIR resource! },
			}
		}
	}
FHIR Patient
SMART Health Cards always contain a FHIR Patient resource. Unlike a typical Patient resource, the only information in the resource is the patient's given and family name, and date of birth.
When consuming a SMART Health Card, the demographics in this Patient resource are verified against the user's identity.
{
	"resource": {
		"resourceType": "Patient",
		"name": [{
			"family": "McCall",
			"given": ["Table"]
		}],
		"birthDate": "2000-04-15"
	}
}
Considerations For Patient Identity
Importantly, possession of a SMART Health Card does not prove a patient's identity. In fact, patient caregivers, for example: parents, may access and download the SMART Health Cards of their wards. Pass apps and verifiers must verify identity.
When a patient shares a SMART Health Card with a verifier, the verifier is expected to validate the patient's identity independently. For example, if a patient presents their driver's license along with their SMART Health Card, the verifier should confirm that the demographics within the SMART Health Card (specifically, the name and date of birth), match those on the driver's license.
FHIR Immunization
A SMART Health Card documenting a vaccination contains one or two FHIR Immunization resources. The below example describes a Pfizer immunizations completed on February 1.
status– contains the value “completed”vaccineCode– contains a CVX code identifying the given vaccine.occurrenceDateTime– the date on which the vaccine was administeredlotNumber– the product lot number, further identifying the vaccineperformer– contains the name of the organization at which the vaccine was administered. Will not be present if administering organization is unknown.
Example Immunization
{
	"resource": {
		"resourceType": "Immunization",
		"status": "completed",
		"vaccineCode": {
			"coding": [{
				"system": "http://hl7.org/fhir/sid/cvx",
				"code": "208"
			}]
		},
		"patient": {
			"reference": "Patient/resource:0"
		},
		"occurrenceDateTime": "2021-02-01",
		"lotNumber": "1234",
		"performer": [{
			"actor": {
				"display": "Current Development Environment (CDE)"
			}
		}]
	}
}
FHIR Observation
A SMART Health Card documenting a lab result contains one FHIR Observation resource. The below example describes a negative lab test resulted on November 23, 202.
status– contains the value "final"code– contains a LOINC code identifying the lab test, if knowneffectiveDateTime– the time at which the lab test was resultedperformer– contains the name of the organization at which the test was performed.value– the result of a COVID-19 lab test may be represented as a SNOMED code, a quantity, or a string.
Example Observation
{
 	"resource": {
 		"resourceType": "Observation",
 		"status": "final",
 		"code": {
 			"coding": [{
 				"system": "http://loinc.org",
 				"code": "882-1"
 			}]
 		},
 		"subject": {
 			"reference": "Patient/resource:0"
 		},
 		"effectiveDateTime": "2020-11-23T06:00:00Z",
 		"performer": [{
 			"display": "Health system"
 		}],
 		"valueString": "Negative"
 	}
 }
SMART Health Cards & Trust
A SMART Health Card is verifiable because its signed payload can be verified against a trusted public key. Each issuer publishes a JSON Web Key Set (JWKS) containing at least one public key. Typically, each healthcare organization that uses Epic acts as a distinct issuer.
A verifier must determine which issuers to trust. Issuers participating in the Vaccine Credential Initiative have shared their publicly accessible JSON Web Key Set URLs in this directory:
Verifiers should consider trusting and caching all of the public keys provided in the key sets from this directory.
Verify the Signed Web Token
An issuer's key set is discoverable during verification by appending "/.well-known/jwks.json" to a SMART Health Card's iss value. For example, iss value in the above SMART Health Cards is an inaccessible, url internal to Epic: https://vs-icx18-28.epic.com/Interconnect-HDR1035915-CDE/api/epic/2021/Security/Open/EcKeys/32001/SHC
HTTP Get https://vs-icx18-28.epic.com/Interconnect-HDR1035915-CDE/api/epic/2021/Security/Open/EcKeys/32001/SHC/.well-known/jwks.json

{
  "keys": [{
    "x": "gfoeoAb2l-hqEHXyZIBqa1OObZ7Tunx5hlYRXtnPJwg",
    "y": "HcBgiLJ53BFqOp5lxiMUz5Jsik9DtM286pyWv2hVKNA",
    "kid": "fhkvi0GVzKPv2iHtzaF-Xqbq6PTaDqWGIwwsdP6vqOM",
    "use": "sig",
    "kty": "EC",
    "alg": "ES256",
    "crv": "P-256"
  }]
}
The key identifier from the JWKS's kid element corresponds to kid element in the header of the SMART Health Card's JWS. Epic issued SMART Health Cards are signed using ECDSA P-256 SHA-256.
Verifiers should use standard security libraries to verify SMART Health Card signatures. Refer to Appendix A.3 of RFC 7515 to understand how Epic's signature is calculated and formatted.
Open Source Libraries & References
While it is not an exhaustive list, nor maintained or affiliated with Epic, the following resources might be helpful:
- Reference implementation: https://c19.cards/venue and open source code: https://github.com/smart-on-fhir/health-cards-tests
- Microsoft-developed SMART Health Card validation SDK: https://github.com/microsoft/health-cards-validation-SDK
- MITRE-developed SMART Health Cards tutorial Jupyter Notebook: https://github.com/dvci/health-cards-walkthrough/blob/main/SMART%20Health%20Cards.ipynb
Get Started
These connection practices have enabled many successful connections across our community. As every product has unique goals, we encourage you to review this approach with your customers to confirm the best fit.
If you're just getting started, check out our step-by-step Developer Guide.
Want a little extra help? Vendor Services offers an optional suite of benefits including the ability to request individualized assistance with your app's data exchange.
In addition, some product categories qualify for Toolbox support and designation on Showroom, which can accelerate implementation and enable you to highlight your product's strengths. Explore the list of eligible categories and share your interest with us through the Technology Guidance form.
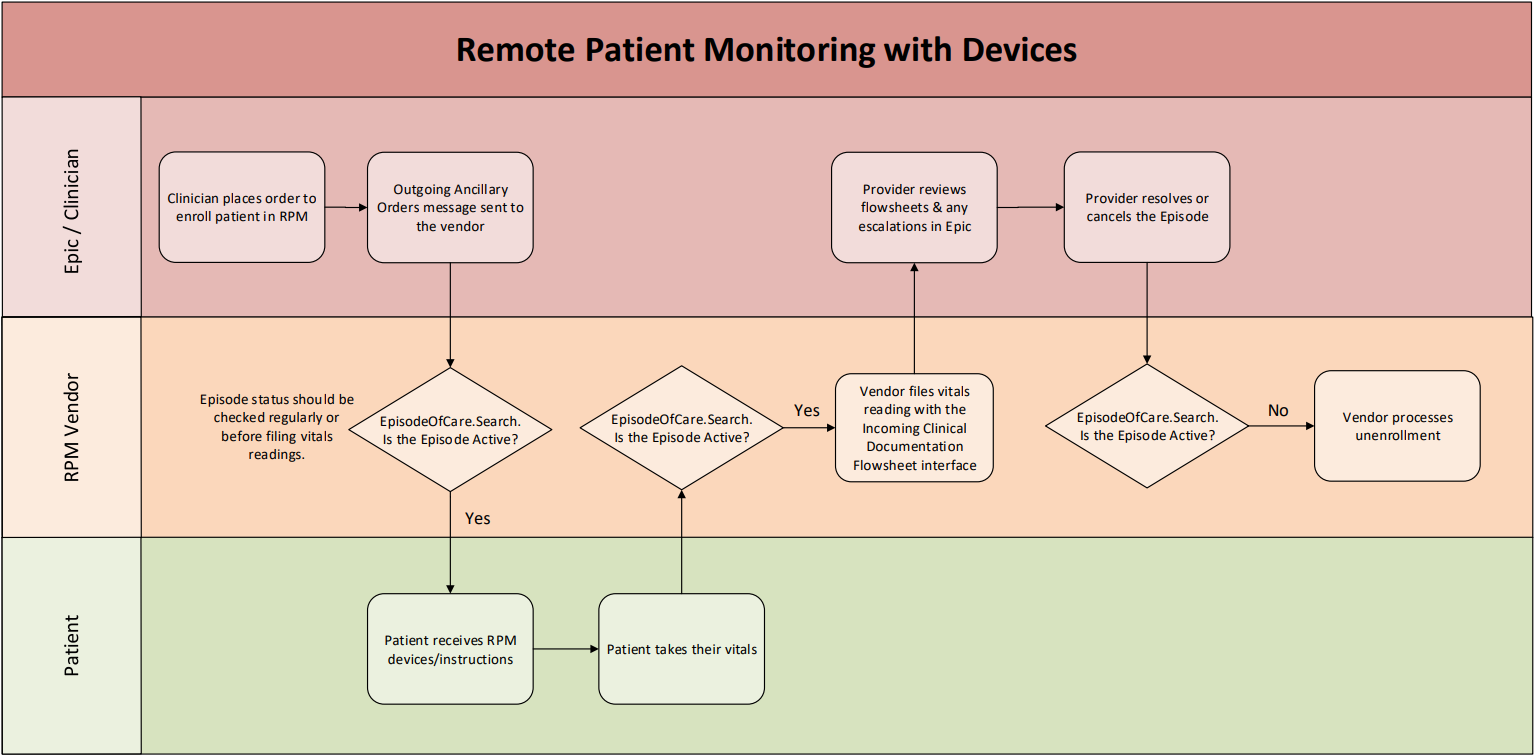
Remote Patient Monitoring
Remote Patient Monitoring
Overview
In Epic, the designated data structure for discrete data is called a flowsheet. For RPM use cases, we use patient-entered flowsheets (PEFs) to indicate data that was sourced from a patient, either directly from a patient-owned device, or manually entered by the patient. The following document steps through how an RPM program or Home Dialysis program can connect to Epic securely using HL7v2 and FHIR standards.
By filing RPM data to the patient’s chart, you ensure the full context of their at-home care is available for providers, and you enable downstream processes in Epic such as triggering escalations enabling the automatic calculation of RPM billing.
Workflow Diagram
This diagram illustrates an example workflow using HL7v2 as the primary method to file flowsheet readings.
Enrollment
-
On Epic, PEFs are not ready-to-file by default. There is an enrollment workflow that opens PEF data structures for a specific patient and time period, known as an episode. This enrollment workflow usually involves a provider placing an order for an RPM program in Epic and optionally entering additional data specific to that order (order-specific questions) such as:
- High/Low normal ranges for individual vitals - Note if the RPM device files an abnormal vital an In Basket message can be sent to the provider through MyChart functionality.
- How often (in days) the provider would like to be notified of a patient's flowsheet entries
- The supporting diagnoses
-
After an RPM program order is placed, a notification can be sent to the RPM system in the form of an HL7v2 Outgoing Ancillary Orders message. for more details, and refer to the example message in the appendix. This notification contains information such as:
- The Patient's identifiers and demographics
- The signing provider's identifiers and demographics
- An identifier for the corresponding order record in Epic
- Optionally, the additional order-specific data above captured by the provider during enrollment
-
Depending on the customer’s workflow, there may be two Episodes created. This will become relevant in the Ending Enrollment section below.
- One episode is explicitly tied to the flowsheet, which we’ll call the PEF Episode. This should be created for all RPM workflows.
- The optional 2nd episode is the Compass Rose episode, which represents that the patient is being actively monitored by clinicians.
Filing Vitals (HL7v2)
-
If your app does not have a patient-facing UI where patients manually enter/modify readings, or it needs to file multiple vitals readings at once, then Epic recommends using the HL7 Incoming Clinical Documentation Flowsheet Data – Patient Entered interface to file readings.
This interface is designed to ingest data straight from a device. The data it files is read-only for patients in MyChart. (They cannot manually enter/modify the readings after you file them, but they can delete them.)- PEFs filed via this interface do not require patients to have an active MyChart account, unlike PEFs with Observation.Create discussed below.
- If you are using HL7v2 over HTTP(s), “HL7v2” must be added as an Incoming API on an app with a primary user type of “Backend Systems.” Refer to the Application User Context tutorial for additional background.
-
You need the patient’s name and an identifier for the interface to file readings to the correct patient. You can use the MRN and other identifiers from the Outgoing Ancillary Orders message, or you can use the Patient.Search API to obtain other identifiers.
-
In the sandbox, you can use an ID system of urn:oid:1.2.840.114350.1.13.0.1.7.5.737384.14 to search by MRN with Patient.Search. Note: this system value will differ in each customer environment. Refer to the ID Types for APIs tutorial for more information.
- Ex: /api/FHIR/R4/Patient?identifier=urn:oid:1.2.840.114350.1.13.0.1.7.5.737384.14|<Insert MRN>
-
If you already have the patient’s FHIR ID, you can instead make a Patient.Read call. The response includes an “identifiers” array that includes the patient’s MRN with that same system: urn:oid:1.2.840.114350.1.13.0.1.7.5.737384.14
   {
      "use": "usual",
      "type": {
        "text": "MRN" //Do NOT rely on this saying ‘MRN’ at every customer!
      },
      "system": "urn:oid:1.2.840.114350.1.13.0.1.7.5.737384.14",
      "value": "206919"
    }
-
In the sandbox, you can use an ID system of urn:oid:1.2.840.114350.1.13.0.1.7.5.737384.14 to search by MRN with Patient.Search. Note: this system value will differ in each customer environment. Refer to the ID Types for APIs tutorial for more information.
- Starting in the November 2025 version of Epic, the Incoming Flowsheet Data interfaces supports a flag in OBX-17 to indicate whether the data was manually entered. The actual values you'll send in this field are mapped during customer implementation.
- To allow an interface to write to a given flowsheet row, customers need to perform some ID mapping in Epic. Some flowsheet rows have LOINC codes mapped to them by default, which you can use in your interface message to indicate which flowsheet rows to file to. Work with your customer to determine the IDs mapped to the flowsheet rows you want to use
- Refer to the appendix for a sample interface message.
Filing Vitals (FHIR Observation.Create)
- If your app has a patient-facing UI such as a website or mobile app that patients need to log into to file their readings, Epic recommends the use of the Observation.Create API on a patient-facing app for filing readings authorized with the patient’s credentials.
-
This workflow has a few key requirements:
- Patients must have active MyChart accounts. Epic customers will be responsible for provisioning MyChart accounts for their patients before enrolling them in an RPM program that uses Observation.Create.
- You need to add the Observation.Create API to an app with “Patients” as the primary user type. This enables the API to write to PEFs as opposed to other types of flowsheets. Refer to the Application User Context tutorial for additional background.
- You must authenticate your Observation.Create calls using OAuth 2.0, as described in an upcoming section.
Account Linking
-
After the provider has placed the enrollment order and the notification has been sent to your system, the patient opens MyChart and launches your account linking portal through an embedded EHR launch. At the end of this launch sequence, your portal receives the following data:
- An OAuth 2.0 access token (for use with all API calls, such as Observation.Create for filing vitals)
- An OAuth 2.0 refresh token (for obtaining a new access token periodically)
- The patient's FHIR ID (for use with Observation.Create and Patient.Read)
- The response to Patient.Read contains the Patient's MRN, which can be used to match to the MRN received in the HL7 enrollment notification.
- It's important that your portal is properly setup with JWT authentication to receive a refresh token, so that patients do not have to login each time you file a reading.
Observation.Create (Vitals)
-
The main inputs to this API are:
- The patient's FHIR ID, as a unique identifier for that Patient in Epic
- Your Epic customer's specific "code.coding.system" value, identifying you are filing to the flowsheet data structure
- The ID of the specific flowsheet row that you are filing to, where each row corresponds to a different type of vital for example, systolic blood pressure or heart rate). This will be used as the "code.coding.code" value in the payload.
- The value of the reading, with an optional unit assigned. The unit must either be omitted or match the understood unit for that vital (listed in the appendix).
- Any relevant metadata that should be stored with the reading such as whether the reading was manually entered. (The Component field)
Ending Enrollment
- Providers control the RPM Episode(s) from Hyperspace and can end them at any time. After the episode has ended, your application cannot and should not attempt to file more readings to the patient's chart.
-
The EpisodeOfCare resource is used to signal when the patient's enrollment has been ended by the provider. For each patient enrolled in your program, you can periodically (example: once per day) query to check whether the status has changed from "active" to "finished".
-
On enrollment, you can use the EpisodeOfCare.Search resource, filtered to the Patient's MyChart Episodes using the following search:
EpisodeOfCare?patient={patient}&type=urn:oid:1.2.840.114350.1.13.0.1.7.2.726668|3200 -
Note the "type" field varies by Epic environment. Refer to the ID Types for APIs tutorial for background.
- If the customer is also using a Compass Rose episode to track active monitoring in addition to the PEF episode, you will also need to check the status of that episode. If either episode is not active, you should stop filing RPM data.
Because this patient might be on multiple RPM programs, you need to identify your specific episodes. You can do this using the "episode-name" extension, which has a unique valueString per RPM program. Work with your customers to determine which Episode names to check for (both PEF and Compass Rose episodes):
"extension": [
    {
        "valueString": "Sample RPM Template",
        "url": "http://open.epic.com/FHIR/StructureDefinition/extension/episode-name"
    }
]
The episode's FHIR ID is persistent, so you can store them after the initial EpisodeOfCare.Search for use in later queries to EpisodeofCare.Read instead
Appendix
FAQs
-
Q: Will recorded vitals show up in Hyperspace?
A: Yes. Clinicians can manage an Episode and review its associated flowsheets.
-
Q: Will recorded vitals show up in MyChart?
A: Yes. They show up in MyChart and can be reviewed by patients. If your readings were filed with Observation.Create, patients can modify these values from MyChart. If they were filed with HL7v2, these values cannot be modified but can be deleted by the patient.
-
Q: Can I file more than one vital reading at once?
A: Not with Observation.Create. Vital readings must be individually posted as their own Observation.Create calls. To make several readings show up with the same timestamp in Epic, send multiple requests where each payload has the same "effectiveDateTime" value. The incoming flowsheet interface can file multiple readings at once.
-
Q: Can I file both systolic and diastolic blood pressure at the same time?
A: Yes. it’s possible to file systolic and diastolic blood pressure at the same time with HL7v2 if using the right linked flowsheet rows. For Observation.Create, include the Observation.Component field and the appropriate metadata.
-
Q: Should I file readings in real time?
A: Yes, you should. Your filed readings can trigger messages to providers, so it’s important those are sent as soon as possible.
-
Q: Should I use the abnormal ranges sent on the HL7 messages?
A: No, you shouldn't, since providers can change those values after the fact, and there is no way to notify you of this.
-
Q: Should I send in charges for my RPM services?
A: In the November 2023 version of Epic, we released enhanced tools to automatically calculate RPM billing based on PEF/DEF device data and clinical time spent with the patient. You do not need to send in charges yourselves. (IE with a DFT interface).
Example Outgoing HL7 Ancillary Orders Message
MSH|^~\&|EPIC||||20210806112409|ADSTRICK|ORM^O01|7|T|2.3
PID|1||E4035^^^EPIC^EPI~203739^^^MRN^MRN||MYCHART^PEG^^^^^D||19500101|M|||^^^^^US^L|||||||38454|000-00-0000|||||||||||N
PV1||OUTPATIENT|10501101^^^10501^^^^^^^DEPID||||1000^FAMILY MEDICINE^PHYSICIAN^^^^^^PROVID^^^^PROVID~1627363736^FAMILY MEDICINE^PHYSICIAN^^^^^^NPI^^^^NPI||||||||||||38454|||||||||||||||||||||||||||||||38454
ORC|NW|1078751^EPC||38454|||^^^20210806^^R^^||20210806112404|ADSTRICK^STRICKLAND^ADAM^^||1000^FAMILY MEDICINE^PHYSICIAN^^^^^^PROVID^^^^PROVID~1627363736^FAMILY MEDICINE^PHYSICIAN^^^^^^NPI^^^^NPI|10501101^^^10501^^^^^EMC FAMILY MEDICINE|(555)555-5555^^^^^555^5555555||||CLISUP^EPIC SUPPORT^^10101102^EMH MED SURG||||||123 Anywhere Street^^MADISON^WI^53719^^C|||||O
OBR|1|1078751^EPC||^SAMPLE RPM PROGRAM ENROLLMENT^^^SAMPLE RPM ENROLLMENT||20210806|||||Clinic|||||1000^FAMILY MEDICINE^PHYSICIAN^^^^^^PROVID^^^^PROVID~1627363736^FAMILY MEDICINE^PHYSICIAN^^^^^^NPI^^^^NPI|(555)555-5555^^^^^555^5555555|||||||Procedures|||^^^20210806^^R^^|||||||||20210806
NTE|1||This flowsheet is filled with data from your Sample RPM device. Please do
NTE|2||not manually enter vitals here.
NTE|3||After how many days would you like to receive a notification of this patient's flowsheet entries?->7
NTE|4||What is the highest normal systolic value for this patient?->180
NTE|5||What is the lowest normal systolic value for this patient?->100
NTE|6||What is the highest normal diastolic value for this patient?->100
NTE|7||What is the highest normal weight in lbs for this patient?->180
DG1|1|I10|I50.22^Chronic systolic (congestive) heart failure^I10|Chronic systolic (congestive) heart failure||^180;ORD
DG1|2|I10|E08.22^Diabetes mellitus due to underlying condition with diabetic chronic kidney disease^I10|Diabetes mellitus due to underlying condition with diabetic chronic kidney disease||^180;ORD
DG1|3|I10|N18.6^End stage renal disease^I10|End stage renal disease||^180;ORD
DG1|4|I10|Z79.4^Long term (current) use of insulin^I10|Long term (current) use of insulin||^180;ORD
DG1|5|I10|Z99.2^Dependence on renal dialysis^I10|Dependence on renal dialysis||^180;ORD
Example Observation.Create Payload
{
  "resourceType": "Observation",
  "category": [
    {
      "coding": [
        {
          "system": "http://hl7.org/fhir/observation-category",
          "code": "vital-signs",
          "display": "Vital Signs"
        }
      ],
      "text": "Vital Signs"
    }
  ],
  "code": {
    "coding": [
      {
        "system": "urn:oid:1.2.840.114350.1.13.0.1.7.2.707679",
        "code": "8",
        "display": "Heart Rate"
      }
    ]
  },
  "subject": {
    "reference": "Patient/e63wRTbPfr1p8UW81d8Seiw3"
  },
 "component": [
        { "code": {
                "coding": [
                    {
                        "system": "urn:oid:1.2.840.114350.1.13.861.1.7.4.708368.1310",
                        "code": "6",
                        "display": "Manually Entered"
                    }
                ]
            },
            "valueBoolean": true
        }
    ],

  "valueQuantity": {
    "value": 75
  },
  "effectiveDateTime": "2025-03-18T21:59:55",
  "note":[{"text":"Sample RPM device"}]
}
Example HL7 Incoming Clinical Documentation Flowsheet Data message
MSH|^~\&|||AM_RPM_POSTMAN|EPIC|20230208134707||ORU^R01|e5649b0a-59ab-4b5a-aefa-f63c2c744db7|T|2.3
PID|||<PATIENT MRN>^^^^MRN||<PATIENT LAST NAME>^<PATIENT FIRST NAME>||19970501|F|||||||||||||||||||||||
OBR|||||||20230208134707|||<VENDOR-SPECIFIC IDENTIFIER>|
OBX|1||8480-6||140||
OBX|2||8462-4||90||
OBX|3||8867-4||100||
International Patient Summary Playbook
About the International Patient Summary
The International Patient Summary (IPS) is a FHIR document that contains an essential set of healthcare information for a single patient, making it easy for healthcare organizations to exchange clinical data for patient care across borders and jurisdictions.
Organizations that use Epic can generate FHIR-based IPS documents for treatment-based exchange between providers as well as make those documents available for patients. Consider the following example use case:
Ontario native, 73-year-old Gwendolyn visited a Michigan emergency department during a beach vacation to Lake Erie with her grandchildren. The emergency physician was able to view her complete medical history, previous diagnoses, problem list, medications, allergies, and other crucial information from her regular physician – leading to faster diagnosis, reduced duplicate testing, and better-coordinated care for patients.
Epic is among the first organizations to support the International Patient Summary (IPS) FHIR specification, beginning in May 2025. IPS improves care for patients by making it simpler for healthcare organizations to exchange data securely with partner organizations down the street, provincially, or even across international borders. Support for IPS extends Epic's decades-long track record as a leader in universal interoperability.
IPS builds on Epic's existing Care Everywhere and CDA workflows to help customers coordinate care with groups that exclusively use FHIR. The new specification governs the creation of electronic health record FHIR documents containing essential healthcare information about a patient. It is endorsed by multinational organizations such as the G7 and the GDHP.
IPS Data Types and Roadmap
Epic’s initial release includes all required IPS data types – problems, allergies, and medications – as well as immunizations. We plan to add results, procedures, and other optional data types over time. Organizations that use Epic can generate IPS documents in response to treatment-based requests from providers and make those documents available for patients.
Epic’s IPS contains both discrete, machine-readable data about the patient, and human-readable narrative text. Systems or scenarios that don’t support the standard discrete FHIR data should present the narrative contained within the IPS.
Exchange Pattern
For system-to-system integrations, such as provider-to-provider exchange of the IPS for treatment, the IPS $summary operation is well suited for query-based document exchange at the point of care. Epic recommends the use of backend OAuth 2.0 for authorization and authentication of clients querying for the IPS as well as the FHIR $match operation for patient lookup.
Technical Specification
In Epic, the IPS is generated at the time of each request to ensure that integrations receive a real-time snapshot of the patient's clinical record. Developers who integrate with Epic organizations can request IPS documents.
Structure of an IPS
The International Patient Summary is available starting in the May 2025 version of Epic. The IPS is returned as a FHIR Bundle that always contains at minimum the following resources:
- A FHIR Composition resource that summarizes all other data in the IPS Bundle
- A FHIR Patient resource, representing the patient who is the subject of this IPS document
- A FHIR Organization resource, representing the healthcare organization that provided the data in the IPS document
Additionally, the IPS FHIR Bundle contains FHIR resources for each discrete piece of healthcare data referenced in the overall Composition – including the patient's problem list, allergies and intolerances, immunizations, and medications. These are returned as FHIR Condition, AllergyIntolerance, Immunization, MedicationRequest, and Medication resources.
Narrative Content
The FHIR IPS document contains narrative content in XHTML format, which is intended to make it easy for integrations to show patient data to end users without needing to do extra work parsing the FHIR resources in the response. The narrative XHTML is unstyled, so depending on the type of integration, developers should consider supplying a stylesheet to supplement the IPS narrative. Narrative content is unique to the IPS and is found in several locations in the $summary response Bundle, including each of the following:
|
Element |
Section |
Description |
|
Patient.text |
Patient narrative, including name and demographics, such as address, phone, email, preferred languages, primary care providers, and contacts |
|
|
Composition.text |
IPS document overview, including details about the organization that generated this document and the time it was generated |
|
|
Composition.section.text |
Problems |
A tabular list of the patient's active and recent problems, along with relevant dates, notes, and priorities |
|
Composition.section.text |
Allergies |
A tabular list of the patient's active and recent allergies, along with relevant dates, criticality, and reaction information |
|
Composition.section.text |
Medications |
A tabular list of the patient's medications, including the sig, start and end dates, status information, and data about refill and dispense quantities |
|
Composition.section.text |
Immunizations |
A tabular list of the patient's immunizations, administration dates, and next due dates |
Sample Request and Response
To retrieve a patient’s IPS document, you first need the patient’s FHIR ID. Then, make a GET request to the Patient.$summary endpoint using the patient FHIR ID in the following format:
https://hostname/instance/api/FHIR/R4/Patient/<PATIENT_FHIR_ID>/$summary
A sample request and response for an example patient with all of the core IPS data types (problems, allergies, medications, and immunizations) is shown below:
Request:
https://hostname/instance/api/FHIR/R4/Patient/eNO3wqOfAltfnWMfWBQ1WmQ3/$summary
Response:
{
"resourceType": "Bundle",
"identifier": {
"system": "urn:ietf:rfc:3986",
"value": "urn:uuid:9b0990f1-5de7-423f-a215-8b65ac69e37d"
},
"type": "document",
"timestamp": "2025-02-19T21:04:03Z",
"entry": [
{
"fullUrl": "https://vs-icx18-25.epic.com/Interconnect-FHIR-Current-Stage1-Primary-Unsecured/api/FHIR/R4/Composition/feE1F.6OLpos2ZZAXV5UHxg4",
"resource": {
"resourceType": "Composition",
"id": "feE1F.6OLpos2ZZAXV5UHxg4",
"text": {
"status": "generated",
"div": "<div xmlns=\"http://www.w3.org/1999/xhtml\"><div class=\"Section\" idref=\"eBBFDl1F2A4AHQpheZzVucw3\"><div class=\"Header\"><h3>Author</h3></div><div class=\"Body\"><span>Epic Central Clinic<br />608-163-0003<br />410 HIGH POINT ROAD<br />MADISON WI 53711</span></div></div><br /><div class=\"Section\"><div class=\"Header\"><h3>Document Information</h3></div><div class=\"Body\"><div class=\"SingleLineField\"><span class=\"Prefix\"><strong>UTC offset: </strong></span><span class=\"Value\">UTC-06:00</span></div><div class=\"SingleLineField\"><span class=\"Prefix\"><strong>Date format: </strong></span><span class=\"Value\">M/d/yyyy</span></div><div class=\"SingleLineField\"><span class=\"Prefix\"><strong>Decimal separator: </strong></span><span class=\"Value\">.</span></div><div class=\"SingleLineField\"><span class=\"Prefix\"><strong>Date generated: </strong></span><span class=\"Value\">2/19/2025</span></div></div></div></div>"
},
"status": "final",
"type": {
"coding": [
{
"system": "http://loinc.org",
"code": "60591-5",
"display": "Patient summary Document"
}
],
"text": "International Patient Summary"
},
"subject": {
"reference": "Patient/eNO3wqOfAltfnWMfWBQ1WmQ3",
"display": "Jackson, Jayden"
},
"date": "2025-02-19T21:04:03Z",
"author": [
{
"reference": "Organization/eBBFDl1F2A4AHQpheZzVucw3",
"display": "Epic Central Clinic"
}
],
"title": "International Patient Summary for Jackson, Jayden",
"custodian": {
"reference": "Organization/eBBFDl1F2A4AHQpheZzVucw3",
"display": "Epic Central Clinic"
},
"section": [
{
"title": "Problems",
"code": {
"coding": [
{
"system": "http://loinc.org",
"code": "11450-4",
"display": "Problem list - Reported"
}
],
"text": "Problem list - Reported"
},
"text": {
"status": "generated",
"div": "<div xmlns=\"http://www.w3.org/1999/xhtml\"><div class=\"ActiveProblems\"><h3>Active Problems</h3><table class=\"ActiveProblemTable\"><thead><tr><th>Problem</th><th>Priority</th><th>Noted Date</th><th>Diagnosed Date</th></tr></thead><tbody><tr><td class=\"Name\"><span class=\"ProblemName\">Moderate persistent asthma (HHS/HCC) (HHS)</span></td><td class=\"Priority\">-</td><td class=\"NotedDate\">2/17/2025</td><td class=\"DiagnosedDate\">-</td></tr></tbody></table></div><br /><div class=\"ResolvedProblems\"><h3>Resolved Problems</h3><table class=\"ResolvedProblemTable\"><thead><tr><th>Problem</th><th>Priority</th><th>Noted Date</th><th>Diagnosed Date</th><th>Resolved Date</th></tr></thead><tbody><tr><td class=\"Name\"><span class=\"ProblemName\">Struck by alligator</span><ul><li class=\"Note\"><span class=\"NoteTitle\">Overview (2/18/2018 1:22 PM):</span><br /><span class=\"WarningMsg\"><em>Formatting of this note might be different from the original.</em></span><br /><span class=\"NoteText\">It was a real big gator.<br /></span></li></ul></td><td class=\"Priority\">High</td><td class=\"NotedDate\">2/18/2018</td><td class=\"DiagnosedDate\">2/18/2018</td><td class=\"ResolvedDate\">2/18/2018</td></tr></tbody></table></div></div>"
},
"entry": [
{
"reference": "Condition/e-8nWH.bGEpZxDWq2oCoCLREUwM32POPS7KMw9NU04mg3"
},
{
"reference": "Condition/evRt9rC4iF4hQ8HrVrp6408lZdE-j24dngrOAo3aMboY3"
}
]
},
{
"title": "Allergies",
"code": {
"coding": [
{
"system": "http://loinc.org",
"code": "48765-2",
"display": "Allergies and adverse reactions Document"
}
],
"text": "Allergies and adverse reactions Document"
},
"text": {
"status": "generated",
"div": "<div xmlns=\"http://www.w3.org/1999/xhtml\"><table class=\"ActiveAllergyTable\"><thead class=\"ActiveAllergyHeader\"><tr><th>Active Allergy</th><th>Allergen Type</th><th>Reactions</th><th>Criticality</th><th>Noted Date</th><th>Comments</th></tr></thead><tbody class=\"ActiveAllergy\"><tr class=\"ActiveAllergy\"><td class=\"Name\">NICKEL</td><td class=\"Type\">Allergy</td><td class=\"Reactions\">Hives</td><td class=\"Criticality\">High</td><td class=\"NotedDate\">9/13/2024</td><td class=\"Comments\">-</td></tr><tr class=\"ActiveAllergy\"><td class=\"Name\">LACTOSE</td><td class=\"Type\">Allergy</td><td class=\"Reactions\">Nausea</td><td class=\"Criticality\">Low</td><td class=\"NotedDate\">1/24/2025</td><td class=\"Comments\">-</td></tr></tbody></table></div>"
},
"entry": [
{
"reference": "AllergyIntolerance/eq.ZnjVL0b3grxEEs0Jb512-FP-IEF5CPgq1LtNhj8vE3"
},
{
"reference": "AllergyIntolerance/ew9Q0B3JJOwNipaZ.Pb2J5sXukodDH.N271w777jlVLU3"
}
]
},
{
"title": "Medications",
"code": {
"coding": [
{
"system": "http://loinc.org",
"code": "10160-0",
"display": "History of Medication use Narrative"
}
],
"text": "History of Medication use Narrative"
},
"text": {
"status": "generated",
"div": "<div xmlns=\"http://www.w3.org/1999/xhtml\"><table><thead><tr><th>Medication</th><th>Sig</th><th>Dispense Quantity</th><th>Refills</th><th>Start Date</th><th>End Date</th><th>Status</th><tr><td>aspirin-acetaminophen-caffeine (EXCEDRIN MIGRAINE) 250-250-65 MG per tablet<ul></ul></td><td>For headaches, take 1 pill by mouth every 6 hours as needed.</td><td>30 tablet</td><td>0</td><td>9/17/2024</td><td>-</td><td>On Hold</td></tr></tbody></table></div>"
},
"entry": [
{
"reference": "MedicationRequest/eZ.jcFkxpptG67qxgRtMnjY5sQsmiFdGFbRTrWxSCDtU3"
}
]
},
{
"title": "Immunizations",
"code": {
"coding": [
{
"system": "http://loinc.org",
"code": "11369-6",
"display": "History of Immunization Narrative"
}
],
"text": "History of Immunization Narrative"
},
"text": {
"status": "generated",
"div": "<div xmlns=\"http://www.w3.org/1999/xhtml\"><table><thead><tr><th>Immunization</th><th>Administration Dates</th><th>Next Due</th></tr></thead><tbody><tr><td>Influenza Virus Vaccine</td><td>1/7/2025</td><td>-</td></tr></tbody></table></div>"
},
"entry": [
{
"reference": "Immunization/ehsR6jLoIwy.GKVtLGLzBSRS1O4-Hh7BxqD4hCyfh.5o3"
}
]
}
]
}
},
{
"fullUrl": "https://vs-icx18-25.epic.com/Interconnect-FHIR-Current-Stage1-Primary-Unsecured/api/FHIR/R4/AllergyIntolerance/eq.ZnjVL0b3grxEEs0Jb512-FP-IEF5CPgq1LtNhj8vE3",
"resource": {
"resourceType": "AllergyIntolerance",
"id": "eq.ZnjVL0b3grxEEs0Jb512-FP-IEF5CPgq1LtNhj8vE3",
"clinicalStatus": {
"coding": [
{
"system": "http://terminology.hl7.org/CodeSystem/allergyintolerance-clinical",
"version": "4.0.0",
"code": "active",
"display": "Active"
}
],
"text": "Active"
},
"verificationStatus": {
"coding": [
{
"system": "http://terminology.hl7.org/CodeSystem/allergyintolerance-verification",
"version": "4.0.0",
"code": "confirmed",
"display": "Confirmed"
}
],
"text": "Confirmed"
},
"type": "allergy",
"category": [
"medication"
],
"criticality": "high",
"code": {
"coding": [
{
"system": "http://www.nlm.nih.gov/research/umls/rxnorm",
"code": "31738",
"display": "NICKEL"
},
{
"system": "http://www.nlm.nih.gov/research/umls/rxnorm",
"code": "1311629"
},
{
"system": "http://www.nlm.nih.gov/research/umls/rxnorm",
"code": "1546280"
},
{
"system": "urn:oid:2.16.840.1.113883.4.9",
"code": "4FLT4T3WUN"
},
{
"system": "urn:oid:2.16.840.1.113883.4.9",
"code": "696BNE976J"
},
{
"system": "urn:oid:2.16.840.1.113883.4.9",
"code": "7OV03QG267"
},
{
"system": "urn:oid:2.16.840.1.113883.4.9",
"code": "J7B7WZ5ZMT"
},
{
"system": "urn:oid:2.16.840.1.113883.4.9",
"code": "NUZ5T2QN2V"
}
],
"text": "NICKEL"
},
"patient": {
"reference": "Patient/eNO3wqOfAltfnWMfWBQ1WmQ3",
"display": "Jackson, Jayden"
},
"onsetDateTime": "2024-09-13",
"recordedDate": "2024-09-13T22:28:43Z",
"reaction": [
{
"manifestation": [
{
"coding": [
{
"system": "http://snomed.info/sct",
"code": "201272008",
"display": "(URTICARIA NOS) OR (HIVES)"
}
],
"text": "Hives"
}
],
"description": "Hives"
}
]
}
},
{
"fullUrl": "https://vs-icx18-25.epic.com/Interconnect-FHIR-Current-Stage1-Primary-Unsecured/api/FHIR/R4/AllergyIntolerance/ew9Q0B3JJOwNipaZ.Pb2J5sXukodDH.N271w777jlVLU3",
"resource": {
"resourceType": "AllergyIntolerance",
"id": "ew9Q0B3JJOwNipaZ.Pb2J5sXukodDH.N271w777jlVLU3",
"clinicalStatus": {
"coding": [
{
"system": "http://terminology.hl7.org/CodeSystem/allergyintolerance-clinical",
"version": "4.0.0",
"code": "active",
"display": "Active"
}
],
"text": "Active"
},
"verificationStatus": {
"coding": [
{
"system": "http://terminology.hl7.org/CodeSystem/allergyintolerance-verification",
"version": "4.0.0",
"code": "confirmed",
"display": "Confirmed"
}
],
"text": "Confirmed"
},
"type": "allergy",
"category": [
"medication"
],
"criticality": "low",
"code": {
"coding": [
{
"system": "http://www.nlm.nih.gov/research/umls/rxnorm",
"code": "6211",
"display": "LACTOSE"
},
{
"system": "http://www.nlm.nih.gov/research/umls/rxnorm",
"code": "1305527"
},
{
"system": "http://www.nlm.nih.gov/research/umls/rxnorm",
"code": "1307662"
},
{
"system": "http://www.nlm.nih.gov/research/umls/rxnorm",
"code": "2359362"
},
{
"system": "urn:oid:2.16.840.1.113883.4.9",
"code": "3SY5LH9PMK"
},
{
"system": "urn:oid:2.16.840.1.113883.4.9",
"code": "EWQ57Q8I5X"
},
{
"system": "urn:oid:2.16.840.1.113883.4.9",
"code": "J2B2A4N98G"
},
{
"system": "urn:oid:2.16.840.1.113883.4.9",
"code": "MJF4JAT10B"
}
],
"text": "LACTOSE"
},
"patient": {
"reference": "Patient/eNO3wqOfAltfnWMfWBQ1WmQ3",
"display": "Jackson, Jayden"
},
"onsetDateTime": "2025-01-24",
"recordedDate": "2025-01-24T16:45:23Z",
"reaction": [
{
"manifestation": [
{
"text": "Nausea"
}
],
"description": "Nausea"
}
]
}
},
{
"fullUrl": "https://vs-icx18-25.epic.com/Interconnect-FHIR-Current-Stage1-Primary-Unsecured/api/FHIR/R4/Immunization/ehsR6jLoIwy.GKVtLGLzBSRS1O4-Hh7BxqD4hCyfh.5o3",
"resource": {
"resourceType": "Immunization",
"id": "ehsR6jLoIwy.GKVtLGLzBSRS1O4-Hh7BxqD4hCyfh.5o3",
"identifier": [
{
"use": "usual",
"system": "urn:oid:1.2.840.114350.1.13.5325.1.7.2.768076",
"value": "1000057742"
}
],
"status": "completed",
"vaccineCode": {
"coding": [
{
"system": "http://hl7.org/fhir/sid/ndc",
"code": "2000-1234-01"
}
],
"text": "Influenza Virus Vaccine"
},
"patient": {
"reference": "Patient/eNO3wqOfAltfnWMfWBQ1WmQ3",
"display": "Jackson, Jayden"
},
"occurrenceDateTime": "2025-01-07T20:25:00Z",
"primarySource": true,
"lotNumber": "1564",
"site": {
"coding": [
{
"system": "urn:oid:1.2.840.114350.1.13.5325.1.7.10.768076.4040",
"code": "14",
"display": "Left arm"
}
],
"text": "Left arm"
},
"route": {
"coding": [
{
"system": "urn:oid:1.2.840.114350.1.13.5325.1.7.10.768076.4030",
"code": "2",
"display": "Intramuscular"
},
{
"system": "http://ncicb.nci.nih.gov/xml/owl/EVS/Thesaurus.owl",
"code": "56"
}
],
"text": "Intramuscular"
},
"doseQuantity": {
"value": 5,
"unit": "mL",
"system": "urn:oid:1.2.840.114350.1.13.5325.1.7.10.768076.4019",
"code": "1"
},
"performer": [
{
"function": {
"coding": [
{
"system": "http://terminology.hl7.org/CodeSystem/v2-0443",
"code": "AP",
"display": "Administering Provider"
}
],
"text": "Administering Provider"
},
"actor": {
"reference": "Practitioner/eb3d.4apzwRM33Q91Nm7wJA3",
"type": "Practitioner",
"display": "Emile Underwood, MD"
}
}
]
}
},
{
"fullUrl": "https://vs-icx18-25.epic.com/Interconnect-FHIR-Current-Stage1-Primary-Unsecured/api/FHIR/R4/MedicationRequest/eZ.jcFkxpptG67qxgRtMnjY5sQsmiFdGFbRTrWxSCDtU3",
"resource": {
"resourceType": "MedicationRequest",
"id": "eZ.jcFkxpptG67qxgRtMnjY5sQsmiFdGFbRTrWxSCDtU3",
"identifier": [
{
"use": "usual",
"system": "urn:oid:1.2.840.114350.1.13.5325.1.7.2.798268",
"value": "1020672672"
}
],
"status": "on-hold",
"intent": "order",
"category": [
{
"coding": [
{
"system": "http://terminology.hl7.org/CodeSystem/medicationrequest-category",
"code": "community",
"display": "Community"
}
],
"text": "Community"
}
],
"medicationReference": {
"reference": "Medication/eFPOEegDKIjYsM3RkHequHJ5I2sLnb6kCobyvt.2bHUQMn5mMSA84ght6QXRPlsUrYrpRQOlGll1yESbZhar2gGHGBpCW6ZAZfG3I-2k38Uw3",
"display": "aspirin-acetaminophen-caffeine (EXCEDRIN MIGRAINE) 250-250-65 MG per tablet"
},
"subject": {
"reference": "Patient/eNO3wqOfAltfnWMfWBQ1WmQ3",
"display": "Jackson, Jayden"
},
"encounter": {
"reference": "Encounter/eUxsoXoUZAJwTHuf8BKfp10EW8pkwRRRqSke8aOSl6jo3",
"identifier": {
"use": "usual",
"system": "urn:oid:1.2.840.114350.1.13.5325.1.7.3.698084.8",
"value": "10004197672"
},
"display": "Office Visit"
},
"authoredOn": "2024-09-17",
"requester": {
"reference": "Practitioner/eb3d.4apzwRM33Q91Nm7wJA3",
"type": "Practitioner",
"display": "Emile Underwood, MD"
},
"recorder": {
"reference": "Practitioner/eb3d.4apzwRM33Q91Nm7wJA3",
"type": "Practitioner",
"display": "Emile Underwood, MD"
},
"courseOfTherapyType": {
"coding": [
{
"system": "http://terminology.hl7.org/CodeSystem/medicationrequest-course-of-therapy",
"code": "acute",
"display": "Short course (acute) therapy"
}
],
"text": "Short course (acute) therapy"
},
"dosageInstruction": [
{
"text": "1 tablet, Oral, EVERY 6 HOURS PRN Starting Tue 9/17/2024, Disp-30 tablet, R-0, Normal",
"patientInstruction": "For headaches, take 1 pill by mouth every 6 hours as needed.",
"timing": {
"repeat": {
"boundsPeriod": {
"start": "2024-09-17"
},
"frequency": 1,
"period": 6,
"periodUnit": "h"
},
"code": {
"text": "Q6H PRN"
}
},
"asNeededBoolean": true,
"route": {
"coding": [
{
"system": "http://snomed.info/sct",
"code": "260548002",
"display": "Oral (qualifier value)"
},
{
"system": "urn:oid:1.2.840.114350.1.13.5325.1.7.4.798268.7025",
"code": "15",
"display": "Oral"
}
],
"text": "Oral"
},
"method": {
"coding": [
{
"system": "http://snomed.info/sct",
"code": "419652001",
"display": "Take"
}
],
"text": "Take"
},
"doseAndRate": [
{
"type": {
"coding": [
{
"system": "http://epic.com/CodeSystem/dose-rate-type",
"code": "calculated",
"display": "calculated"
}
],
"text": "calculated"
},
"doseQuantity": {
"value": 1,
"unit": "tablet",
"system": "http://unitsofmeasure.org",
"code": "{tbl}"
}
},
{
"type": {
"coding": [
{
"system": "http://epic.com/CodeSystem/dose-rate-type",
"code": "admin-amount",
"display": "admin-amount"
}
],
"text": "admin-amount"
},
"doseQuantity": {
"value": 1,
"unit": "tablet",
"system": "http://unitsofmeasure.org",
"code": "{tbl}"
}
},
{
"type": {
"coding": [
{
"system": "http://epic.com/CodeSystem/dose-rate-type",
"code": "ordered",
"display": "ordered"
}
],
"text": "ordered"
},
"doseQuantity": {
"value": 1,
"unit": "tablet",
"system": "http://unitsofmeasure.org",
"code": "{tbl}"
}
}
]
}
],
"dispenseRequest": {
"validityPeriod": {
"start": "2024-09-17"
},
"numberOfRepeatsAllowed": 0,
"quantity": {
"value": 30,
"unit": "tablet"
},
"expectedSupplyDuration": {
"value": 8,
"unit": "Day",
"system": "http://unitsofmeasure.org",
"code": "d"
}
}
}
},
{
"fullUrl": "https://vs-icx18-25.epic.com/Interconnect-FHIR-Current-Stage1-Primary-Unsecured/api/FHIR/R4/Condition/e-8nWH.bGEpZxDWq2oCoCLREUwM32POPS7KMw9NU04mg3",
"resource": {
"resourceType": "Condition",
"id": "e-8nWH.bGEpZxDWq2oCoCLREUwM32POPS7KMw9NU04mg3",
"extension": [
{
"valueDateTime": "2018-02-18",
"url": "http://hl7.org/fhir/StructureDefinition/condition-assertedDate"
}
],
"clinicalStatus": {
"coding": [
{
"system": "http://terminology.hl7.org/CodeSystem/condition-clinical",
"version": "4.0.0",
"code": "resolved",
"display": "Resolved"
}
],
"text": "Resolved"
},
"verificationStatus": {
"coding": [
{
"system": "http://terminology.hl7.org/CodeSystem/condition-ver-status",
"version": "4.0.0",
"code": "confirmed",
"display": "Confirmed"
}
],
"text": "Confirmed"
},
"category": [
{
"coding": [
{
"system": "http://terminology.hl7.org/CodeSystem/condition-category",
"code": "problem-list-item",
"display": "Problem List Item"
}
],
"text": "Problem List Item"
}
],
"severity": {
"coding": [
{
"system": "urn:oid:2.16.840.1.113883.6.96",
"code": "24484000",
"display": "Severe"
}
],
"text": "High"
},
"code": {
"coding": [
{
"system": "http://hl7.org/fhir/sid/icd-10-cm",
"code": "W58.02XA",
"display": "Struck by alligator, initial encounter"
},
{
"system": "http://snomed.info/sct",
"code": "418589001",
"display": "Accidental Physical Contact With Animal"
}
],
"text": "Struck by alligator"
},
"subject": {
"reference": "Patient/eng1-x9wfpFRTWZ1fXHxlhg3",
"display": "Realistic, Jayden FHIR Jr."
},
"onsetDateTime": "2018-02-18",
"abatementDateTime": "2025-02-17",
"recordedDate": "2018-02-18",
"note": [
{
"extension": [
{
"valueString": "Formatting of this note might be different from the original.",
"url": "http://open.epic.com/FHIR/StructureDefinition/extension/data-conversion-warning"
},
{
"valueCodeableConcept": {
"coding": [
{
"system": "http://loinc.org",
"code": "68608-9",
"display": "Summary note"
}
],
"text": "Problem Overview"
},
"url": "http://hl7.org/fhir/StructureDefinition/annotationType"
}
],
"authorReference": {
"reference": "Practitioner/eTgWia0U3VHmeYIDAJ2.kFw3",
"display": "Justin Ramm"
},
"time": "2018-02-18T19:22:47Z",
"text": "It was a real big gator.\r\n"
}
]
}
},
{
"fullUrl": "https://vs-icx18-25.epic.com/Interconnect-FHIR-Current-Stage1-Primary-Unsecured/api/FHIR/R4/Condition/evRt9rC4iF4hQ8HrVrp6408lZdE-j24dngrOAo3aMboY3",
"resource": {
"resourceType": "Condition",
"id": "evRt9rC4iF4hQ8HrVrp6408lZdE-j24dngrOAo3aMboY3",
"extension": [
{
"valueDateTime": "2007",
"url": "http://hl7.org/fhir/StructureDefinition/condition-assertedDate"
}
],
"clinicalStatus": {
"coding": [
{
"system": "http://terminology.hl7.org/CodeSystem/condition-clinical",
"version": "4.0.0",
"code": "resolved",
"display": "Resolved"
}
],
"text": "Resolved"
},
"verificationStatus": {
"coding": [
{
"system": "http://terminology.hl7.org/CodeSystem/condition-ver-status",
"version": "4.0.0",
"code": "confirmed",
"display": "Confirmed"
}
],
"text": "Confirmed"
},
"category": [
{
"coding": [
{
"system": "http://terminology.hl7.org/CodeSystem/condition-category",
"code": "problem-list-item",
"display": "Problem List Item"
}
],
"text": "Problem List Item"
}
],
"severity": {
"coding": [
{
"system": "urn:oid:2.16.840.1.113883.6.96",
"code": "6736007",
"display": "Moderate"
}
],
"text": "Med"
},
"code": {
"coding": [
{
"system": "http://hl7.org/fhir/sid/icd-10-cm",
"code": "J45.40",
"display": "Moderate persistent asthma, uncomplicated"
},
{
"system": "http://snomed.info/sct",
"code": "427295004",
"display": "Moderate Persistent Asthma"
}
],
"text": "Moderate persistent asthma (HHS/HCC) (HHS)"
},
"subject": {
"reference": "Patient/eng1-x9wfpFRTWZ1fXHxlhg3",
"display": "Realistic, Jayden FHIR Jr."
},
"onsetDateTime": "2025-02-17",
"abatementDateTime": "2025-02-17",
"recordedDate": "2025-02-17"
}
},
{
"fullUrl": "https://vs-icx18-25.epic.com/Interconnect-FHIR-Current-Stage1-Primary-Unsecured/api/FHIR/R4/Medication/eFPOEegDKIjYsM3RkHequHJ5I2sLnb6kCobyvt.2bHUQMn5mMSA84ght6QXRPlsUrYrpRQOlGll1yESbZhar2gGHGBpCW6ZAZfG3I-2k38Uw3",
"resource": {
"resourceType": "Medication",
"id": "eFPOEegDKIjYsM3RkHequHJ5I2sLnb6kCobyvt.2bHUQMn5mMSA84ght6QXRPlsUrYrpRQOlGll1yESbZhar2gGHGBpCW6ZAZfG3I-2k38Uw3",
"identifier": [
{
"use": "usual",
"system": "urn:oid:1.2.840.114350.1.13.5325.1.7.2.698288",
"value": "22850"
}
],
"code": {
"coding": [
{
"system": "http://www.whocc.no/atc",
"code": "N02BE51"
},
{
"system": "urn:oid:2.16.840.1.113883.6.253",
"code": "55360"
},
{
"system": "urn:oid:2.16.840.1.113883.6.68",
"code": "64990003200350"
},
{
"system": "urn:oid:2.16.840.1.113883.6.162",
"code": "03485"
},
{
"system": "http://www.nlm.nih.gov/research/umls/rxnorm",
"code": "161"
},
{
"system": "http://www.nlm.nih.gov/research/umls/rxnorm",
"code": "1191"
},
{
"system": "http://www.nlm.nih.gov/research/umls/rxnorm",
"code": "1886"
},
{
"system": "http://www.nlm.nih.gov/research/umls/rxnorm",
"code": "209468"
},
{
"system": "http://www.nlm.nih.gov/research/umls/rxnorm",
"code": "308297"
},
{
"system": "http://www.nlm.nih.gov/research/umls/rxnorm",
"code": "466584"
}
],
"text": "aspirin-acetaminophen-caffeine (EXCEDRIN MIGRAINE) 250-250-65 MG per tablet"
},
"form": {
"coding": [
{
"system": "urn:oid:1.2.840.114350.1.13.5325.1.7.4.698288.310",
"code": "TABS",
"display": "Tablet"
}
],
"text": "Tablet"
},
"ingredient": [
{
"itemCodeableConcept": {
"coding": [
{
"system": "http://www.whocc.no/atc",
"code": "N02BE51"
},
{
"system": "urn:oid:2.16.840.1.113883.6.253",
"code": "55360"
},
{
"system": "urn:oid:2.16.840.1.113883.6.68",
"code": "64990003200350"
},
{
"system": "urn:oid:2.16.840.1.113883.6.162",
"code": "03485"
},
{
"system": "http://www.nlm.nih.gov/research/umls/rxnorm",
"code": "161"
},
{
"system": "http://www.nlm.nih.gov/research/umls/rxnorm",
"code": "1191"
},
{
"system": "http://www.nlm.nih.gov/research/umls/rxnorm",
"code": "1886"
},
{
"system": "http://www.nlm.nih.gov/research/umls/rxnorm",
"code": "209468"
},
{
"system": "http://www.nlm.nih.gov/research/umls/rxnorm",
"code": "308297"
},
{
"system": "http://www.nlm.nih.gov/research/umls/rxnorm",
"code": "466584"
}
],
"text": "aspirin-acetaminophen-caffeine (EXCEDRIN MIGRAINE) 250-250-65 MG per tablet"
}
}
]
}
},
{
"fullUrl": "https://vs-icx18-25.epic.com/Interconnect-FHIR-Current-Stage1-Primary-Unsecured/api/FHIR/R4/Organization/eBBFDl1F2A4AHQpheZzVucw3",
"resource": {
"resourceType": "Organization",
"id": "eBBFDl1F2A4AHQpheZzVucw3",
"identifier": [
{
"use": "usual",
"type": {
"text": "TAX"
},
"system": "urn:oid:2.16.840.1.113883.4.4",
"value": "4749832920"
},
{
"use": "usual",
"system": "urn:oid:1.2.840.114350.1.13.5325.1.7.2.696570",
"value": "163002"
}
],
"active": true,
"name": "Epic Central Clinic",
"telecom": [
{
"system": "phone",
"value": "608-163-0003",
"use": "work"
}
],
"address": [
{
"text": "410 HIGH POINT ROAD\r\nMADISON WI 53711",
"line": [
"410 HIGH POINT ROAD"
],
"city": "MADISON",
"state": "Wisconsin",
"postalCode": "53711"
}
]
}
},
{
"fullUrl": "https://vs-icx18-25.epic.com/Interconnect-FHIR-Current-Stage1-Primary-Unsecured/api/FHIR/R4/Patient/eNO3wqOfAltfnWMfWBQ1WmQ3",
"resource": {
"resourceType": "Patient",
"id": "eNO3wqOfAltfnWMfWBQ1WmQ3",
"text": {
"status": "generated",
"div": "<div xmlns=\"http://www.w3.org/1999/xhtml\"><h1>Jayden Jackson</h1><div class=\"Section\"><div class=\"Header\"><h2>Demographics</h2></div><div class=\"Body\"><div class=\"Section\"><div class=\"SingleLineField\"><span class=\"Prefix\"><strong>Legal name:</strong></span> <span class=\"Value\">Jayden Jackson</span></div><div class=\"SingleLineField\"><span class=\"Prefix\"><strong>Preferred name:</strong></span> <span class=\"Value\">Not on file</span></div><div class=\"SingleLineField\"><span class=\"Prefix\"><strong>Age:</strong></span> <span class=\"Value\">33 y.o.</span></div><div class=\"SingleLineField\"><span class=\"Prefix\"><strong>Legal sex:</strong></span> <span class=\"Value\">Female</span></div><div class=\"SingleLineField\"><span class=\"Prefix\"><strong>Gender identity:</strong></span> <span class=\"Value\">Non-binary</span></div><div class=\"SingleLineField\"><span class=\"Prefix\"><strong>Birth date:</strong></span> <span class=\"Value\">8/23/1991</span></div></div><br /><div class=\"Section\"><div class=\"Header\"><h3>Identifiers</h3></div><div class=\"Body\"><p class=\"NotOnFile\">Not on file</p></div></div><br /><div class=\"Section\"><div class=\"Header\"><h3>Addresses</h3></div><div class=\"Body\"><div class=\"Section\"><div class=\"Header\"><h4>Current Addresses</h4></div><div class=\"Body\"><ul class=\"unlist\"><li><div>1979 Milky Way (Home)</div><div>VERONA WI 53593</div><div>United States of America</div></li></ul></div></div><br /><div class=\"Section\"><div class=\"Header\"><h4>Former Addresses</h4></div><div class=\"Body\"><p class=\"NotOnFile\">Not on file</p></div></div></div></div><br /><div class=\"Section\"><div class=\"Header\"><h3>Communication</h3></div><div class=\"Body\"><ol class=\"unlist\"><li>fhir@email.com (Email)</li><li>+1 608-777-7777 (Work Phone)</li></ol></div></div><br /><div class=\"Section\"><div class=\"Header\"><h3>Languages</h3></div><div class=\"Body\"><div class=\"Section\"><div class=\"Header\"><h4>Spoken Languages</h4></div><div class=\"Body\"><ol class=\"unlist\"><li>English (Preferred)</li></ol></div></div><br /><div class=\"Section\"><div class=\"Header\"><h4>Written Languages</h4></div><div class=\"Body\"><p class=\"NotOnFile\">Not on file</p></div></div></div></div></div></div><br /><br /><div class=\"Section\"><div class=\"Header\"><h2>Contacts</h2></div><div class=\"Body\"><table><thead><tr><th>Contact Name</th><th>Communication</th><th>Relationship to Patient</th></tr></thead><tbody><tr><td class=\"ContactName\">Smith,Sally</td><td class=\"ContactTelecom\"><div>+1 608-222-2392 (Mobile Phone)</div></td><td class=\"ContactRelationship\">Spouse, Emergency Contact</td></tr><tr><td class=\"ContactName\">Brown,Ryan</td><td class=\"ContactTelecom\"><div>+1 608-777-7777 (Mobile Phone)</div></td><td class=\"ContactRelationship\">Care giver, Legal Guardian</td></tr></tbody></table></div></div><br /><br /><div class=\"Section\"><div class=\"Header\"><h2>Primary Care Providers</h2></div><div class=\"Body\"><table><thead><tr><th>Provider Name</th></tr></thead><tbody><tr><td class=\"PCPName\">Emile Underwood, MD</td></tr></tbody></table></div></div></div>"
},
"extension": [
{
"valueCodeableConcept": {
"coding": [
{
"system": "urn:oid:1.2.840.114350.1.13.5325.1.7.10.698084.130.768080.39128",
"code": "female",
"display": "female"
}
],
"text": "Female"
},
"url": "http://open.epic.com/FHIR/StructureDefinition/extension/legal-sex"
},
{
"valueCodeableConcept": {
"coding": [
{
"system": "http://hl7.org/fhir/gender-identity",
"code": "other",
"display": "other"
}
],
"text": "Non-binary"
},
"url": "http://hl7.org/fhir/StructureDefinition/patient-genderIdentity"
},
{
"valueCode": "F",
"url": "http://hl7.org/fhir/us/core/StructureDefinition/us-core-birthsex"
},
{
"extension": [
{
"valueCoding": {
"system": "http://terminology.hl7.org/CodeSystem/v3-NullFlavor",
"code": "UNK",
"display": "Unknown"
},
"url": "ombCategory"
},
{
"valueString": "Unknown",
"url": "text"
}
],
"url": "http://hl7.org/fhir/us/core/StructureDefinition/us-core-race"
},
{
"extension": [
{
"valueCoding": {
"system": "urn:oid:2.16.840.1.113883.6.238",
"code": "2186-5",
"display": "Not Hispanic or Latino"
},
"url": "ombCategory"
},
{
"valueString": "Not Hispanic or Latino",
"url": "text"
}
],
"url": "http://hl7.org/fhir/us/core/StructureDefinition/us-core-ethnicity"
},
{
"valueCode": "184115007",
"url": "http://hl7.org/fhir/us/core/StructureDefinition/us-core-sex"
},
{
"valueCodeableConcept": {
"coding": [
{
"system": "http://loinc.org",
"code": "LA29519-8",
"display": "she/her/her/hers/herself"
}
]
},
"url": "http://open.epic.com/FHIR/StructureDefinition/extension/calculated-pronouns-to-use-for-text"
},
{
"extension": [
{
"valueCodeableConcept": {
"coding": [
{
"system": "http://loinc.org",
"code": "LA29519-8",
"display": "she/her/her/hers/herself"
}
]
},
"url": "value"
},
{
"valuePeriod": {
"start": "2025-01-07T20:28:32Z"
},
"url": "period"
}
],
"url": "http://hl7.org/fhir/StructureDefinition/individual-pronouns"
}
],
"identifier": [
{
"use": "usual",
"type": {
"text": "CEID"
},
"system": "urn:oid:1.2.840.114350.1.13.5325.1.7.3.688884.100",
"value": "YC82BDQ3VDJK6XX"
},
{
"use": "usual",
"type": {
"text": "EDI"
},
"system": "urn:oid:1.2.840.114350.1.13.5325.1.7.5.737384.421",
"value": "33400003"
},
{
"use": "usual",
"type": {
"text": "EPI"
},
"system": "urn:oid:1.2.840.114350.1.1",
"value": "107393"
},
{
"use": "usual",
"type": {
"text": "EXTERNAL"
},
"system": "urn:oid:1.2.840.114350.1.13.5325.1.7.2.698084",
"value": "Z9668"
},
{
"use": "usual",
"type": {
"text": "FHIR"
},
"system": "http://open.epic.com/FHIR/StructureDefinition/patient-dstu2-fhir-id",
"value": "TjK9XmsROjvY5OtpAOfF9aVnhgNSOVh3AzZHjvyQOKPcB"
},
{
"use": "usual",
"type": {
"text": "FHIR STU3"
},
"system": "http://open.epic.com/FHIR/StructureDefinition/patient-fhir-id",
"value": "eNO3wqOfAltfnWMfWBQ1WmQ3"
},
{
"use": "usual",
"type": {
"text": "INTERNAL"
},
"system": "urn:oid:1.2.840.114350.1.13.5325.1.7.2.698084",
"value": " Z9668"
},
{
"use": "usual",
"type": {
"text": "MYCHARTLOGIN"
},
"system": "urn:oid:1.2.840.114350.1.13.5325.1.7.3.878082.110",
"value": "EFWFHIR"
},
{
"use": "usual",
"type": {
"text": "WPRINTERNAL"
},
"system": "urn:oid:1.2.840.114350.1.13.5325.1.7.2.878082",
"value": "12921"
},
{
"use": "usual",
"system": "https://open.epic.com/FHIR/StructureDefinition/PayerMemberId",
"value": "187935"
},
{
"use": "usual",
"system": "urn:oid:2.16.840.1.113883.4.1",
"value": "011-23-5813"
}
],
"active": true,
"name": [
{
"use": "official",
"text": "Jayden Jackson",
"family": "Jackson",
"given": [
"Jayden"
]
},
{
"use": "usual",
"text": "Jayden Jackson",
"family": "Jackson",
"given": [
"Jayden"
]
}
],
"telecom": [
{
"system": "phone",
"value": "+1 608-777-7777",
"use": "work"
},
{
"system": "email",
"value": "fhir@email.com",
"rank": 1
}
],
"gender": "female",
"birthDate": "1991-08-23",
"deceasedBoolean": false,
"address": [
{
"use": "home",
"text": "1979 Milky Way\r\nVERONA WI 53593\r\nUnited States of America",
"line": [
"1979 Milky Way"
],
"city": "VERONA",
"district": "DANE",
"state": "WI",
"postalCode": "53593",
"country": "USA",
"period": {
"start": "2019-08-23"
}
}
],
"maritalStatus": {
"coding": [
{
"system": "http://terminology.hl7.org/CodeSystem/v3-NullFlavor",
"code": "OTH",
"display": "Other"
}
],
"text": "Married"
},
"contact": [
{
"relationship": [
{
"coding": [
{
"system": "http://terminology.hl7.org/CodeSystem/v3-RoleCode",
"code": "SPS",
"display": "spouse"
},
{
"system": "urn:oid:1.2.840.114350.1.13.5325.1.7.4.827665.1000",
"code": "17",
"display": "Spouse"
}
],
"text": "Spouse"
},
{
"coding": [
{
"system": "http://terminology.hl7.org/CodeSystem/v2-0131",
"code": "C",
"display": "Emergency Contact"
}
],
"text": "Emergency Contact"
}
],
"name": {
"use": "usual",
"text": "Smith,Sally"
},
"telecom": [
{
"system": "phone",
"value": "+1 608-222-2392",
"use": "mobile",
"rank": 1
}
]
},
{
"relationship": [
{
"coding": [
{
"system": "http://terminology.hl7.org/CodeSystem/v2-0131",
"code": "O",
"display": "Other"
},
{
"system": "urn:oid:1.2.840.114350.1.13.5325.1.7.4.827665.1000",
"code": "22",
"display": "Care giver"
}
],
"text": "Care giver"
},
{
"coding": [
{
"system": "http://terminology.hl7.org/CodeSystem/v3-RoleClass",
"code": "GUARD",
"display": "guardian"
}
],
"text": "Legal Guardian"
}
],
"name": {
"use": "usual",
"text": "Brown,Ryan"
},
"telecom": [
{
"system": "phone",
"value": "+1 608-777-7777",
"use": "mobile",
"rank": 1
}
],
"period": {
"end": "2025-02-11"
}
},
{
"relationship": [
{
"coding": [
{
"system": "http://terminology.hl7.org/CodeSystem/v2-0131",
"code": "E",
"display": "Employer"
}
]
}
],
"telecom": [
{
"system": "phone",
"value": "608-271-9000",
"use": "work"
}
],
"address": {
"use": "work",
"text": "TOKAY BLVD\r\nMADISON WI 53719\r\nUnited States of America",
"line": [
"TOKAY BLVD"
],
"city": "MADISON",
"district": "DANE",
"state": "WI",
"postalCode": "53719",
"country": "USA"
},
"organization": {
"display": "Epic Systems Corp"
},
"period": {
"start": "2014-07-07"
}
}
],
"communication": [
{
"extension": [
{
"extension": [
{
"valueCoding": {
"system": "http://terminology.hl7.org/CodeSystem/v3-LanguageAbilityMode",
"code": "ESP",
"display": "Expressed spoken"
},
"url": "type"
}
],
"url": "http://hl7.org/fhir/StructureDefinition/patient-proficiency"
}
],
"language": {
"coding": [
{
"system": "urn:ietf:bcp:47",
"code": "en",
"display": "English"
}
],
"text": "English"
},
"preferred": true,
"_preferred": {
"extension": [
{
"valueCoding": {
"system": "http://hl7.org/fhir/language-preference-type",
"code": "verbal",
"display": "verbal"
},
"url": "http://hl7.org/fhir/StructureDefinition/patient-preferenceType"
}
]
}
}
],
"generalPractitioner": [
{
"reference": "Practitioner/eb3d.4apzwRM33Q91Nm7wJA3",
"type": "Practitioner",
"display": "Emile Underwood, MD"
}
],
"managingOrganization": {
"reference": "Organization/ePioZEeqCYv.F5W96swOaXA3",
"display": "EDI Healthcare Management #%~&"
},
"_birthDate": {
"extension": [
{
"valueDateTime": "1991-08-23T23:23:00Z",
"url": "http://hl7.org/fhir/StructureDefinition/patient-birthTime"
}
]
}
}
}
]
}
Wound Care Apps
Connecting wound care apps typically involve the following steps:
- Search for or create a wound in Epic.
- File a wound image in Epic.
- File wound data in Epic flowsheet rows.
Search for or create a wound in Epic
An app can file data for an existing wound or a new wound. Either way, the app should search the patient’s existing wounds to ensure it is not duplicating an existing wound. You can use the following web service to complete this search.
Observation.Search (LDA-W)
To search for a patient’s existing wounds, you need their Patient FHIR ID. You can get this ID either through a launch token during a SMART on FHIR launch (if your app is launched from Epic with patient context) or a search for the Patient FHIR ID using patient demographics.
When you have the Patient FHIR ID, you can call Observation.Search (LDA-W) to retrieve the patient’s wounds. Each wound has an Observation FHIR ID, which can be used to file data to that wound.
Observation.Create (LDA-W)
If the patient chart does not yet include the wound for which the app is storing data, you need to create it. To do this, you need to understand the difference between wound properties and wound assessments.
Properties vs. Assessments
In Epic, wounds are documented in property flowsheet rows and assessment flowsheet rows. Properties are static data points, such as the wound type and location. These are used to identify the wound and are documented once per wound. Assessments are the data points that change over time and are documented many times while the patient has the wound, such as wound images and wound length, width, and depth.
You need to call Observation.Create (LDA-W) once to create the wound and document the wound properties before you can file the assessments to Epic. When you make an Observation.Create (LDA-W) request to create a new wound, the wound’s Observation FHIR ID is returned. The Observation FHIR ID can then be used to file assessment data to that wound.
Flowsheet Row IDs
All flowsheet rows, whether they are properties or assessments, have a flowsheet row ID. This ID is what you use in your Observation.Create (LDA-W) request to indicate which flowsheet row you are filing data to. When working in a customer environment, you should work with the customer to get the necessary flowsheet row names and IDs. If a flowsheet row doesn’t already exist for the data point you need, a custom row can be created.
Below you can find the wound care flowsheet rows currently available in the sandbox. Note that these will likely not be the flowsheet rows or IDs used by your customers. If you need to test writing to a Category Type or Custom List flowsheet row, open a Sherlock ticket to request the flowsheet response options.
Property Flowsheet Rows
| Flowsheet Row | Flowsheet ID | Value Type |
|---|---|---|
| PLACEMENT DATE | 700 | Date |
| PLACEMENT TIME | 701 | Time |
| R WOUND PRESENT ON ORIGINAL ADMISSION | 1570010003 | Category Type |
| R WOUND APPROX AGE AT FIRST ASSESSMENT (WEEKS) | 1570010004 | Numeric Type |
| R HAND HYGIENE COMPLETED | 3040109763 | Custom List |
| WOUND PRIMARY WOUND TYPE | 1570010000 | Category Type |
| R WOUND LOCATION | 396060 | Custom List |
| R WOUND LOCATION ORIENTATION | 303740 | Custom List |
| R WOUND DESCRIPTION | 400633 | String Type |
| R NUMBER OF SUTURES PLACED | 3040109153 | Numeric Type |
| R NUMBER OF STAPLES PLACED | 3040109154 | Numeric Type |
| REMOVAL DATE | 702 | Date |
| REMOVAL TIME | 703 | Time |
| R WOUND OUTCOME | 1570010001 | Category Type |
Assessment Flowsheet Rows
| Flowsheet Row | Flowsheet ID | Value Type |
|---|---|---|
| WOUND IMAGE | 705 | Image |
| R WOUND SITE ASSESSMENT | 303750 | Custom List |
| R PERI-WOUND ASSESSMENT | 7061190 | Custom List |
| R WOUND SHAPE | 7061200 | String Type |
| R WOUND LENGTH (CM) | 1570010005 | Numeric Type |
| R WOUND WIDTH (CM) | 1570010006 | Numeric Type |
| R WOUND DEPTH (CM) | 1570010007 | Numeric Type |
| R WOUND VOLUME | 1570010009 | Numeric Type |
| R WOUND HEALING AS % | 3040105062 | Numeric Type |
| R WOUND SITE CLOSURE | 303760 | Custom List |
| R WOUND DRAINAGE AMOUNT | 303770 | Custom List |
| R WOUND DRAINAGE COLOR | 303780 | Custom List |
| R NON-STAGED WOUND DESCRIPTION | 7061220 | Custom List |
| R WOUND TREATMENTS | 3040102846 | Custom List |
| R WOUND DRESSING | 303800 | Custom List |
| R WOUND DRESSING CHANGED | 303820 | Custom List |
| R DRESSING STATUS | 304850 | Custom List |
| R ADHESIVE CLOSURE STRIPS | 3040109151 | Custom List |
| R NUMBER OF ADHESIVE CLOSURE STRIPS | 3040109152 | Numeric Type |
| R SUTURES REMOVED INTACT | 3040109148 | Custom List |
| R NUMBER OF SUTURES REMOVED | 3040109149 | Numeric Type |
| R STAPLES REMOVED INTACT | 3040109178 | Custom List |
| R NUMBER OF STAPLES REMOVED | 3040109150 | Numeric Type |
| R WOUND TUNNELING | 7061250 | Numeric Type |
| R WOUND UNDERMINING | 7061260 | Numeric Type |
| R WOUND MARGINS | 7061270 | Custom List |
| R $ WOUND CARE CHARGES | 3040105063 | Custom List |
File a wound image in Epic
If your app takes photos of wounds, users likely want those photos available within their normal workflow in Epic. To send a wound image to Epic, you need to use the Incoming Scanned Document Link HL7v2 interface. This interface files the image to a patient encounter so that it appears in the patient chart but does not file the image to the wound image flowsheet row. The image can be linked to the flowsheet row using Observation.Create (LDA-W). This step is described in the next section.
File wound data in Epic flowsheet rows
Wound images and other wound assessment data can be filed to the Flowsheet activity using Observation.Create (LDA-W). In order to file assessment data, you need:
- The Observation FHIR ID of the wound being documented on, which is obtained either through a search or as a result of creating a new wound.
- The flowsheet row ID of the flowsheet row that you are writing data to. You’ll get this ID from the customer during the app install.
- The value type (string type, numeric type, custom list, etc.) of the flowsheet rows to which you are writing data. If you are writing to a custom list flowsheet row, you also need to know the custom list values. You can get these from the customer during the app install.
One Observation.Create request can file one assessment to Epic. For example, if your app is documenting the wound image, wound width, and wound length, you need to make three separate API calls.
Get Started
These connection practices have enabled many successful connections across our community. As every product has unique goals, we encourage you to review this approach with your customers to confirm the best fit.
If you're just getting started, check out our step-by-step Developer Guide.
Want a little extra help? Vendor Services offers an optional suite of benefits including the ability to request individualized assistance with your app's data exchange.
In addition, some product categories qualify for Toolbox support and designation on Showroom, which can accelerate implementation and enable you to highlight your product’s strengths. Explore the list of eligible categories and share your interest with us through the Technology Guidance form.
JWT Authentication Troubleshooting
When developing Backend OAuth 2.0 applications, the issue developers most often run into is a HTTP 400 status code with an invalid_client error, which looks like this:
{
    "error": "invalid_client",
    "error_description": null
}
This error can be caused by a few different underlying issues. A few of the most common causes are listed below.
Issues with the App Listing
- Ensure the backend systems consumer type and OAuth 2.0 boxes are checked on the app listing.
- In Epic on FHIR, the OAuth 2.0 box is always checked.
- Ensure you have uploaded a public key to your environment.
- If creating a user/patient facing app that uses JWTs, make sure that “Require Refresh Tokens” is checked, so that you can then upload your public key.
Issues with the Request Body
- Ensure in the body of the POST, “client_assertion” is used and NOT “client-assertion”.
- Ensure you aren’t double-encoding the “client_assertion_type” parameter’s value of “urn:ietf:params:oauth:client-assertion-type:jwt-bearer”.
Issues with the Token Request Formatting
- Ensure the request URL ends in /token and NOT /authorize.
- Ensure HTTP POST verb is used, NOT GET.
- Ensure the Content-Type of “application/x-www-form-urlencoded” is used.
- Ensure the content is in the body of the request, NOT the URL.
Issues with the JWT
- Ensure the iat and nbf claims are NOT in the future.
- Ensure the exp claim is in the future.
- Ensure the exp is no more than 5 minutes in the future.
- Ensure the exp is not more than 5 minutes after the iat and nbf claims.
- Ensure the app's client ID is in both the iss and sub claims.
- Ensure the correct client ID is used. For the Sandbox, non-prod client ID should be used.
- Ensure the jti is no longer than 151 characters and contains a unique ID.
- Ensure the JWT was not expired at the time of use.
Issues with the Signature
- Ensure the private key used to sign the JWT corresponds to the public key registered with the sandbox or Epic
customer.
- If you re-upload your public key, you need to wait for the changes to sync. This might take up to 60 minutes to sync with the Sandbox, and 12 hours to sync at an Epic organization's Epic instance.
- Note the “Sandbox Public Key” on your app is for use against the Epic sandbox. When you are ready to integrate with an Epic customer, you will be asked to upload non-PRD and PRD public keys for each customer.
- If your app is cloud-hosted, it is OK to re-use public keys across customers. This assumes you can protect a single copy of the key and are using a different key for non-PRD and PRD.
- Ensure the signature algorithm indicated is the algorithm your code cryptographically signs the JWT with.
- Ensure the signature algorithm used is supported. RS256 and RS384 are RS384 is preferred.
If you are unable to identify the issue with your request and would like additional assistance, you can request optional technical support from Epic through Vendor Services at an hourly billable rate.
Payer Connections to Epic Provider Systems
Payers may want to connect to Epic provider systems to gain insights about their patients. A variety of use cases are supported and detailed below as well as general guidelines on how to limit the information received to just your patient population.
Roster Management
Providers can import identifiers from your systems to patients in their Epic instance which can subsequently be used to accurately filter your data requests to just patients in your population. Flat files of patient demographics with one line per patient is the expected format.
Format
ID|Last|First|Middle|Suffix|Sex|Gender Identity|Sexual Orientation|Sex Assigned at Birth|DOB|SSN|Address1|Address2|City|State|Zip|County|Country Phone1|Phone2|Phone3|Last Update Date|Status|Date of Death|Aliases|Email|Maiden|Marital Status|Race|Religion|Language
Example
80347521|Roberts|Allison|Marie|Jr.|F|F|Straight|F|06/11/1956|111-11-1111|113 Park St.|#102|Madison|WI|53709|Dane|United States of America|608-271-9000|608-472-1900|608-888-9090|10/24/2011|Deceased|10/24/2011|Smith,Allison M^Jones,Allison M|example@epic.com|Stevens|Married|Unknown|Lutheran|English|
The demographics and identifier can be used in subsequent FHIR queries like Patient.$match to discover the FHIR Patient Resource ID and use that for additional FHIR API calls to gather data. Refer to our recommendations for strong patient matching when using FHIR APIs for additional details.
The identifier can also be used to filter information received over HL7v2 Interfaces such as the ones used to support Encounter Notification so that you only receive information for your patients.
Clinical Data Exchange (CDE)
CDE is possible using FHIR. Payers can use the DocumentReference (Generated CCDA) FHIR Resource to obtain a CCDA of a patient or an encounter. Additionally Epic supports a broad library of FHIR APIs including and beyond USCDI v3 which can be used to gain more specific information you may need outside of the CCDA. Information for these can be found at fhir.epic.com.
Combined with Encounter Notification you can use this to get near real time clinical information about your patients.
Encounter Notification
Epic supports the HL7v2 Outgoing ADT Interface and the 278N X12 Notice of Admission Interface which can be implemented by provider organizations to send you messages when patients have a visit.
For upcoming scheduled encounters Epic also supports the HL7v2 Outgoing Appointment Scheduling Interface which will send real time updates when appointments are scheduled or updated.
You can work with Epic provider customers to configure these interfaces to send you real time notifications for your patient roster.
Member Insights and Care Gaps
Care Gaps can be ingested by Epic provider systems in bulk using the Care Gaps Exchange flat file interface. Patient, Event, and Medication Adherence Care Gaps are supported through this method.
The Community Specification for Care Gaps data is available here. Forming your data to this specification will allow provider customers to load this to their system and track care gaps for your patient population.
The CDS Hooks framework can call into your system at pre-defined triggers so that you can surface Care Gaps, Member Insights or other information to the provider while the patient is being seen.
You can work with Epic provider organizations to filter these CDS Hooks interactions to just your patient roster using the identifiers you would import when working through Roster Management.
Epic’s support for CDS Hooks is built on a workflow engine and CDS rule engine. Organizations using Epic can configure native CDS alerts by defining the workflow point at which they are triggered, known as the hook, and the criteria to evaluate when they are triggered. These criteria determine whether a CDS alert appears to the clinician and, if it does, what information it contains. Epic’s implementation of CDS Hooks enables native criteria to call a remote CDS Hooks API when evaluating whether to show a CDS alert.
CDS Hooks also supports feedback on the actions taken by the provider so that you can gain additional insights and refine the information presented at point of care.
We have an extensive CDS Hooks Tutorial that walks through the Epic implementation of CDS Hooks.
Prior Authorization
Epic now supports the prior authorization FHIR APIs required by the CMS 0057 Final Rule, released in the February 2026 version of Epic. The Da Vinci 2.1 implementation guide provides general guidance, with API-specific details available on the API specifications pages at Vendor Services or Epic on FHIR. For guidance on connecting with other systems for CRD, DTR, or PAS, please refer to the CMS Prior Authorization Playbook. Groups can also join Vendor Services for general technical support and basic connectivity testing tools.
Get Started
These connection practices have enabled many successful connections across our community. As every product has unique goals, we encourage you to review this approach with your customers to confirm the best fit.
If you're just getting started, check out our step-by-step Developer Guide.
Want a little extra help? Vendor Services offers an optional suite of benefits including the ability to request individualized assistance with your app's data exchange.
In addition, some product categories qualify for Toolbox support and designation on Showroom, which can accelerate implementation and enable you to highlight your product’s strengths. Explore the list of eligible categories and share your interest with us through the Technology Guidance form.
Implantable Cardiac Devices Playbook
Implantable Cardiac Devices
Overview
Implantable cardiac device monitoring systems are used to streamline cardiac device data workflows, support informed clinical decisions, and deliver efficient, comprehensive care. The IHE Implantable Device – Cardiac Observations (IDCO) profile is used to communicate data from an implantable cardiac device (such as a pacemaker or ICD) with Epic and allows that data to be incorporated into the patient chart, helping ensure the legal medical record contains complete, accurate data. Device interrogations can happen in-clinic during a scheduled appointment or remotely where the patient initiates a device check from home and sends them in through the device vendor’s system. From here, the general pieces to the device check workflow include the following:
- Ordering and scheduling
- Device interrogation and data uploads to the vendor-specific programmer
- Data analysis and any needed clinical action
- Study signed
- Data filed to Epic
- Billing
Workflow Diagrams
These diagrams illustrate two possible workflows. In both examples below, the order originates from your cardiac system and is sent to Epic with an Incoming ORM message. However, these orders could also be placed within Epic directly, removing the need for the Incoming ORM message. Your exact workflow may be a mixture of elements from both of these diagrams.
This workflow is designed to work well both for customers licensed for Cupid (Epic's cardiology application), and those not licensed for Cupid.
Device check study is finalized in Epic
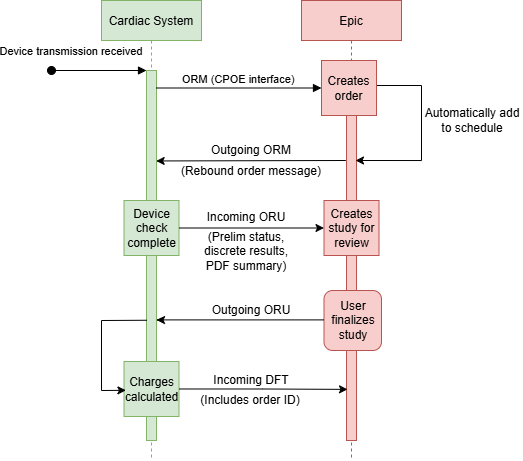
Device check study is finalized in your cardiac system
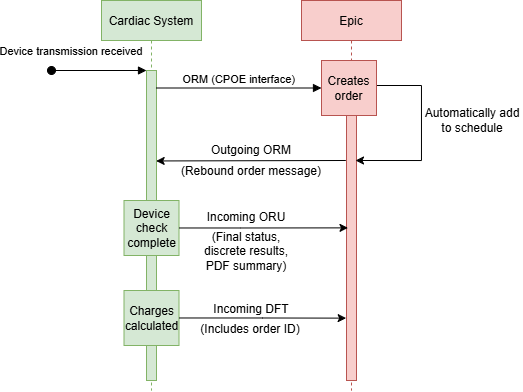
Initial Order
An imaging order must be placed in Epic for the device check. The order holds the entire workflow together, ensuring all the device data makes it to the right place and enabling other functionality such as automated scheduling of device checks. Orders can be placed via two equally valid methods.
- Your app can send an Incoming Orders from CPOE Systems message to create the order. This is typically done for remote device checks.
- Or Epic users can place the order in Epic. This is typically done for in-clinic device checks.
Your system can be notified of the successful device check order via an Outgoing Imaging Results and Orders message. This is either a rebound of the Incoming CPOE message you sent, or your notification of the order placed natively in Epic. You'll use the retrieved Epic order ID and patient identifiers when resulting and charging for the device check.
Filing Device Data
File discrete results for the device interrogation with Incoming Ancillary Results - Imaging interface. In addition to any fields required by the interface specification, this message should include the following:- The Epic Order ID in the OBR-2 segment
- A PDF summary of the data
- This can be either an embedded Base-64-encoded PDF filed to Epic's Web BLOB, or a pointer to a document on a Document Management System (DMS).
- The Narrative & Impression (even if preliminary).
- As much discrete data from the IHE IDCO profile as is relevant for your app.
- The appropriate status of the result in OBR-25.
- If the result was finalized in your system, specify “F” for Final.
- If the result needs to be finalized in Epic, or your system will send final results later, send “P” for Preliminary.
Finalizing Results
If the results are finalized in Epic, your app will be notified of the result with an Outgoing Imaging Results and Orders message.
Alternatively, if results are finalized in your system instead of in Epic, we recommend supporting SMART on FHIR to allow users to securely SSO into your system while also potentially giving you access to call additional APIs for necessary clinical data. Refer to the OAuth 2.0 tutorial. for more information.
Once the results are finalized, send charges for the device check with the Incoming Financial Transactions interface. Include the original order identifier in FT1-23.
Get Started
These connection practices have enabled many successful connections across our community. As every product has unique goals, we encourage you to review this approach with your customers to confirm the best fit.
If you're just getting started, check out our step-by-step Developer Guide.
Want a little extra help? Vendor Services offers an optional suite of benefits including the ability to request individualized assistance with your app's data exchange.
In addition, some product categories qualify for Toolbox support and designation on Showroom, which can accelerate implementation and enable you to highlight your product’s strengths. Explore the list of eligible categories and share your interest with us through the Technology Guidance form.
Computer Telephony Integrations (CTI)
Computer Telephony Integration (CTI) apps allow Epic users to make and receive telephone calls in Hyperspace. Incoming calls from a phone system bring the user to the activity in Epic that matches the purpose of the call and with the caller identified. Outgoing calls allow the user to initiate a call in the phone system to a selected phone number with a single click.
Incoming Calls to Epic
Phone systems use the Incoming Computer Telephony Integration web service to route a call to a user working in Epic and automatically open the correct patient record and activity for the context of the call.Outgoing Calls from Epic
Contact center agents and other Epic users can make telephone calls directly from Hyperspace with computer telephony integration (CTI), cutting down on misdials and spending less time dialing. When a user clicks a button or link in Hyperspace to call a patient, provider, or other phone number, Epic uses the Outgoing Computer Telephony Integration web service to pass the dialed number and information about the agent to the phone system and log a record of the call.
Pause/Resume Call Recording
When a payment collection screen appears to a user in Epic for collecting credit card information, Epic uses the PhoneSystem web service to send a request to the phone system to pause a call recording. When the payment collection is complete, the same web service sends a request to resume the recording.Embeded Call Controls
Contact center agents interact with a phone system's controls for accepting, placing, and transferring calls directly in Hyperspace using the Active Guidelines (AGL) framework. Phone systems use the AGL Telephone Alert API to notify the agent of an incoming call and open embedded call controls.
Call Analytics and Transcripts
Contact center agents and managers providing quality assurance can view analytics such as average call time and number of transfers, along with call transcripts in Hyperspace. Phone systems use the DocumentCallAnalytics and TranscriptIngestion APIs to file these items to Epic.
Get Started
These connection practices have enabled many successful connections across our community. As every product has unique goals, we encourage you to review this approach with your customers to confirm the best fit.
If you're just getting started, check out our step-by-step Developer Guide.
Want a little extra help? Vendor Services offers an optional suite of benefits including the ability to request individualized assistance with your app's data exchange.
In addition, some product categories qualify for Toolbox support and designation on Showroom, which can accelerate implementation and enable you to highlight your product’s strengths. Explore the list of eligible categories and share your interest with us through the Technology Guidance form.
Payment Device Integrations Playbook
The Payment Device Integration allows payments to be collected in real time. This is handled by outgoing requests sent to your endpoint during a payment workflow. The first request checks whether the device is initialized while the second request is needed for a payment transaction response. The payment is processed outside of Epic and through the payment processor.
Payment Device Technology
The Credit Card and Check Device Interface resource contains specification details for both the InitializeDevice and ProcessTransaction calls. Additionally, the Generic Payment Gateway Interface is used for transactions such as voiding a payment or removing a stored token.
Custom Transaction Fields
Epic supports sending custom key/value pairs in requests in addition to credit card transaction key/value pairs. Key/value pairs can either be static or dynamic. An example of a static value is the inclusion of a serial number for a device. Dynamic values can be used to send the logged in user (%USERID%), workstation id (%WORKSTATIONID%), or the logged in department id (%DEPTID%). Additional mnemonics for dynamic fields can be found in Appendix A of the Generic Payment Gateway Interface resource.
Get Started
These connection practices have enabled many successful connections across our community. As every product has unique goals, we encourage you to review this approach with your customers to confirm the best fit.
If you're just getting started, check out our step-by-step Developer Guide.
Want a little extra help? Vendor Services offers an optional suite of benefits including the ability to request individualized assistance with your app's data exchange.
In addition, some product categories qualify for Toolbox support and designation on Showroom, which can accelerate implementation and enable you to highlight your product’s strengths. Explore the list of eligible categories and share your interest with us through the Technology Guidance form.
Bayesian Medication Dosing Decision Support Playbook
A third-party decision support system used to provide personalized medication dosing recommendations. These products launch from Hyperspace using SMART on FHIR, pull patient and medication information, and provide the end user with optimized medication dosing recommendations. Bayesian analysis is commonly used for medications with narrow therapeutic windows or medications requiring precise dosing based on patient factors.
Technology Overview
A SMART on FHIR launch uses OAuth 2.0 to embed an iframe within Hyperspace for provider access. To support Bayesian analysis, begin by reviewing available public APIs instead of relying on manual provider entry. If using the MedicationRequest.Search API, apply data or status filters to retrieve only the relevant medication orders. The Launching Your App resource walks through details for SMART on FHIR launches, embedding an app in Hyperspace, and more.
Get Started
These connection practices have enabled many successful connections across our community. As every product has unique goals, we encourage you to review this approach with your customers to confirm the best fit.
If you're just getting started, check out our step-by-step Developer Guide.
Want a little extra help? Vendor Services offers an optional suite of benefits including the ability to request individualized assistance with your app's data exchange.
In addition, some product categories qualify for Toolbox support and designation on Showroom, which can accelerate implementation and enable you to highlight your product’s strengths. Explore the list of eligible categories and share your interest with us through the Technology Guidance form.
Medication Ordering Decision Support Playbook
A third-party decision support system used to suggest medication changes. These products launch from Hyperspace using CDS Hooks to pull medication order information and provide the end user with medication ordering recommendations.
Technology Overview
CDS Hooks can be used at the point of provider ordering to provide medication recommendations. When a medication change may be needed, a suggested action can be used in the CDS Hooks response to show the recommendation. If additional data needs to be pulled, start by reviewing available public APIs rather than relying on manual provider entry. We have an extensive CDS Hooks Tutorial that walks through the Epic implementation of CDS Hooks.
Get Started
These connection practices have enabled many successful connections across our community. As every product has unique goals, we encourage you to review this approach with your customers to confirm the best fit.
If you're just getting started, check out our step-by-step Developer Guide.
Want a little extra help? Vendor Services offers an optional suite of benefits including the ability to request individualized assistance with your app's data exchange.
In addition, some product categories qualify for Toolbox support and designation on Showroom, which can accelerate implementation and enable you to highlight your product’s strengths. Explore the list of eligible categories and share your interest with us through the Technology Guidance form.
Fully Autonomous Coding Playbook
Fully Autonomous Coding applications utilize AI and machine learning to assign billing codes to patient charges or accounts. Applications receive patient information, clinical documentation, result and charge details from various outgoing interfaces and APIs. The autonomous coding app processes this information, sends updated charges back to the EHR, and they are filed to Professional Billing or Hospital Billing.
Financial Transactions Interfaces
The autonomous coding flow uses the Outgoing Financial Transactions and Incoming Financial Transactions interfaces. The outgoing interface can be used in charge review mode to receive charges or placeholder charges present for an encounter. The incoming interface can be used in charge update mode in order to send automated coded charges back to Professional Billing and/or Hospital Billing. The incoming interface can be used to send the following:
- Update charge messages are used for charges needing updates to modifiers, procedure code, service date, billing provider, and service provider. Placeholder charges typically fall into this bucket if there is billable activity on that clinical document. Update charge messages can also be used with no updated data to acknowledge that a charge is good as is and should be billed without changes.
- New charge messages are used when adding net new charges that don't have an original Epic charge to match with. If a procedure note should generate two charges but only one placeholder charge exists, the first charge should be an update charge message to the placeholder charge and the second should be a new charge.
- Delete charge messages are used for charges that should not be billed.
Additional Technology
The Outgoing Patient Administration interface is used to receive encounters for autonomous coding. Additional interfaces and APIs can be used to pull the data necessary for your product to complete autonomous coding. Examples of interfaces include, but are not limited to:
- Outgoing Documentation Interface
- Outgoing Results and Orders - LRI/ORM Interface
- Outgoing Imaging Results and Orders Interface
- (Hospital Coding) - Coding (Bidirectional) Interface
- DocumentReference.Search (Clinical Notes)
- Condition.Search (Encounter Diagnosis)
- Observation.Search (Labs)
Get Started
These connection practices have enabled many successful connections across our community. As every product has unique goals, we encourage you to review this approach with your customers to confirm the best fit.
If you're just getting started, check out our step-by-step Developer Guide.
Want a little extra help? Vendor Services offers an optional suite of benefits including the ability to request individualized assistance with your app's data exchange.
In addition, some product categories qualify for Toolbox support and designation on Showroom, which can accelerate implementation and enable you to highlight your product’s strengths. Explore the list of eligible categories and share your interest with us through the Technology Guidance form.
Automated Dispensing System Playbook
Automated Dispensing Systems (ADS) manage and include computerized devices that store, dispense, and track medications at the place of service. ADS commonly receive patient and order information to determine what medications are available for dispensing and send dispense information back to Epic when medications are removed from the ADS.
Hardware
Vendors that support Automated Dispensing System functionality typically provide hardware to control and manage dispensing of medications.
Patient Tracking
Epic supports the HL7v2 Outgoing Patient Administration (ADT) Interface. This interface enables ADS to track patient demographics and location. This information is used to create a patient profile in the ADS system such that providers are able to find the right patient when dispensing medications.
Medication Tracking
Epic supports the HL7v2 Outgoing Verified Medication Orders Interface. This interface enables ADS to track the list of verified medication orders for a patient. Integration with this interface enables providers to select the right medication when dispensing medications.
Dispensing Integration
Epic supports the HL7v2 Incoming Medication Dispenses and Load/Unload from ADS Interface. This interface enables ADS to communicate dispenses and waste to Epic. Additionally, the "load/unload" functionality of this interface is used to keep Epic in sync with what medication packages are currently stocked to the ADS hardware.
Get Started
These connection practices have enabled many successful connections across our community. As every product has unique goals, we encourage you to review this approach with your customers to confirm the best fit.
If you're just getting started, check out our step-by-step Developer Guide.
Want a little extra help? Vendor Services offers an optional suite of benefits including the ability to request individualized assistance with your app's data exchange.
In addition, some product categories qualify for Toolbox support and designation on Showroom, which can accelerate implementation and enable you to highlight your product’s strengths. Explore the list of eligible categories and share your interest with us through the Technology Guidance form.
Hemodynamics System Playbook
Hemodynamic Monitoring Systems are used in Cardiac Cath Labs, Cardiac EP Labs, and some Interventional Radiology Labs to monitor patients during invasive procedures. These systems monitor the patient’s vitals and pressures associated with specific cardiac structures. Epic’s procedure log is used in conjunction with the existing hemodynamic monitoring system, and the hemodynamic system writes relevant data into Epic’s procedure log to keep all the data integrated with the patient’s chart in Epic.
Recommended Workflow
- Support the Outgoing Imaging Results and Orders Interface to receive the order from Epic.
- This will include the procedure log ID in ZPF-9 that you’ll use in later messages.
- Support the Outgoing Patient Administration – Registration and ADT Interface to receive the CSN (encounter identifier for the surgery).
- Support the Incoming Procedure Log Interface to file the hemodynamic data such as discrete vitals into flowsheet rows. You should file this data at regular intervals during the case (Example: every 5 minutes).
- Send the log ID to Epic in PID-18 or PV1-19.
- Include a timestamp in OBX-14. This is required for the flowsheet data to function in Epic.
- When the patient's condition changes, support filing that condition to a flowsheet row using the Incoming Procedure Log Interface.
- This can be filed in the same periodic batches as your other hemodynamic data, or it can be ad-hoc as the condition changes.
- Include the Log ID and Timestamp like you would with your other hemodynamic data.
- Support generating a waveform PDF summary. Send it either to Epic’s Web BLOB via the Incoming Scanned Document Link interface, or to a document management system (DMS).
- Include the CSN received from the Outgoing ADT interface.
Get Started
These connection practices have enabled many successful connections across our community. As every product has unique goals, we encourage you to review this approach with your customers to confirm the best fit.
If you're just getting started, check out our step-by-step Developer Guide.
Want a little extra help? Vendor Services offers an optional suite of benefits including the ability to request individualized assistance with your app's data exchange.
In addition, some product categories qualify for Toolbox support and designation on Showroom, which can accelerate implementation and enable you to highlight your product’s strengths. Explore the list of eligible categories and share your interest with us through the Technology Guidance form.
ECG Management System Playbook
Electrocardiogram (ECG) management systems store and interpret waveforms produced from an ECG machine, associate the waveform with an order for a patient, and file the data back to Epic. ECG management systems differ from point-of-care (PC-based) ECG and waveform visualization solutions in their ability to store data to a server and provide comprehensive workflow and interpretation support.
Receiving Orders
ECG management systems use the Outgoing Ancillary Orders HL7v2 interface to receive ECG orders from Epic. Orders may be solicited (application receives an order from Epic and files a result to Epic) or unsolicited (application files an ECG result to Epic without receiving an order from Epic).
Filing Results
To send ECG results to Epic, ECG management systems use the Incoming Ancillary Results HL7v2 interface. When filing results for unsolicited ECG orders, Epic rebounds an Outgoing Ancillary Orders HL7v2 message for this new order which is accepted by the ECG management system and may be automatically associated with the corresponding study. If the ECG management system cannot automatically associate the order with the result, a user will need to manually associate the result in Epic.
The ECG management system will send two result HL7v2 messages to Epic: the preliminary result message (sent after acquiring the ECG) and the final result message.
Each result message includes the following:
- Patient demographics in PID segment
- Assigned Patient Location in PV1-3
- Visit Number in PV1-19
- Image availability in OBR-21 or OBX-5
- Time ECG was performed in OBR-7
- Accession number OBR-3
- Procedure code in OBR-4
The preliminary result message includes a preliminary result Status in OBR-25.
The final result message includes the following:
- Result text and discrete measurements in OBX segments:
- Impression
- Narrative
- Ventricular Rate
- Atrial Rate
- PR Interval
- QT Interval
- QRS Duration
- QTC Calc
- ST Interval
- TP Interval
- Cardiac axes (e.g. P-axis, R-axis, etc.)
- Actionable Findings, sent discretely in the result message as mapped OBX values
- Ex. Atrial fibrillation
- A discrete diagnosis in DG1
- Used for medical billing and coding
SMART on FHIR App Launch
Allow users to access a view of the ECG by launching a web viewer from Epic using SMART on FHIR. You may choose to support study-level, patient-level, and/or work list mode integration.
Responding to Release of Information Request
To support integration with Epic’s Release of Information module, send the PDF of the ECG result in the ORU^R01 message as a reference pointer. You can then use the EPS Document Retrieval web service to deliver the PDF on demand.
Get Started
These connection practices have enabled many successful connections across our community. As every product has unique goals, we encourage you to review this approach with your customers to confirm the best fit.
If you're just getting started, check out our step-by-step Developer Guide.
Want a little extra help? Vendor Services offers an optional suite of benefits including the ability to request individualized assistance with your app's data exchange.
In addition, some product categories qualify for Toolbox support and designation on Showroom, which can accelerate implementation and enable you to highlight your product’s strengths. Explore the list of eligible categories and share your interest with us through the Technology Guidance form.
Point-of-care Lab Middleware Integrations Playbook
Point-of-care lab middleware integrations connect lab hardware to Epic to facilitate receiving results from point-of-care devices into Epic. These integrations are necessary to translate data received by many different types of lab devices into a standard format to be consumed by Epic.
Receiving Orders
Point-of-care tests (POCT) may be solicited (lab middleware receives an order from Epic and files a result to Epic) or unsolicited (lab middleware files a result to Epic without receiving an order from Epic). Most commonly, these tests will be unsolicited. In this scenario, the lab middleware will use the Outgoing Patient Administration HL7v2 interface to receive patient and encounter information related to a given test.
If a point-of-care test is solicited, the lab middleware will receive the order via the Outgoing Orders to Lab Instruments HL7v2 interface.
Filing Results
Customers may choose to file POCT results to either EpicCare or Beaker. To file POCT results to EpicCare, use the Incoming Ancillary Results HL7v2 interface. To file POCT results to Beaker, use the Incoming Results from Lab Instruments HL7v2 interface.
In order to offer flexible translation capabilities across multiple instrument types, be sure your product is able to pass instrument error codes to Epic in the OBX-8 segment of the ORU result message.
Get Started
These connection practices have enabled many successful connections across our community. As every product has unique goals, we encourage you to review this approach with your customers to confirm the best fit.
If you're just getting started, check out our step-by-step Developer Guide.
Want a little extra help? Vendor Services offers an optional suite of benefits including the ability to request individualized assistance with your app's data exchange.
In addition, some product categories qualify for Toolbox support and designation on Showroom, which can accelerate implementation and enable you to highlight your product’s strengths. Explore the list of eligible categories and share your interest with us through the Technology Guidance form.
Standard Lab Middleware Integrations Playbook
Standard lab middleware integrations connect lab hardware to Epic to facilitate receiving results from lab instruments into Beaker. These integrations are necessary to translate data received by many different types of lab instruments into a standard format to be consumed by Epic.
Receiving Orders
Use the Outgoing Orders to Lab Instruments HL7v2 interface to receive standard instrumentation lab orders from Epic.
Filing Results
To file standard instrumentation lab results into Beaker, use the Incoming Results from Lab Instruments HL7v2 interface.
In order to offer flexible translation capabilities across multiple instrument types, be sure your product is able to pass instrument error codes to Epic in the OBX-8 segment of the ORU result message.
High-volume Result Throughput
Some customers may process a large amount of standard lab orders and results each day, so it is important that your middleware is able to support a realistic volume of orders. Consider aiming to support processing:
- 15,000 specimen per day per organization
- At least 5,000 orders within one hour
Get Started
These connection practices have enabled many successful connections across our community. As every product has unique goals, we encourage you to review this approach with your customers to confirm the best fit.
If you're just getting started, check out our step-by-step Developer Guide.
Want a little extra help? Vendor Services offers an optional suite of benefits including the ability to request individualized assistance with your app's data exchange.
In addition, some product categories qualify for Toolbox support and designation on Showroom, which can accelerate implementation and enable you to highlight your product’s strengths. Explore the list of eligible categories and share your interest with us through the Technology Guidance form.
Waveform Visualization Playbook
Waveform visualization apps display waveform data in near real time via a web and/or mobile app that launches from Epic. They may support viewing historical data (ex. data from the past 24 hours).
App Launch
Launch your waveform visualization app from Epic by passing patient context as part of an encrypted launch URL. Customers may use these products on with a variety of devices.
Send Images to Epic
As part of this integration, you may choose to send images to Epic. You can do so via the Incoming Scanned Document Link HL7v2 interface.
Get Started
These connection practices have enabled many successful connections across our community. As every product has unique goals, we encourage you to review this approach with your customers to confirm the best fit.
If you're just getting started, check out our step-by-step Developer Guide.
Want a little extra help? Vendor Services offers an optional suite of benefits including the ability to request individualized assistance with your app's data exchange.
In addition, some product categories qualify for Toolbox support and designation on Showroom, which can accelerate implementation and enable you to highlight your product’s strengths. Explore the list of eligible categories and share your interest with us through the Technology Guidance form.
RTLS Playbook
Real-Time Location System (RTLS) is used within the healthcare industry to provide real-time visibility into where patients, staff, and assets are located within their facilities. RTLS uses a tag that gets assigned to the entity (patient/staff/asset) they want to locate and a sensory network that’s deployed within the facility to determine location of the tag. Epic integrates with RTLS leveraging an HL7v3 interface to communicate incoming patient, staff, and medical device locations, and tag associations. In Epic, the RTLS data is used to provide visibility and automate workflows.
Location Updates
The Application can support messaging to notify Epic of badge location changes through the HL7v3 Incoming (to Epic) Real Time Location Services Interface. The Epic implementation of the HL7v3 specification also facilitates patient and provider co-location messages to allow the Application to indicate when a provider has spent a significant amount of time with the patient such that they should be recorded as having attended to the patient’s care.Badge Associations and Disassociations
RTLS data exchange with Epic supports messaging to keep badge associations to patients in sync between Epic and the Application. For example, associations can be performed as part of the a user's workflow with in Epic so that the user does not need to navigate to a separate application. In addition, Epic supports messaging to keep badge disassociations to patients in sync between Epic and the Application. These associations and disassociations between systems can be accomplished through one of the following integration means:
- By HL7v2 Outgoing Patient Administration Interface supported z-segment, ZPV-14.
- By HL7v3 Incoming and Outgoing Real Time Location Services Interface.
Get Started
These connection practices have enabled many successful connections across our community. As every product has unique goals, we encourage you to review this approach with your customers to confirm the best fit.
If you're just getting started, check out our step-by-step Developer Guide.
Want a little extra help? Vendor Services offers an optional suite of benefits including the ability to request individualized assistance with your app's data exchange.
In addition, some product categories qualify for Toolbox support and designation on Showroom, which can accelerate implementation and enable you to highlight your product’s strengths. Explore the list of eligible categories and share your interest with us through the Technology Guidance form.
Surgical Materials Playbook
Epic supports integration with external Materials Management Systems to streamline surgical supply and instrument tracking. Epic recommends implementing the following functionalities to ensure accurate and timely information in both Epic and the external system.
Synchronizing Supply Definitions
You may use the Incoming Materials Management Interface to automate synchronization of supply definitions from an external materials management system to Epic. This message creates or updates a surgical inventory item record and corresponding balance records. It can contain multiple item segments to add/update multiple items in a single message.
Surgical Resources
The Incoming Surgical Resource Data Interface can be used to synchronize the surgical instrument records maintained in an external instrument tracking system to Epic. The M16 event can create, update and inactivate surgical instrument records inside of Epic. A message can contain information about the status of the surgical instruments, and the locations where they are authorized.
The Outgoing Surgical Case Scheduling Interface should be used to plan surgical instrument usage from within Epic for specific encounters.
Supply Depletion
Typically, planned usage will be sent from Epic to the materials management system the previous business day using the Outgoing Surgical Case Scheduling Interface. After the encounter occurs, actual usage and wastage will be reconciled against the planned usage using the Outgoing Inventory Depletion Interface. It indicates to the external system which supply was used, from where it was picked, and the number by which the external system should decrement the balance of the supply.
If using an external system where supply usage is being documented (such as a cabinet dispensing system), the Incoming Procedural Supply Usage Interface can be used to trigger usage messages through the external system to Epic. The interface works together with the previous two interfaces to reconcile planned supply usage for an encounter with the items pulled from the supply cabinet on the day of.
Get Started
These connection practices have enabled many successful connections across our community. As every product has unique goals, we encourage you to review this approach with your customers to confirm the best fit.
If you're just getting started, check out our step-by-step Developer Guide.
Want a little extra help? Vendor Services offers an optional suite of benefits including the ability to request individualized assistance with your app's data exchange.
In addition, some product categories qualify for Toolbox support and designation on Showroom, which can accelerate implementation and enable you to highlight your product’s strengths. Explore the list of eligible categories and share your interest with us through the Technology Guidance form.
Digital Pathology Playbook
Overview
Digital Pathology is an integration between Beaker (Epic's laboratory application) and a 3rd party Image Management System (IMS) to allow pathologists to gain access via a hyperlink to high-resolution, digitized images of case slides for examination and interpretation. The hyperlink can be set up as one link for the overall case with all the associated slide images (Case-level) and/or as multiple links to the individual slide images (Slide-level).
Workflow: (A detailed diagram can be found in the Digital Pathology Specification)
- When a lab user orders a slide, Beaker will send an Outgoing Orders to Lab Instruments message to the image vendor for image availability.
- When each slide image is available, the vendor will send an Incoming Results to Lab Instruments message back into Beaker. Hyperlinks for the images on the case and/or individual slides are generated, which can be viewed by Pathologists.
- This will open the vendor's IMS with the selected case/slide.
Interface Messages
- When a lab user orders a slide, Beaker will send an Outgoing Orders to Lab Instruments message (OML^O21) to the image vendor for image availability.
- Message elements are defined in the Digital Pathology Specification.
- When each slide image is available, the vendor will send an Incoming Results to Lab Instruments message back into Beaker - Specifically a Specimen Status Update (SSU^U03) message for each individual slide.
- This is as opposed to sending multiple slides in the same message. It allows for faster image availability and avoids potential storage issues in Epic.
- You should allow linking to slide images using an LIS-generated barcode ID.
- We recommend sending additional slide status messages besides overall image availability in the SAC-8 field of your Incoming Results from Lab Instruments messages. Examples include:
- QC Complete
- Pathologist Reviewed
- To improve synchronization with your IMS, you can optionally receive an Outgoing Results and Orders Interface (ORU^R01) message when a case has been finished and use that to close out the case in the IMS.
Your IMS System
- We recommend you display at least the following minimum amount of information that was received in the Outgoing Orders to Lab Instruments message in the IMS:
- Display patient demographics
- PID-3: Patient Identifier List (MRN)
- PID-5: Patient Name
- Display the current case/slide ID
- ORC-2/OBR-2: Case ID
- OBR-19: Container (Slide) ID
- Display patient demographics
- Sync the selected case in the Beaker worklist to the images in your IMS. We recommend using a web-based application since it advantages over a local thick client method. It allows better synchronization between the IMS and Beaker. For example, switching cases in Beaker can switch cases and images in the IMS, or you can close case images in the IMS if the user is no longer viewing the case in Beaker. If you support a thick client application, it should follow the XML Context Synchronization specification (note that this only works for case-level image links).
- Provide your customers a web URL format for your IMS for Beaker to launch with a hyperlink. This should be a deep link based off the case ID or slide ID depending on which formats you support.
- Ex. "https://viewer.vendor.com/pathology/cases/scanID=ID"
- In the incoming lab instruments message, send the string portion of the URL that can be used as an identifier for the case/container (not required if using Beaker container ID).
- ZSP-2.1: URL Identifier
- ZSP-2.3: IMS specific ID Type
- Provide your customers a web URL format for your IMS for Beaker to launch with a hyperlink. This should be a deep link based off the case ID or slide ID depending on which formats you support.
Consult Workflows
An external organization may want to send their slides digitally to an organization on Beaker for consult or vice versa. To consider this workflow, you must be able to exchange images between two organizations.- This will require that the sending organization sends orders to Epic with case and slide external IDs by either:
- A paper requisition
- An order message across an Incoming Orders from CPOE Systems Interface
- The consult organization can create a case and send image availability messages using the external IDs to match the scanned images in the IMS.
- The consult organization will then send the results back to the sending organization by either:
- Fax
- A result message across an Outgoing Results and Orders Interface
Get Started
These connection practices have enabled many successful connections across our community. As every product has unique goals, we encourage you to review this approach with your customers to confirm the best fit.
If you're just getting started, check out our step-by-step Developer Guide.
Want a little extra help? Vendor Services offers an optional suite of benefits including the ability to request individualized assistance with your app's data exchange.
In addition, some product categories qualify for Toolbox support and designation on Showroom, which can accelerate implementation and enable you to highlight your product’s strengths. Explore the list of eligible categories and share your interest with us through the Technology Guidance form.
Wearable Cardiac Devices Playbook
Wearable Cardiac Devices
Overview
Overview
Wearable cardiac devices, like Holter monitors, event monitors, long-term continuous monitors and mobile cardiac telemetry, are used to monitor and record cardiac data while a patient is away from the office or hospital. This ECG data can be recorded over multiple days and analyzed by your system to produce preliminary reports for clinical review and follow-up. The general pieces to the wearable cardiac monitor workflow include the following:
- Ordering and scheduling
- Device placement and activation
- Data analysis from wearable device vendor
- Data filed to Epic
- Study signed
- Billing
Initial Order
An imaging order must be placed in Epic for the cardiac monitor. The order holds the entire workflow together, ensuring all the device data makes it to the right place and enabling other functionality such as automated scheduling and billing.
Your system can be notified of the placement of a cardiac monitor via an Outgoing Imaging Results and Orders message. This is a notification of the order placed natively in Epic. You'll use the retrieved Epic order ID and patient identifiers when sending result data for the monitor.
Filing Device Data
File discrete results for the device with the Incoming Ancillary Results - Imaging interface In addition to any fields required by the interface specification, this message must include the following:
- The Epic Order ID in the OBR-2 segment
- A PDF summary of the data
- This can be either an embedded Base-64-encoded PDF filed to Epic's Web BLOB, or a pointer to a document on a Document Management System (DMS).
- The Narrative & Impression (even if preliminary).
- As much discrete data from the IHE IDCO profile as is relevant to your app.
- The appropriate status of the result in OBR-25.
- If the result was finalized in your system, specify “F” for Final.
- If the result needs to be finalized in Epic, or your system will send final results later, send “P” for Preliminary.
Finalizing Results
If the results are finalized in Epic, your app will be notified of the result with an Outgoing Imaging Results and Orders message.
Alternatively, if results are finalized in your system instead of in Epic, we recommend supporting SMART on FHIR to allow users to securely SSO into your system while also potentially giving you access to call additional APIs for necessary clinical data. Refer to the OAuth 2.0 tutorial for more information.
Get Started
These connection practices have enabled many successful connections across our community. As every product has unique goals, we encourage you to review this approach with your customers to confirm the best fit.
If you're just getting started, check out our step-by-step Developer Guide.
Want a little extra help? Vendor Services offers an optional suite of benefits including the ability to request individualized assistance with your app's data exchange.
In addition, some product categories qualify for Toolbox support and designation on Showroom, which can accelerate implementation and enable you to highlight your product’s strengths. Explore the list of eligible categories and share your interest with us through the Technology Guidance form.
Clinical Knowledge Set Apps Playbook
The Clinical Knowledge Set integration is based on the HL7 Infobutton standard, which allows clinicians to retrieve targeted information provided by third parties, specific to the context of the patient or clinical workflow. Rather than searching third party knowledge base, searches are performed automatically based off elements of the patient's chart like diagnoses or orders.
Integrating Targeted Information into Clinical Workflows
During a variety of clinical workflows, clinicians can benefit from the addition of targeted information that is included automatically based on elements of the patient's chart. Using the Infobutton, third-party content groups can make their knowledge base readily available in Epic's system for relevant users.
Applications can follow the HL7 Infobutton specification for keys to send with the URL. Potentially sensitive data should be encrypted and limited to patient and provider demographic information.
If users would like to manually search for content, launching your application from Epic using the Smart on FHIR standard is possible.
Get Started
These connection practices have enabled many successful connections across our community. As every product has unique goals, we encourage you to review this approach with your customers to confirm the best fit.
If you're just getting started, check out our step-by-step Developer Guide.
Want a little extra help? Vendor Services offers an optional suite of benefits including the ability to request individualized assistance with your app's data exchange.
In addition, some product categories qualify for Toolbox support and designation on Showroom, which can accelerate implementation and enable you to highlight your product’s strengths. Explore the list of eligible categories and share your interest with us through the Technology Guidance form.
Total Parenteral Nutrition Compounding Playbook
Total Parenteral Nutrition (TPN) Compounding is the process of preparing sterile solutions for patients to receive intravenously. This process is conducted via TPN compounding machines (compounders), which are computerized medical devices that receive ingredient level information and compound precise amounts of each component. TPNs can be compounded in-house or offsite by a third-party compounding service.
Accepting Orders from Epic
For Total Parenteral Nutrition compounding, you will need to be able to receive and process orders from Epic. Some examples of how this is done:
- Directly receive TPN orders via the Outgoing Verified Medication Orders interface.
- Have your customer export TPN orders from Epic to a flat file and import the flat file directly into the compounder.
- Print TPN orders from Epic and manually enter them into a program that processes and adjusts orders as necessary.
Processing Orders
Other considerations as a third-party provider of TPN Compounding. Your application could:
- Handle barcode information with dispense messages
- Provide hardware that allows for effective clinician workflows
- Report on manually added ingredients
Order Complete
Your application should help automatically compound sterile solution for a patient, adhering to the precise amounts provided in the order. The final output should be a complete or near-complete solution to be delivered to a patient.Get Started
These connection practices have enabled many successful connections across our community. As every product has unique goals, we encourage you to review this approach with your customers to confirm the best fit.
If you're just getting started, check out our step-by-step Developer Guide.
Want a little extra help? Vendor Services offers an optional suite of benefits including the ability to request individualized assistance with your app's data exchange.
In addition, some product categories qualify for Toolbox support and designation on Showroom, which can accelerate implementation and enable you to highlight your product’s strengths. Explore the list of eligible categories and share your interest with us through the Technology Guidance form.
Encoder Playbook
Encoder integrations involve using a third-party system to determine and file diagnosis, procedure, and DRG codes based on clinical documentation. Coders or Clinical Documentation Specialists (CDS) launch from Epic into the encoder, which interfaces with Epic to ensure accurate coding and data storage. Encoders can integrate for both facility coding workflows and Clinical Documentation Improvement (CDI) workflows.
DRG Support
Encoders must support filing multiple DRG types in a single launch. If supporting CDI workflows, the encoder can provide an auto-suggested DRG via a backend interface for automated CDI reviews, while still supporting multiple DRG types for filing.
Integration occurs through a front-end workflow by using a SMART on FHIR EHR launch with either of the two methods below. In both cases, the payload is defined in the Coding – Bidirectional Interface Technical Specification, which applies to both CDI and coding workflows:
Clinical Data Access
To support auto-suggested DRGs for CDI workflows, encoders can retrieve clinical documentation from the patient’s chart using FHIR APIs or outgoing interfaces such as:
- DocumentReference.Search (Generated CCDA) (R4)
- DocumentReference.Search (Clinical Notes) (R4)
- Outgoing Documentation Interface
- Outgoing Results and Orders – LRI/ORM Interface
- Outgoing Imaging Results and Orders Interface
Backend Integration
Encoders use the backend portion of the Coding – Bidirectional Interface Technical Specification, to file autonomous suggested DRGs for CDI workflows. A Backend Systems app is required to make asynchronous FHIR API calls and to send interface messages (e.g., automated CDI reviews).
Get Started
These connection practices have enabled many successful connections across our community. As every product has unique goals, we encourage you to review this approach with your customers to confirm the best fit.
If you're just getting started, check out our step-by-step Developer Guide.
Want a little extra help? Vendor Services offers an optional suite of benefits including the ability to request individualized assistance with your app's data exchange.
In addition, some product categories qualify for Toolbox support and designation on Showroom, which can accelerate implementation and enable you to highlight your product’s strengths. Explore the list of eligible categories and share your interest with us through the Technology Guidance form.
Medication Carousel Playbook
Medication Carousels/Robots are used in inpatient pharmacies to store, retrieve, and automate dispenses to pharmacists. Carousels unlike ADS act more as an inventory hub in a central pharmacy which allows for space optimization and improve picking efficiency for high-volume storage.
Hardware
Vendors that support Medication Carousels and Robots provide the hardware to control and manage dispensing of medications.
Medication Tracking
Epic supports the HL7v2 Outgoing Verified Medication Orders Interface. This interface enables medication carousels and robots to track verified orders associated with pharmacy workflows. Integration with this interface ensures that the correct medications are retrieved and dispensed from the carousel inventory.
Inventory Integration
Epic supports the HL7v2 Load/Unload (ZPM) Interface. This interface enables carousels to communicate physical stock movements such as load, unload, restock, destock, expiration, and return bin actions. Using this interface keeps Epic and Willow Inventory in sync with the current stock levels within the carousel hardware.
Optional Integration
Medication carousels may also use the Interdepartmental Transfer (IDTR) Interface to automate non-patient stock movements, such as replenishment or ADS restocks. This supports coordinated transfers between the central pharmacy carousel and other care locations, while Load/Unload continues to maintain accurate inventory counts.
Get Started
These connection practices have enabled many successful connections across our community. As every product has unique goals, we encourage you to review this approach with your customers to confirm the best fit.
If you're just getting started, check out our step-by-step Developer Guide.
Want a little extra help? Vendor Services offers an optional suite of benefits including the ability to request individualized assistance with your app's data exchange.
In addition, some product categories qualify for Toolbox support and designation on Showroom, which can accelerate implementation and enable you to highlight your product’s strengths. Explore the list of eligible categories and share your interest with us through the Technology Guidance form.
End-User Authentication Playbook
All users are required to authenticate when logging in to Hyperspace, but there are several other workflows that might demand the extra security that additional authentication provides. End-User Authentication includes two subcategories, Login & Session Management and Reauthentication. Login & Session Management applications provide secure and efficient mechanisms for users to access Epic’s applications such as Hyperspace, Haiku, Canto, or Rover. Reauthentication applications verify the identity of end-users before performing certain actions within Epic’s applications such as Hyperspace, Haiku, Canto, or Rover.
User Login
By default, Hyperdrive and Epic mobile applications require users to authenticate by entering their User ID and password. However, additional authentication devices can be configured to use either Generic Desktop Authentication with SAML tokens or OpenID Connect to authenticate the user. If subspace APIs will be used to manage the state of the users Hyperdrive session, Generic Desktop Authentication can be used to gather the needed information to connect to the subspace hub.
Session Management
Epic supports the Subspace Communication Framework for asynchronous, semi-event-driven integrations between Epic and external applications. These should be used to manage the state of the user's Hyperdrive session such as securing the workstation or logging the user out of Hyperdrive.
Reauthentication and Witnessing
There are common workflows in Epic which require a user to reauthenticate or have a witness to complete the action. Epic uses OpenID Connect to compete reauthentication workflows in most contexts. Passive authentication, such as ED Narrator, will require using Desktop Generic Authentication.
In “witnessing” workflows or “dual sign” workflows, a second user is witnessing the user doing an event (example: disposing of narcotics or prescribing controlled substances) and both users need to sign off on the event having happened. In this case, the logged-in user will re-authenticate in their session and a second, separate user will also authenticate within the user’s session to sign off on the event. In other workflows, there are expectations to “default in” the currently logged-in user, but other users are acceptable as sources of signoff in these workflows.
Get Started
These connection practices have enabled many successful connections across our community. As every product has unique goals, we encourage you to review this approach with your customers to confirm the best fit.
If you're just getting started, check out our step-by-step Developer Guide.
Want a little extra help? Vendor Services offers an optional suite of benefits including the ability to request individualized assistance with your app's data exchange.
In addition, some product categories qualify for Toolbox support and designation on Showroom, which can accelerate implementation and enable you to highlight your product’s strengths. Explore the list of eligible categories and share your interest with us through the Technology Guidance form.
Bedside Dining Playbook
Bedside Dining applications present patients dining menus and options to place dining orders within MyChart Bedside.
Launching from MyChart Using SMART on FHIR
Patients can access your dining menu directly from MyChart Bedside and Bedside TV. When launching third-party applications, Epic uses SMART on FHIR to pass patient context along with other information to facilitate your ordering workflow.
Dietary Restrictions
Epic can share dietary orders in real-time using the Outgoing Diet Orders interface to send you important nutritional information to assist the patient with meal selections.
Get Started
These connection practices have enabled many successful connections across our community. As every product has unique goals, we encourage you to review this approach with your customers to confirm the best fit.
If you're just getting started, check out our step-by-step Developer Guide.
Want a little extra help? Vendor Services offers an optional suite of benefits including the ability to request individualized assistance with your app's data exchange.
In addition, some product categories qualify for Toolbox support and designation on Showroom, which can accelerate implementation and enable you to highlight your product’s strengths. Explore the list of eligible categories and share your interest with us through the Technology Guidance form.
Printing Output Management Playbook
Output Management
All Epic community members use the Epic Print Service (EPS) to print documents generated by various applications from their instance of Epic. While EPS is not the only method of printing from Epic, it processes the majority of print jobs exiting the system. Third-party products can integrate with EPS to collect the jobs exiting from the service that are bound for physical printer devices, which would normally be done through Windows print queues.
Print jobs contain two components, the metadata and the data to be printed. The metadata will include important information needed to complete the print job (e.g., the printer name) as well as information that will be useful for reporting (e.g., scenario name).
Batch Printing
EPS batch printing allows multiple print jobs in any combination of formats to be printed together on the printer without other batched jobs coming between them. Epic will send a Batch Open request followed by all relevant print jobs in that batch and then a Batch Close request.
Large Documents
Requests are sent using a chunked transfer encoding, which allows requests to be streamed directly to and from the disk. EPS is capable of sending any size of document over the output API so it’s important to account for memory limitations on these documents, often imposed by web servers.
Status Updates
Output Management systems can file back a status to Epic on specific print jobs using the StatusUpdateURL provided in the metadata of the print job. Filing back these statuses will help users keep track of which printouts were successful and which have failed.
Get Started
These connection practices have enabled many successful connections across our community. As every product has unique goals, we encourage you to review this approach with your customers to confirm the best fit.
If you're just getting started, check out our step-by-step Developer Guide.
Want a little extra help? Vendor Services offers an optional suite of benefits including the ability to request individualized assistance with your app's data exchange.
In addition, some product categories qualify for Toolbox support and designation on Showroom, which can accelerate implementation and enable you to highlight your product’s strengths. Explore the list of eligible categories and share your interest with us through the Technology Guidance form.
Wayfinding Playbook
Wayfinding applications can use a patient’s appointment information, such as the encounter department, to help users navigate healthcare organizations.
Launching from MyChart
Patients may launch your application from MyChart and use your navigational tools to reach their destination. When launching third-party applications, patient context, such as the Department ID of an upcoming appointment, can be passed to your wayfinding application. If you require PHI, a SMART on FHIR launch must be used. Using this context, wayfinding applications can appropriately navigate the patient from their current location to where they need to go.
Blue Dot Wayfinding Using BLE APIs
Wayfinding applications embedded in MyChart Mobile can support blue dot navigation by integrating with Epic's MyChart BLE APIs, which provide access to nearby BLE beacon and scan data. These APIs handle permission checks and enable apps to start monitoring for specific devices, delivering a continuous stream of detected BLE data. Your wayfinding application's positioning engine then translates this incoming signal data into a computed user location.
Get Started
These connection practices have enabled many successful connections across our community. As every product has unique goals, we encourage you to review this approach with your customers to confirm the best fit.
If you're just getting started, check out our step-by-step Developer Guide.
Want a little extra help? Vendor Services offers an optional suite of benefits including the ability to request individualized assistance with your app's data exchange.
In addition, some product categories qualify for Toolbox support and designation on Showroom, which can accelerate implementation and enable you to highlight your product’s strengths. Explore the list of eligible categories and share your interest with us through the Technology Guidance form.
Infusion Pump Playbook
Bi-directional infusion pump integration enables Epic to exchange information directly with your pumps. Clinicians can send order details from Epic to auto-program the pump, minimizing manual entry and potential errors. Your pump then transmits documentation data such as rate changes and infused volumes back to Epic, where it is filed seamlessly into the patient’s chart. Follow the IHE-PCD standard, using the interface specifications below.
Outgoing Interfaces (Epic to Pump)
Use the Outgoing Infusion Orders interface to send the infusion order from Epic to the pump.Incoming Interfaces (Pump to Epic)
Use the Incoming Infusion Verification interface to send an acknowledgement from the pump to Epic indicating the pump successfully accepted the order or send a rejection from the pump indicating why the order was rejected.Use the Incoming Infusion Documentation interface to send discrete measurements from a running infusion pump into Epic.
- Send event-based PCD-10 and periodic PCD-01 messages via the incoming infusion documentation interface.
Get Started
These connection practices have enabled many successful connections across our community. As every product has unique goals, we encourage you to review this approach with your customers to confirm the best fit.
If you're just getting started, check out our step-by-step Developer Guide.
Want a little extra help? Vendor Services offers an optional suite of benefits including the ability to request individualized assistance with your app's data exchange.
In addition, some product categories qualify for Toolbox support and designation on Showroom, which can accelerate implementation and enable you to highlight your product’s strengths. Explore the list of eligible categories and share your interest with us through the Technology Guidance form.
Patient-Facing / Consumer Health Apps
Patient-Facing Consumer Health Apps
Patient-authorized health apps allow people to access, track, and share their medical records and personal health information, connecting their MyChart credentials to healthcare provider data. Third-party developers play a large role in this process, creating patient-facing apps that patients can choose to retrieve the desired data from instances of Epic where they receive care.
Connect Your Health Apps and Devices
Patient-facing apps use OAuth2.0 so that patients can authenticate using their MyChart credentials. When patients use your app to access their health record, they are redirected to their healthcare provider's MyChart page and log in with their credentials. Patients authorize the app to pull specific data types that the app requests via FHIR APIs (authorization can be revoked at any time). Screenshots of the patient experience are detailed in our step-by-step Patient Authentication tutorial.
Encouraging Patient Data Sharing
We have found that complex or confusing workflows can discourage patients from sharing their health data. To help address this, we've compiled a few strategies to encourage successful data exchange with patient-facing apps in our Design Strategies to Increase Patient Data Sharing tutorial.
Client Record Registration and Distribution
To complete this workflow, each app must first pre-register with Epic and receive a client record (client ID). This client ID includes the app’s requested FHIR APIs. An app can only request data through the FHIR APIs that are both registered to its client ID and authorized by the patient.
As part of registration, the app developer is expected to complete and attest to a Data Use Questionnaire for the client ID. The questionnaire determines what patients see when they are asked to authorize data sharing.
The client ID must then be distributed to each customer environment the app connects to. Developers of patient-facing health apps have several options for distributing their client ID to customer environments, as described below:
Automatic Client ID Distribution
Developers can create Patient-Facing Apps Using FHIR without coordination with a health system, either through TEFCA IAS or Epic on FHIR.TEFCA for Individual Access Services (IAS)
What is TEFCA?The Trusted Exchange Framework and Common Agreement™ (TEFCA) is a U.S. government-sponsored exchange framework for healthcare data interoperability that aims to provide a single network on-ramp for a wide variety of health information exchange use cases. Read more about TEFCA on open.epic.
What role do third-party app developers have with TEFCA for Individual Access Services?One of the interoperability pathways TEFCA supports is the ability for patients to use apps of their choice to retrieve copies of their medical records from participants in the framework. In TEFCA, this is referred to as Individual Access Services (IAS). The idea is that individuals can use TEFCA-connected IAS apps to augment their access to patient portals with their health information.
Benefits of TEFCA IAS:
- There are over 200 Epic provider organizations participating in TEFCA and responding to IAS requests as of September 2025.
- As Epic on FHIR connections do not have record location capabilities, patient-facing apps must query all network endpoints for data retrieval. In comparison, TEFCA IAS can identify a list of organizations where a patient likely has data stored, allowing for efficient querying.
- Future: TEFCA IAS will allow for broader connection to health systems beyond Epic.
- Future: Epic is committed to growing TEFCA membership with a goal of onboarding 100% of the Epic provider community.
- Future: Patients using TEFCA IAS apps will be able to authorize sharing their health data from one central location using MyChart Central. This allows providers to continue managing federal, state, and organizational privacy requirements and gives patients a unified workflow for managing how their data is shared.
Patient-Facing Apps through Epic on FHIR
Apps created through Epic on FHIR that adhere to specific technology use requirements, allow the Client IDs to be automatically distributed to Epic organizations with auto-downloads enabled. The types of auto-download apps through Epic on FHIR fall into three categories:
- USCDI Apps using only USCDIv1 or USCDIv3 APIs, depending on the Epic version.
- CCDS (MU3) Apps using only a subset of DSTU2 FHIR APIs.
- CMS Payer Apps using only ExplanationOfBenefit and/or a subset of FHIR APIs
Details on which APIs are available for the automatic client distribution app types listed above can be found here.
Benefits of Epic on FHIR apps:
- All US provider organizations currently receive client IDs that meet the automatic distribution criteria that are activated through Epic on FHIR.
- Client ID registration steps are self-service to app developers through the Epic on FHIR website.
Client Record Distribution by Customer Request
Some patient-facing applications are designed as part of a larger product that involves the implementation of a clinician or backend systems app where coordination with an Epic customer is needed. Your app may also need to use APIs that are outside the scope to qualify for automatic download. In these situations, you can create your app using any of the available resources from Epic on FHIR and customers can request it through the App Request Process. You can work directly with a healthcare organization who is interested in your application, or make your app more visible by requesting a listing on Showroom.Get Started
These connection practices have enabled many successful connections across our community. As every product has unique goals, we encourage you to review this approach with your customers to confirm the best fit.
Client Record Registration
How do I register my app with TEFCA IAS?
After creating a qualifying product that meets the conditions described here, developers follow registration steps in order to exchange data with TEFCA participants. Epic Nexus Participants then respond to FHIR-based queries from IAS apps through this framework.
We offer a testing plan to ensure that apps are well prepared for a successful production data exchange. When your application is ready for production exchange, it will be automatically distributed to Epic community members who are live on TEFCA and IAS via FHIR.
How do I register my app with Epic on FHIR?Check out our step-by-step Developer Guide, where you can find details on Creating a Client ID and more.
How do I connect my app to customer environments?Once your app is active (Ready for Production) and synced to customer environments, either through the automatic or customer-requested distribution methods, you can connect to customer-specific endpoints included in our User-access Brands Bundle, which includes details that can help patients find the right endpoint.
Developer Support
Want a little extra help? Vendor Services offers an optional suite of benefits including the ability to request individualized assistance with your app's data exchange.
In addition, some product categories qualify for Toolbox support and designation on Showroom, which can accelerate implementation and enable you to highlight your product’s strengths. Explore the list of eligible categories and share your interest with us through the Technology Guidance form.
Endoscope Data Capture Playbook
Endoscope data capture integrations allow vendors to gather data from a scope, format it, and then send it downstream. Currently, Epic is focused on image data, though that will expand to video, event, and other data in the future. This data is used throughout Lumens workflows, e.g., documenting findings or writing a procedure note.
Processing an Order
Customers send an ORM Message from the Outgoing Imaging Orders Interface to provide a list of orders per room/device being utilized so an end user can select an order to acquire data against.
Sample message:
MSH|^~\&|IMG_ARRIVE_APPT||||20250110141123|1|ORM^O01|334314.48|T
PID|1||205042^^^EPI^MR||ZZTEST^SAG^^^^^L||19650110|M|||^^^^^US^PERM|||||||2282|374-75-8473
PV1|1|OUTPATIENT|^^^^^^^^EMH GASTROENTEROLOGY^^||||1004^GASTROENTEROLOGY^PHYSICIAN^^^^^^PROVID^^^^PROVID|1004^GASTROENTEROLOGY^PHYSICIAN^^^^^^PROVID^^^^PROVID|||||||||||2282|||||||||||||||||||||||||20250110133709|||||||V
ORC|NW|1065621^EPC|AccNum8||Arrived||^^^20250110133758^^R||20250110141123|1^EPIC^USER^^||1004^GASTROENTEROLOGY^PHYSICIAN^^^^^^PROVID^^^^PROVID|^^^^^^^^EMH GASTROENTEROLOGY|(555)555-5555^^^^^555^5555555|||||||||||||||I
OBR|1|1065621^EPC|AccNum8|GI2^EGD^IMGEAP|R|20250110141122|||||O|||||1004^GASTROENTEROLOGY^PHYSICIAN^^^^^^PROVID^^^^PROVID|(555)555-5555^^^^^555^5555555|||||||ES|Arrived||^^^20250110133758^^R|||||||||20250110134000
ZPF|1|ENDO^ENDOSCOPY PROCEDURE ORDERABLES|||||^^^^^^^^EMH GASTROENTEROLOGY||1846
We recommend that the device and this interface should not be replaced with a DICOM MWL capable product. DICOM MWL products pull from a database, rather than read information from a message sent in real-time. As such, there is always a chance of data being desynced in the data capture system from the EMR based on when a change is made in the EMR versus when a DICOM MWL checks for a change. This can have interface filing implications if you use an interface method to file data that checks against procedure, provider, or diagnosis.
Sending Data Back to Epic
Customers accept data from your data capture system in one of three ways:
- Send data to Epic’s Gallery Product through a Windows upload directory:
- Send files to a directory to then be absorbed by Gallery via a file sweep.
- Send one file per image sent with a title in the format <ACCNO>_<ENTERPRISE MRN>_<SCAN DATE>_<SCAN TIME>_<generic file name> where ACCNO is the accession number, Enterprise MRN is the unique Epic MRN for a patient, Scan Date is the day the image was taken, and Scan Time is the time the image was taken. Images are sent as files in tiff, gif, or jpeg format.
- Send data to the Epic Web Blob Server through Base64 encoded HL7
- Send data in MDM T02 messages through the Incoming Scanned Document Link Interface with base64 encoded image data. Images are encoded from a file in the tiff, gif, or jpeg format. We recommend one message per image with a unique identifier for each image.
- Sample Message:
- Send data to a 3rd party image storage vendor that integrates with Lumens:
- The data capture vendor partners with an image storage vendor to send media to.
MSH|^~\&|PACS|PACS|PACS|PACS|20200916175205||MDM^T02|16002787236963|P|2.3|3
PID|1||205042^^^EPI^MR||ZZTEST^SAG^^^^^L||19650110|M|||^^^^^US^PERM||||||||374-75-8473
PV1|1|OUTPATIENT|^^^^^^^^EMH GASTROENTEROLOGY^^|||||1004^GASTROENTEROLOGY^PHYSICIAN^^^^^^PROVID^^^^PROVID||||||||||||||||||||||||||||||||||||20250110133709|||||||V
ORC|RE||AccNum8||SC||^^^20200916110000^20200325133000^R|||||59889^ DOCTOR ^DOC^^^^^^PROVID|||||101094130^EPIC ENDOSCOPY^SYSTEM||||||||IMAGES_AVAILABLE
TXA||Endoscopy Image||20200916175205|1004^GASTROENTEROLOGY^PHYSICIAN^^^^^^PROVID|||||||1.2.826.0.1.3680043.9.6362.6674457083739351392865841291186902891|||^^AccNum8||AU||AV|
OBX|1|ED|Endoscopy Image^Endoscopy Image|1|^JPG^^^<encoded image>
Timing
You should aim to hit minimum benchmark of sending 30 image files or messages to Epic in under 50 seconds to ensure the media files appear in an Endoscopist’s report. The “clock” starts when an end user indicates to data capture to send images and ends when the last image hits the relevant Windows upload directory or Incoming Interface.
Get Started
These connection practices have enabled many successful connections across our community. As every product has unique goals, we encourage you to review this approach with your customers to confirm the best fit.
If you're just getting started, check out our step-by-step Developer Guide.
Want a little extra help? Vendor Services offers an optional suite of benefits including the ability to request individualized assistance with your app's data exchange.
In addition, some product categories qualify for Toolbox support and designation on Showroom, which can accelerate implementation and enable you to highlight your product’s strengths. Explore the list of eligible categories and share your interest with us through the Technology Guidance form.
Alert Manager Playbook
Alert Communicator is included in EpicCare Inpatient and requires a third-party Alert Manager. Alert Managers ingest alerts from a variety of devices, such as inpatient vitals monitors, and determine who should get notified for each alert. They then send Epic’s Alert Communicator a standardized PCD-06 message including the alert recipient and the relevant alert details. We then display it to the appropriate users as a toast notification in Hyperspace or a push notification in Haiku, Canto, and Rover. They also handle escalation in scenarios where the original recipient does not respond in an appropriate amount of time.
IHE ACM PCD Profile
Epic supports the IHE ACM PCD profile for receiving device-initiated alerts. This standard helps facilitate communication of alarm information to caregivers. To connect with Epic's Alert Communicator, the alert manager should be approved by the FDA via the 510(k) process for reviewing medical devices and we recommend implementing the following fields as specified in version 1.3 (or newer) of the IHE ACM profile:
| Field | Used for... |
|---|---|
|
IHEPCDACMParticipants |
discrete patient mapping |
|
IHEPCDACMLocations |
discrete patient mapping |
|
IHEPCDACMObservation alertTimestamp |
discrete patient mapping |
|
IHEPCDACMObservation eventIdentification |
alert subtyping/display |
|
Wctp-ChoicePair |
sending discrete follow up actions for the user to take on an alert |
|
Wctp-Recipient |
specifying the recipient of the alert |
|
Wctp-MessageControl deliveryPriority |
alert notification priority mapping |
|
Embedded IHEPCD04 HL7 Messages |
displaying inline waveform information |
Outgoing HL7v2 ADT
It is recommended to have an Outgoing ADT (Patient Administration) interface in scope so that the alert manager system can receive pertinent patient information such as demographics, location, and treatment team to inform alarm routing.
Get Started
These connection practices have enabled many successful connections across our community. As every product has unique goals, we encourage you to review this approach with your customers to confirm the best fit.
If you're just getting started, check out our step-by-step Developer Guide.
Want a little extra help? Vendor Services offers an optional suite of benefits including the ability to request individualized assistance with your app's data exchange.
In addition, some product categories qualify for Toolbox support and designation on Showroom, which can accelerate implementation and enable you to highlight your product’s strengths. Explore the list of eligible categories and share your interest with us through the Technology Guidance form.
Telehealth Providers Playbook
Healthcare organizations may look to supplement their own telehealth operations for the purposes of 24/7 access or increased capacity of on-demand video visits.
MyChart Extensibility & SSO
After patients or proxies have logged in to MyChart, the Epic customer's IT team can give them access to additional features from the menu within the existing MyChart mobile app or website. This menu launch could open a separate app or website for the patient to interact with. MyChart can also pass along information about the logged in user so that the other app or website can provide user-specific content, potentially eliminating the need for the patient or proxy to log in again. For example, you can identify a patient or proxy based on tokens that pass the patient ID, MyChart account ID, name, or date of birth. An OAuth 2.0 access token can also be used to call FHIR APIs on behalf of the patient to read, search, or write data that the application is authorized to interact with. This approach is an implementation of an EHR Launch.
Alternatively or additionally, you can implement the standalone launch workflow when you'd like to use OAuth 2.0 for SSO, but you do not need your app to be launched from Epic. Your app initiates a login on its own, and Epic presents the patient with a MyChart login screen where they can enter their credentials.Clinical Data Exchange
EHR-to-EHR clinical information interfaces are typically used between two clinical systems looking to exchange patient-specific information. They include both the transport standards for clinical information exchange and the format and content of the information exchanged. Check out our supported standards to learn more.The below list represents some of the interfaces which may be useful to implement:
- Incoming and Outgoing Patient Discovery (Link)
- The Direct Standard® (Link)
- Clinical Document Architecture (CDA) (Link)
Get Started
These connection practices have enabled many successful connections across our community. As every product has unique goals, we encourage you to review this approach with your customers to confirm the best fit.
If you're just getting started, check out our step-by-step Developer Guide.
Want a little extra help? Vendor Services offers an optional suite of benefits including the ability to request individualized assistance with your app's data exchange.
In addition, some product categories qualify for Toolbox support and designation on Showroom, which can accelerate implementation and enable you to highlight your product’s strengths. Explore the list of eligible categories and share your interest with us through the Technology Guidance form.
Vitals Gateway and Middleware Device Integration Playbook
Vendors in this category receive vitals data from devices like bedside monitors or anesthesia carts. Vendors support either a Spot Check Vitals integration, a Continuous Vitals integration, or both. Spot Check Vitals devices receive discrete data that is validated on the device and then sent to EpicCare Inpatient Clinical Documentation. Continuous Vitals devices receive a constant stream of data which is then sent to EpicCare Inpatient Clinical Documentation or Epic’s Anesthesia application.
Spot Check Vitals
Use the Outgoing Patient Administration (ADT) Interface paired with the Incoming Clinical Documentation Flowsheet Data Interface:
- The Outgoing ADT Interface sends patient data from Epic to the gateway or middleware device.
- The Incoming Flowsheet Interface files the pre-validated data from the device’s system directly into flowsheet rows in the patient’s chart.
Continuous Vitals
Use the Incoming Device Data Interface to send a constant stream of unvalidated data from the device to Epic.
Send a PCD-04 message from the device’s system to a customer’s Alert Management System when an abnormal vital is recorded.
Get Started
These connection practices have enabled many successful connections across our community. As every product has unique goals, we encourage you to review this approach with your customers to confirm the best fit.
If you're just getting started, check out our step-by-step Developer Guide.
Want a little extra help? Vendor Services offers an optional suite of benefits including the ability to request individualized assistance with your app's data exchange.
In addition, some product categories qualify for Toolbox support and designation on Showroom, which can accelerate implementation and enable you to highlight your product’s strengths. Explore the list of eligible categories and share your interest with us through the Technology Guidance form.
Remote Patient Monitoring with Devices Playbook
Remote Patient Monitoring (RPM) empowers clinicians to monitor their patient's chronic conditions from home. Patients submit data to Epic flowsheets such as vitals, via direct device connection with the Bluetooth® Generic Health Sensor Profile or software connections with APIs and interfaces
Bluetooth® Connections
If you manufacture devices used in RPM you can send device data directly into MyChart following the Bluetooth® Generic Health Sensor Profile
RPM Software
If you are not a device manufacturer, or you have a software component to your RPM offering, follow our Remote Patient Monitoring Tutorial to file device data with HL7v2 Interfaces or FHIR APIs.
Home Dialysis
If you provide Home Dialysis software, follow our Remote Patient Monitoring Tutorial to file device and/or patient-entered data with HL7v2 Interfaces or FHIR APIs.
Get Started
These connection practices have enabled many successful connections across our community. As every product has unique goals, we encourage you to review this approach with your customers to confirm the best fit.
If you're just getting started, check out our step-by-step Developer Guide.
Want a little extra help? Vendor Services offers an optional suite of benefits including the ability to request individualized assistance with your app's data exchange.
In addition, some product categories qualify for Toolbox support and designation on Showroom, which can accelerate implementation and enable you to highlight your product’s strengths. Explore the list of eligible categories and share your interest with us through the Technology Guidance form.
External Health Records for Patient Treatment
To provide the right care for a patient, it’s critical that any provider can access the right information for the right patient at the right time. We support many interoperability standards widely used around the world and have created additional tools to make sure there is always a path to accessing the information you need.
Electronic health record vendors can connect providers to national data exchange frameworks using industry-standard technologies.
Carequality
Like the framework and agreements that enable roaming across cellular networks and providers, Carequality enables nationwide coordination of care throughout the US. Carequality’s common framework includes trust policies, implementation-level functionality, standards-based technical and testing requirements, and operational practices for faster connectivity with other network members.
All US-based Epic customers are members of the Carequality network, providing access to coordinated care for millions of patients across hundreds of healthcare organizations.
To get started, contact Carequality to become a member.
The Trusted Exchange Framework and Common Agreement™
The Trusted Exchange Framework and Common Agreement™ (TEFCA™) is a U.S. government-sponsored exchange framework for healthcare data interoperability that aims to provide a single network on-ramp for a wide variety of health information exchange use cases. Epic customers connect to the TEFCA network through the Epic community’s Qualified Health Information Network® (QHIN™): Epic Nexus. The Epic Nexus QHIN connects to other QHINs, allowing for advanced interoperability with minimal setup. The Epic community is in the process of getting connected to TEFCA. You can see the organizations that are live (or planning to go live) here.
If you’re an Epic customer, contact your BFF to get started. If you’re not an Epic customer, you can learn more about connecting to Epic organizations for TEFCA’s supported use cases here.
Direct Messaging
Direct Messaging provides the ability to send patient charts to another provider or organization and works similar to email. The organization that is currently seeing the patient can send a standardized C-CDA summary to another organization for referrals and other transitions of care. It can also be used for provider-to-provider communications between organizations, say for consults.
Epic organizations have also used Direct Messaging to improve social care outcomes with groups like United Way, and to share information with Health Information Exchanges (HIEs), government repositories, and public health reporting databases.
Check out more details about how to set this up in our open.epic specifications.
Health Information Exchanges
In addition, many organizations that use Epic are also connected to other networks or Health Information Exchanges.
Reach out to a specific organization to understand the different additional paths that may be available to you.
Building a Patient Roster
Patient Rostering describes a broad range of use cases that typically start with trying to establish a roster of patients from Epic that are applicable to your product. This article describes a few common ways you might be able to accomplish this. There may be other niche APIs or technologies that were designed for specific use cases. We recommend being both flexible and specific with your roster definition. This will allow healthcare organizations the best chance of meeting your requirements and open the possibility of using those more niche options.
Event Based Interfaces
HL7v2 and other standards-based interfaces are a tried-and-true method to push information based on an event in Epic in real time. The simplest example is an Outgoing Patient Administration (ADT) Interface which can push a message for admissions, discharges, and other encounter or patient events. Organizations using Epic commonly have middleware which can filter messages for you. For example – you might want to roster all patients that are being seen in a particular department. Make sure you are clear with customers in your filtering requirements to reduce the amount of noise you receive.
In addition to the Outgoing Patient Administration (ADT) Interface, other events can also be leveraged to fill your roster. Examples include Outgoing Appointment Scheduling, Outgoing Imaging Orders, Outgoing Ancillary Orders, Outgoing Case Scheduling, and many more.
Bulk FHIR
Before Bulk FHIR can be used, a patient roster must be defined within Epic. The roster within Epic is defined by a set of logical rules that determines if the patient meets those requirements. A common example is all patients with a certain diagnosis. If all you need is basic patient demographic information, you can simply leverage Patient.Search (R4) to construct the Bulk FHIR payload return with only the Patient resource for every individual in the roster. You can then follow up with RESTful FHIR calls – or use Bulk FHIR itself to retrieve the corresponding FHIR resources for each patient.
See our Bulk FHIR Tutorial for more information on using Bulk FHIR and best practice recommendations for being a good steward of system performance. For example, Bulk FHIR would not be a good option for large patient rosters, or if you require up to the minute real time data. Bulk FHIR could be a good option if you infrequently need to update your roster for a small number of patients. We also strongly recommend leveraging _typeFilter to improve system performance.
Extracts
Epic has always provided a myriad of reporting tools that can often double as a way to extract information for third party integrations. This can be a good option if you can define your patient roster in a way that can be translated into an Epic report. Depending on the extraction tool used, these reports can be run anywhere from daily to as frequently as a couple times an hour. Simplifying your requirements could lead to performance gains and the ability to increase extraction frequency. Customer staff business intelligence developers to create ad hoc queries to meet your needs and deliver them to you. Project priority and timelines for these requests vary greatly across customers. Alternatively, you can choose to take on the report complexity and license Kit or Clarity through Vendor Services.
FHIR List.Search API
The List.Search (Patient List) (R4) FHIR API can retrieve predefined patient lists from Epic. The two types of Patient Lists in Epic are System Lists and My Lists, both of which are created and maintained by customer staff.
System Lists are commonly used to populate a list of patients who are admitted to or recently discharged from a specific department. My Lists are commonly used by end users to quickly see a list of patients that they are caring for.
If a pre-existing list doesn’t fit your needs, you can work with the Epic organization to determine if a list could be built for you. Make sure that your requirements are clear and consider being flexible in order to work within the Patient List framework in Epic.
Get Started
These connection practices have enabled many successful connections across our community. As every product has unique goals, we encourage you to review this approach with your customers to confirm the best fit.
If you're just getting started, check out our step-by-step Developer Guide.
Want a little extra help? Vendor Services offers an optional suite of benefits including the ability to request individualized assistance with your app's data exchange.
In addition, some product categories qualify for Toolbox support and designation on Showroom, which can accelerate implementation and enable you to highlight your product’s strengths. Explore the list of eligible categories and share your interest with us through the Technology Guidance form.
Reference Labs
Reference labs and other specialty diagnostic labs can connect to Epic provider systems via point-to-point interfaces for the tests they perform. Common lab, pathology, specialty diagnostic, and genetic testing specimens may be collected at the external lab, by the originating healthcare organization, or directly by the patient.
Lab Test Compendium
External labs work directly with the ordering healthcare provider organization to configure and map lab procedure identifiers in their system that match the orders your lab results. For example, they will configure procedure names and identifiers, result components, order questions, and other discrete data , and.
Epic customers can find additional Epic configuration details and project management recommendations in Galaxy, our customer documentation portal, in the Third-Party Reference Labs Strategy Handbook.
Receiving Outgoing Orders from Epic
Healthcare providers using Epic can transmit lab orders to the external lab LIS with the Outgoing Ancillary Orders interface to be notified when an applicable lab test is placed. The interface message will include details such as procedure, source, type, and collection date/time.
Sending Incoming Results to Epic
When the external lab processes the test, the results then flow back into Epic, giving providers timely access to discrete data within the patient’s chart. Though critical results should be communicated synchronously such as with a phone call, when results are received via interface, Epic provides workflows and routing mechanisms to the appropriate customer-defined staff responsible for acting on results.
Common labs, pathology, and specialty diagnostics
Labs use the Incoming Ancillary Results interface to send these results back to the ordering organization. Results are sent as discrete result components (e.g., WBC count, sodium, glucose, as opposed to sending textual documents) and defined normal ranges, units, and flags. Narrative-only results are generally appropriate for pathology results, though narratives can also add interpretation of other labs with discrete result components.
Genomic Results
Discrete genomic results also file to Epic via the Incoming Ancillary Results interface. To include discrete genomic data as a part of the test's result, specifically formatted OBX segments must be included on the result message. The supported data elements are outlined in our genomics-specific interface specifications.
Get Started
These connection practices have enabled many successful connections across our community. As every product has unique goals, we encourage you to review this approach with your customers to confirm the best fit.
If you're just getting started, check out our step-by-step Developer Guide.
Want a little extra help? Vendor Services offers an optional suite of benefits including the ability to request individualized assistance with your app's data exchange.
In addition, some product categories qualify for Toolbox support and designation on Showroom, which can accelerate implementation and enable you to highlight your product’s strengths. Explore the list of eligible categories and share your interest with us through the Technology Guidance form.
Perioperative Workflows Playbook
Perioperative Workflow Data Sharing Playbook
Epic supports multiple data sharing technologies to support the exchange of perioperative data for surgeries, anesthesia, and related visits. This playbook outlines common data types and workflows. Your product’s connection should account for how users interact with your app at each stage of the patient’s perioperative journey, because timing directly influences how your app exchanges data with organizations using Epic. Additionally, work with your customers to understand their perioperative workflows to create a robust connection.
Before The Day Of Surgery
Surgical Consult visits and Pre-Anesthesia Testing (PAT) appointments
Patients could discuss the surgical plan with their surgeon in an inpatient or outpatient consult appointment prior to the case request order being placed or surgery being scheduled. Similarly, they may also see their anesthesiologist for a pre-anesthesia testing visit in an inpatient or outpatient appointment up to 30 days prior to the scheduled surgery.
Your app can pull appointment data via the Encounter FHIR resource. Outgoing Appointment Scheduling (SIU) HL7v2 interfaces can push appointment information to your app. Work with your customers to determine how to use Surgical Consult or PAT provider information, visit type information, or department information to identify these types of visits.
Case Request Orders
Surgeons use case request orders to electronically request OR schedulers to add a surgical case to the schedule. Includes information like requested date of surgery and surgical procedure. Work with your customers to determine how their scheduling department processes case requests and determines how their surgical schedule is made.
Your app can pull Case Request order information via the ServiceRequest (Orders) FHIR resource. You can use the category field to identify these orders. Your customers may need to do additional setup to include Case Request orders in ServiceRequest. Additionally, the Outgoing Surgical Case Scheduling (SIU) HL7v2 interfaces can push case request order information to your app. Your customers may need to do additional interface setup to trigger outgoing messages when Case Request orders are signed.
Scheduled Surgical Cases
When a surgery has been added to the surgical schedule. Surgeries will be scheduled with information like projected start and end times, procedure, and staff.
Your app can pull scheduled surgery information via the Appointment (Scheduled Surgeries) FHIR resource. The scheduled case will also show up in Encounter albeit with less information. Additionally, the Outgoing Surgical Case Scheduling (SIU) HL7v2 interfaces can push surgery scheduling information to your app.
Preference Cards
Preference cards help OR staff efficiently prepare for surgeries by pulling in information that usually stays the same for a procedure, such as the pick lists and patient positioning used.
There is not currently an industry standard way of exchanging data for preference card information.
Day Of Surgery
On the day of surgery, there are many clinicians, such as nurses, surgeons, and anesthesiologists, that will interact with the patient and document information about the surgery. Work with your customer to understand their day of surgery workflows in order to create a robust connection.
Surgery Progress and Staff Times
Your app can pull surgery progress and surgeon timing information via the Encounter FHIR resource. Additionally, the Outgoing Surgical Case Scheduling (SIU) HL7v2 interfaces can push real-time surgery progress, surgeon, surgical staff, and anesthesia staff information to your app. The outgoing messages can be configured to send at various key surgical events like Procedure Start or Out of Room.
If your app will be the source of truth for surgery progress, your app can use the Incoming Surgical Case Tracking HL7v2 Interface to write key surgical events to the patient chart. Note this will need to be used in conjunction with the Outgoing Surgical Case Scheduling HL7v2 interface.
Surgical History
Your app can pull information about a patient’s historical surgical procedures using the Procedure (Surgical History) FHIR Resource.
Surgical Consent
Your app can pull information about a patient’s surgical consents using the Consent FHIR Resource.
Orders
Your app can pull pre-operative, intra-operative, or post-operative order information via the ServiceRequest (Orders) FHIR resource. You can use the category and encounter fields to identify these orders. Your customers may need to do additional setup to include all types of orders that your app may care about in ServiceRequest.
Labs
Your app can pull pre-operative, intra-operative, or post-operative lab information via the DiagnosticReport (Results) FHIR resource. Those resources may contain component-level lab results, which your app can pull via the Observation (Labs) FHIR resource.
Imaging
Your app can pull pre-op, intra-operative, or post-operative diagnostic imaging report information via the DiagnosticReport (Results) FHIR resource which will contain references to Observation or Binary FHIR resources for impression and narrative results.
Notes
Your app can pull note information via the DocumentReference (Clinical Notes) FHIR resource and text information via the Binary (Clinical Notes) FHIR resource. Work with your customers to understand the note types their users create for documents like H&Ps, Operative Notes, and Anesthesia notes.
Work with your customers to determine if they may store discrete information in SmartData Elements on their perioperative notes. If you need to pull particular SmartData Elements on a particular type of note, work with your customers to identify these scenarios and use the Observation (SmartData) FHIR resource to pull this information into your app.
Your app can write PDF or RTF note information via the Incoming Transcriptions HL7v2 interface or plain text note information via the DocumentReference FHIR API. Work with your customers to determine how their users will incorporate your note into their existing workflows.
Vitals
Your app can pull vitals information via Observation (Vitals) FHIR resource. Preop and postop vitals are often taken by nursing staff. Intraoperative vitals often come from vitals monitor devices.
Device data flows to the patient chart via the Incoming Device Data HL7v2 interface in an intraoperative setting. If your app must read real time intraoperative vitals, many customers will have a way to split an incoming feed in their interface engine. Develop your app to consume the incoming HL7v2 feed.
If your app will write real time intraoperative vitals to the patient chart, use the incoming feed for large amounts of data or the Observation (Vitals) FHIR Resource for small amounts of data.
Lines, Drains, Airways, and Wounds
Your app can pull pre-operative, intra-operative, or post-operative Lines, Drains, Airway, and Wound information via the Observation (LDA-W) FHIR resource.
Additionally, your app can create or update Lines, Drains, and Airway information via the Observation (LDA) FHIR resource.
Medications
Your app can pull pre-op, intraoperative, and post-op medications that were given via the MedicationRequest (Orders) FHIR resource. This will return information like infusion start and stop times but not totals.
Implants
Your app can pull information about implants via the Device (Implants) FHIR resource.
Specimens
Your app can pull information about specimens that were taken during a surgery via the ServiceRequest (Orders) resource which will contain references to Specimen FHIR resources.
Blood Products
Your app can pull blood products that were given via the DiagnosticReport (Results) FHIR resource. This will return information like start and stop times but not totals.
Supply Usage
The Outgoing Inventory Depletion HL7v2 interface can send information about supplies documented as used in Epic to your app. The Incoming Materials Management HL7v2 interface can bring supply data into Epic from your app.
After The Surgery
After the day of surgery, there is a window for clinicians to finalize their documentation and findings. Once the documentation is finalized, charges are posted and sent for billing. Work with your customer to understand how long it typically takes for them to finalize and post their surgeries.
Outcomes
After the surgery documentation is finalized, your app can pull surgery information including outcomes information like complications from Procedure (Surgeries).
Patient Location
Your app can pull information about a patient’s inpatient location after surgery via the Encounter FHIR resource. Additionally, the Outgoing Patient Administration HL7v2 interface can send your app information about patient movement after surgery such as admissions to inpatient, transfers, or discharges.
Charges
We do not currently support industry standard ways of reading which charges were posted to a surgery or on a claim related to a surgery.
Get Started
These connection practices have enabled many successful connections across our community. As every product has unique goals, we encourage you to review this approach with your customers to confirm the best fit.
If you're just getting started, check out our step-by-step Developer Guide.
Want a little extra help? Vendor Services offers an optional suite of benefits including the ability to request individualized assistance with your app's data exchange.
In addition, some product categories qualify for Toolbox support and designation on Showroom, which can accelerate implementation and enable you to highlight your product’s strengths. Explore the list of eligible categories and share your interest with us through the Technology Guidance form.
Deploying Predictive Models Playbook
Deploying Predictive Models to Epic Provider Systems
Epic offers several methods for with connecting predictive analytics models with user workflows. Customers licensed for Epic's Cognitive Computing Platform can deploy your model such that it appears natively in Epic workflows.Epic's Cognitive Computing Platform
You can provide your model directly to Epic customers who license Epic's Cognitive Computing Developer Platform. These customers will map inputs from their Epic system to your models, and either upload the models to their cloud instance or import them to their operational database. Either way, the models look just like the Epic-provided models they're used to seeing.Customers should contact their Epic representative to determine if they have the Cognitive Computing Developer Platform licensed, and to confirm their readiness for custom cloud-based models.
Nebula
Nebula is Epic's managed cloud platform, one of two options for deploying models with the Epic Cognitive Computing Developer Platform.When models are mapped, uploaded, and turned on, customers' Epic systems will securely transport inputs to our managed cloud platform, where the complex calculations take place. Cloud calculated scores are delivered back to the customer's local instance of Epic and are displayed to end users. This option works well with models created in tools like Pytorch or XGBoost, and has the most processing power suitable for complex models. Any Python package that can be used for modelling can be installed and accessed for real-time calculation.
Nebula and the Cognitive Computing Platform is the most full-featured option for providing predictive models to customers. Your data scientist can implement a variety of algorithms using standard python packages, and customers' users benefit from the clear score displays in Epic. Our native visualization of contributing factors helps users identify which factors are most significantly impacting a score. Nebula also provides the most processing power for complicated algorithms.
PMML
For simpler models and for customers who don't have Nebula, you can export your model as a PMML file for customers to import. They'll import the model and map inputs from their Epic system to allow your model to run. The PMML option also requires Epic's Cognitive Computing Developer Platform. We recommend using Nebula instead of PMML.Limitations
The PMML option is limited to file sizes of less than 4MB, and supports Naive Bayes, decision tree, decision forest, and certain regression algorithms.Filing scores using FHIR APIs
For Epic customers without the Cognitive Computing Platform, model vendors will need to handle calculations and filing scores into Epic. This option is the least helpful to clinical users, as it's difficult to see the factors that went into the final score, making it difficult for users to validate and trust scores.Using this option, you will gather inputs needed for your model to calculate the scores using FHIR APIs, interfaces, or other methods. You can then calculate the model score, and file the model result using an API. Often, the Observation.Create (R4) API is used as the mechanism to file data to flowsheets. From there, customers can configure their system to display your model’s result where they would like to see it in their workflow, such as a column or configuring alerts to trigger.
Get Started
These connection practices have enabled many successful connections across our community. As every product has unique goals, we encourage you to review this approach with your customers to confirm the best fit.
If you're just getting started, check out our step-by-step Developer Guide.
Want a little extra help? Vendor Services offers an optional suite of benefits including the ability to request individualized assistance with your app's data exchange.
In addition, some product categories qualify for Toolbox support and designation on Showroom, which can accelerate implementation and enable you to highlight your product’s strengths. Explore the list of eligible categories and share your interest with us through the Technology Guidance form.
Clinical Decision Support Playbook
Epic uses CDS Hooks, an HL7 standard, for in-workflow, real-time, dynamic, provider-facing decision support provided by external decision support services.
Applicable Use Cases
CDS Hooks should be used only to trigger real-time, end user-facing decision support. Epic recommends against using this feature for other purposes. If you need only a notification, we instead recommend using an event-based interface.
Developer Considerations
CDS Hooks is a powerful integration technology because it directly interacts with clinician workflows. As a CDS developer, you share responsibility for a positive user experience. Your CDS service must be fast, avoid alert fatigue, and improve over time. Review our Designing an Efficient Application tutorial for additional performance recommendations. Make sure to incorporate CDS Hooks Feedback into your processes in order to monitor acceptance of your decision support suggestions and to continuously improve over time.
Workflow Overview
Epic’s support for CDS Hooks is built on a workflow engine and CDS rule engine. Organizations using Epic can configure native CDS alerts by defining the workflow point at which they are triggered, known as the hook, and the criteria to evaluate when they are triggered. Epic’s implementation of CDS Hooks enables native criteria to call a remote CDS Hooks API when evaluating whether to show a CDS alert. When a hook is triggered and criteria are met, a CDS Hooks call is made to your endpoint with FHIR Prefetch data, both of which are configured by customer analysts when configuring your connection. Your CDS service evaluates context, makes additional FHIR API calls when necessary, and returns a CDS Hooks card response, which can include textual information, suggest discrete actions to be taken, or a link to your SMART app, all of which are embedded directly in the provider's workflow.
Technology Details
For step-by-step details of a CDS Hooks connection, start with our CDS Hooks Developer Tutorial.
For API-specific details of Epic's implementation of the CDS Hooks standard and supported APIs, see our Epic's CDS Hooks Support specification and search for CDS Hooks on the Epic on FHIR Specifications page.
Get Started
These connection practices have enabled many successful connections across our community. As every product has unique goals, we encourage you to review this approach with your customers to confirm the best fit.
If you're just getting started, check out our step-by-step Developer Guide.
Want a little extra help? Vendor Services offers an optional suite of benefits including the ability to request individualized assistance with your app's data exchange.
In addition, some product categories qualify for Toolbox support and designation on Showroom, which can accelerate implementation and enable you to highlight your product’s strengths. Explore the list of eligible categories and share your interest with us through the Technology Guidance form.
ED Pre-Arrival EMS Playbook
Emergency Medical Services (EMS) integrations help emergency departments prepare for incoming patients by exchanging identity, status, and clinical information before arrival. A common starting point is receiving a PDF “run sheet” for clinical review; more advanced connections add real-time ED “expect” notifications, discrete prehospital vitals, and continuous ETA updates so teams can allocate rooms, resources, and clinicians ahead of time.
This playbook outlines recommended practices using public interoperability standards (HL7® v2, FHIR®, SMART on FHIR) so EMS platforms can connect with healthcare provider organizations that use Epic.
Identity Matching
Use the FHIR Patient.$match (demographics) (R4) API to search for an existing high confidence patient match and retrieve the hospital MRN. If no match is returned, maintain the patient identity in your EMS system and plan to reconcile the patient information between systems after arrival—once the patient and Contact Serial Number (CSN) for the encounter has been created in Epic. CSN (is the unique identifier Epic assigns to each patient encounter and once created it does not change. See fhir.epic more information on patient matching and ID Types in FHIR APIs.
Pre-Arrival Notification
During transport, send HL7 v2 ADT A05 Incoming Patient Administration messages to create an expected ED encounter. When sending these messages, include PID demographics, ZAM-16 populated with your EMS Run ID, and a brief NTE that captures the chief complaint or mechanism of injury if available. Upon receiving a successful message, Epic will automatically generate the Epic CSN. To receive the Epic CSN value, process the associated outgoing (from Epic) ADT message for the patient encounter creation.
Encounter Linking
If a pre-arrival notification is not triggered from the EMS system, allow the health system to have already created the ED encounter through its user-based registration/ADT workflows and link to it in your system using the Epic CSN. Creating the ED encounter will trigger an outgoing ADT message which should be consumed from the Outgoing Patient Administration interface. After the CSN exists, include both the EMS Run ID and the CSN in all subsequent messages, and consume ADT A08 messages (demographic updates) and ADT A40 (merges) messages to keep your copy of the patient data synchronized with their system. ADT A31 messages will represent patient demographic updates and can be used to keep demographic information up-to-date in your (EMS) system.
Filing Vitals and Assessments
Transmit transport vitals and assessments via ORU^R01 messages using the Incoming Clinical Flowsheet Data interface as they are documented in your EMS system, ensuring OBR-7 reflects the collection time and OBX-14 is present for each measurement with units; as an alternative, it is acceptable to use FHIR Observation.Create (Vital Signs) (R4) resources to deliver the same content. When using FHIR to file vitals you will need to work with the corresponding health system to obtain the FHIR IDs for the relevant flowsheets during implementation.
Documents
File run sheets, ECGs, and images, to the health system or the health system’s document management system (DMS) using an MDM^T02 Incoming Scanned Document Link interface. You can send these assets after the health system assigns a Contact Serial Number (CSN) encounter identifier; if CSN is not yet available, queue the document messages and transmit them one once the CSN is available. Use descriptive titles such as ‘EMS Run Sheet – Unit 42’ to aid in clinical review of the assets.
Post Arrival Feedback
Allow the health system to return outcome data to the EMS system by consuming messages such as A08, A31, and A03, from Outgoing Patient Administration ADT interface for diagnoses, disposition, and the deceased indicator.
Identifier Patterns
Dual ID: Carry both the EMS Run ID and the CSN in all inbound and outbound messages to maintain reliable matching across systems and to simplify downstream troubleshooting.
Single ID: For workflows that rely solely on the CSN, hold any messages that require the encounter identifier—such as document links—until the patient is banded, and then send those messages using the CSN only.
Operational Notes
Security: Use Backend OAuth for server-to-server FHIR access and network configuration, such as VPNs and adding IPs to an allowlist for connecting to healthcare organizations via an interface. For more information about interfaces and connecting to healthcare organizations via an interface, see the Interfaces (HL7v2) article.
Testing: Engage the hospital’s interfaces team and include the EMS feeds in interface readiness testing as well as clinical mapped record testing to confirm correct filing and display.
Get Started
These connection practices have enabled many successful connections across our community. As every product has unique goals, we encourage you to review this approach with your customers to confirm the best fit.
If you're just getting started, check out our step-by-step Developer Guide.
Want a little extra help? Vendor Services offers an optional suite of benefits including the ability to request individualized assistance with your app's data exchange.
In addition, some product categories qualify for Toolbox support and designation on Showroom, which can accelerate implementation and enable you to highlight your product’s strengths. Explore the list of eligible categories and share your interest with us through the Technology Guidance form.
Specialty Registries Playbook
Specialty registries are used to track and analyze defined patient populations with specific conditions or procedures to improve care quality and patient outcomes or for research. This Playbook outlines the most common workflows used to extract data from Epic so that you can connect to a specialty registry or even build and maintain your own registry.
Getting Started
There are a few things to consider when building a specialty registry:
- Some data may reside in another system of record, outside of Epic (e.g. diagnostic images). To access data that does not reside in Epic, you may need to connect to other products.
- There may be data that exists in Epic but is not discretely documented. You may need to pull non-discrete data from Epic, such as notes, and then abstract the desired data from the note into discrete values that conform to the value set defined by the registry.
- Customer workflows and configuration can vary so your data extraction methods may need to be flexible. For example, customers could capture data in a custom flowsheet row that needs to be mapped in your solution.
Cohort and Trigger Definition
The first step when creating a specialty registry is identifying the target cohort. Start by writing a clear definition, such as “all patients with an active diabetes diagnosis” or “patients between the ages of 18 and 40 scheduled for orthopedic surgery.” Then, go a level deeper, for example, patients with specific ICD-10 codes, defining relevant time ranges. Depending on the data extraction method, you may need to deliver these details to the customer.
Once you have a clear population definition, evaluate whether your criteria are triggered by real-time workflow events such as supported HL7v2 interfaces (e.g. new orders placed), or if the registry is looking for past data (e.g., all patients with a specific condition that may have been entered years ago).
Additionally, determine what will trigger you to collect new data. This could be a workflow event like “annual diabetic check-up”, or you may decide to pull data on the patient population one time each quarter.
Data Extraction Methods
After defining the registry cohort, the next step is pulling the data that represents the relevant clinical event or timeframe. This could be done using various technologies, including SQL , event-based triggers, and bulk FHIR.
SQL Reporting
Epic provides a myriad of reporting tools that can often double as a way to extract information for third party integrations. This can be a good option if you can define the patient population in a way that can be translated into an Epic report. Depending on the extraction tool used, these reports can be run anywhere from daily to as frequently as a couple times an hour.
Reporting tools are a good choice for a broad array of use cases; however, it’s important to understand that it can be a lot of work for customers. You will need to provide customers with your inclusion criteria and the details of the patient data needed for the registry, and they will need to write a report to extract the corresponding data. Some customers have many business intelligence developers that can write queries to meet your needs, whereas other customers may not be able to prioritize these needs for some time. Optionally, you can choose to take on the report complexity, licensing Kit or Clarity through Vendor Services, and writing the SQL query to connect to customer environments and minimize the work each customer needs to complete.
Event-Based Interfaces and Additional APIs
HL7 and other standards-based interfaces can be used to trigger data extraction when certain events occur in Epic. These interfaces can send alerts for events such as admissions, discharges, or orders, as well as future events like scheduled appointments or surgeries. Using these messages as triggers allows you to know when to pull relevant data for specific patients. For example, if the defined cohort includes patients recovering from surgery, you can use the surgery scheduling event as a trigger. Once that event occurs, you can use FHIR APIs to retrieve the relevant clinical information such as lab results, observations, and encounters.
Event-based interfaces are most effective when your use case depends on real-time or near-real-time data. They are less suitable for condition-based registries that do not match to a triggered workflow event, such as those defined by diagnoses alone. If your use case requires timely updates tied to clinical activity, interfaces can be a good trigger method, complemented by FHIR queries to read supplemental data.
Bulk FHIR
Bulk FHIR is another option for extracting registry data, particularly when you need to pull information for a defined cohort on a set schedule (e.g. every two weeks for pediatric patients with type 1 diabetes). Using Bulk FHIR requires configuration from the health system, as they will need to create an analytics registry around specific inclusion criteria, within Epic. Once the registry is in place, you can use Bulk FHIR to query data for that cohort at regular intervals, in this case retrieving the most recent blood-sugar results.
Bulk FHIR can be a powerful tool, but it’s not intended for particularly large-scale, nor high-frequency extractions. We recommend keeping the cohort size around 1,000 patients or fewer to ensure good performance. For detailed setup steps and guidance on how to optimize your queries, refer to the Bulk FHIR Tutorial and accompanying best practice recommendations.
Get Started
These connection practices have enabled many successful connections across our community. As every product has unique goals, we encourage you to review this approach with your customers to confirm the best fit.
If you're just getting started, check out our step-by-step Developer Guide.
Want a little extra help? Vendor Services offers an optional suite of benefits including the ability to request individualized assistance with your app's data exchange.
In addition, some product categories qualify for Toolbox support and designation on Showroom, which can accelerate implementation and enable you to highlight your product’s strengths. Explore the list of eligible categories and share your interest with us through the Technology Guidance form.
Validating AI Features Playbook
Validating AI features is essential to ensuring that models are used appropriately, provide measurable value, and operate fairly across patient populations. While many health systems have governance processes in place, meaningful validation requires testing AI performance on local patient populations and workflows, as these can vary widely across care settings. Validation should also be ongoing rather than a one-time assessment, with continuous monitoring for accuracy and equity over time.
This playbook highlights how app developers can use Epic’s open-source, Python-based AI Trust and Assurance Suite to support standardized, repeatable evaluation of your AI models.
Connecting to the Data
To validate your AI feature, you’ll need access to the underlying data that reflects model inputs, real-world outcomes, and performance between relevant subgroups. Depending on your use case and the customer’s preference, this data can be provided through SQL-based reports or retrieved directly from Epic using FHIR APIs.
SQL
SQL can be used to extract the relevant data for validating the AI feature. You will need to provide customers with a list of data elements required to validate the AI feature; from there, they will need to write a report to extract the corresponding data. Once the report is complete, they will share the resulting dataset with you for use in your validation workflow.
Customers have varying levels of resources that they will be able to devote to writing these reports. Some customers may have several business intelligence developers to write the requested queries, while other customers may not be able to prioritize these needs for some time. Optionally, you can choose to take on the report complexity, licensing Kit or Clarity through Vendor Services, and writing the SQL query to connect to customer environments and minimize the work each customer needs to complete.
FHIR
For specialized models that require smaller amounts of data, you may choose to retrieve the necessary validation data directly from Epic using FHIR APIs. You can query specific resources such as Observations, Conditions, or Encounters, depending on what your AI feature requires.
Setup and Installation
Once you have extracted the necessary data from Epic and are storing it in your system, you can get set up with the Trust and Assurance Suite by following our installation instructions. there are many ways to customize the Seismometer notebook, including creating configuration files, creating a data dictionary, creating usage configuration, and more. For more information, refer to our Customizing the Notebook topic.
Using the Tools
Most health systems will expect you to conduct in-depth review to assess model performance, fairness, drift, and associated impact or outcomes. To conduct this review, you can utilize Seismometer for aggregating line-level metrics into healthcare-specific analysis, along with evaluation instruments that include healthcare-specific LLMs as a judge. For more information on the available tools and recommended workflows, check out the Evaluation Instruments page.
Workflow Considerations
Local organizational practices and workflows can heavily influence real-world performance of AI products. You should work directly with the customer on their local intake and validation processes to optimize workflow integration.
Get Started
If you're using FHIR, check out our step-by-step Developer Guide.
Are you interested in using kit or Clarity, or looking for a little extra help? Vendor Services offers an optional suite of benefits including the ability to request individualized assistance with your app's data exchange.
Follow the steps above to install and use the AI Trust and Assurance Suite.
If you create guidance on how to extract data from your system for use with the Trust and Assurance Suite, and would like to publish it with our materials, feel free to contact us.
In addition, some product categories qualify for Toolbox support and designation on Showroom, which can accelerate implementation and enable you to highlight your product’s strengths. Explore the list of eligible categories and share your interest with us through the Technology Guidance form.
CMS-0057 Prior Authorization Playbook
CMS-0057 Prior Authorization APIs
We have released a comprehensive suite of APIs in support of the CMS-0057 regulation and its goal of modernizing prior authorization processes. These APIs enable real-time, electronic exchange of prior authorization requests and decisions, reducing administrative burden and accelerating access to care for patients.
Prior authorization is a process used by payers to determine whether a requested healthcare service, procedure, or medication meets coverage requirements before the service is delivered. Traditionally, this process has relied on manual workflows including phone calls, faxes, and portal submissions, often resulting in delays, incomplete documentation, and extended turnaround times.
Improving prior authorization efficiency benefits both healthcare systems and payers by reducing administrative costs, minimizing rework, and streamlining utilization management workflows. For patients, faster authorization decisions mean reduced delays in accessing necessary care, fewer appointment cancellations, and improved health outcomes. The CMS-0057 regulation mandates that payers respond to expedited authorization requests within 72 hours and standard requests within 7 calendar days, making automated workflows essential for compliance.
The Three Components of Electronic Prior Authorization
Prior authorization using FHIR APIs is built on three integrated Da Vinci implementation guides that work together to create an end-to-end electronic workflow:
Coverage Requirements Discovery (CRD)
CRD enables providers to receive real-time coverage information directly within their EHR workflow. When an order is placed or an appointment is booked, CRD automatically checks with the payer to determine whether prior authorization is required, what documentation is needed, and whether there are any coverage restrictions. This proactive approach helps providers understand authorization requirements before submitting a request, reducing denials and rework.
Our CRD Response Formatting Guide can be found here.
Documentation Templates and Rules (DTR)
DTR streamlines the collection of required documentation by presenting dynamic, payer-specific questionnaires directly within the EHR. DTR uses embedded clinical logic to ask context-specific questions, ensuring that providers supply complete and accurate documentation the first time. Once documentation is complete, the EHR compiles this clinical information into an authorization request.
Prior Authorization Support (PAS)
PAS automates the electronic submission and tracking of prior authorization requests. The payer system confirms receipt and returns either an approval with an authorization number, a denial with specific reasons, or a pended status requesting additional information. Providers can track authorization status in real-time without phone calls or portal logins.
Accessing Epic Prior Authorization APIs
Epic's prior authorization APIs are available through both Vendor Services and Epic on FHIR via the self-service app creation process.
Epic community members can register their applications on either site to access these APIs and begin integration with Epic customers. Non-community members can join Vendor Services to create applications, receive general technical support, and access limited connectivity testing. Epic on FHIR offers free app creation services and API access to all developers.
Prior Authorization API functionality is released in the February 2026 version of Epic. We recommend working closely with health systems/health plans to ensure alignment on configuration, testing timelines, and go-live readiness.
The APIs were constructed around the Da Vinci 2.1 FHIR IG, though it does not follow it exactly. For more information, please view individual APIs on the "API Specifications" tab of Epic on FHIR or Vendor Services. Our documentation will continue to evolve and upgrade to provide clarifying information as we adapt to this space.
Note: Some APIs have recently changed names - this will not affect functionality. This list should reflect the most updated API namesI am a...
Health System Connecting with an Epic Payer
Create an application with a "Backend Systems" context, select the Use Case of "CMS Prior Auth", and add the following Incoming and Outgoing scopes:
CRD
Incoming:
Outgoing:
DTR
Incoming:
- Questionnaire.$questionnaire-package (R4)
- Questionnaire.$next-question (R4)
- ValueSet.$expand (DTR Payer Guidelines) (R4)
- Questionnaire.$log-questionnaire-errors (R4)
PAS
Incoming:
- Claim.$submit (Prior Auth) (R4)
- Claim.$inquire (Prior Auth) (R4)
- $submit-attachment (Prior Auth) (R4)
Outgoing:
Note: Epic health systems making this connection will additionally need to download the application from the connecting group.
Payer System Connecting with an Epic Provider
Application #1: Clinicians, Staff, or Administrative Users app
Create an application with a "Clinicians, Staff, or Administrative Users" context, select the Use Case of "CMS Prior Auth", and add the following Incoming and Outgoing scopes:
CRD
Required:
Incoming:
- ServiceRequest.Update (Prior Auth) (R4)
- MedicationRequest.Update (Prior Auth) (R4)
- ServiceRequest.Read (Prior Auth) (R4)
- ServiceRequest.Search (Prior Auth) (R4)
- Appointment.Read (Prior Auth) (R4)
- Appointment.Search (Prior Auth)
- MedicationRequest.Read (Prior Auth) (R4)
- MedicationRequest.Search (Prior Auth) (R4)
- Coverage.Read (Patient Insurance Information) (R4)
- Coverage.Search (Patient Insurance Information) (R4)
- Patient.Read (Demographics) (R4)
- Patient.Search (Demographics) (R4)
Outgoing:
Additional scopes to consider (will vary based on your implementation and the resources your CRD service needs to access):
Incoming:
- Encounter.Read (Patient Chart) (R4)
- Encounter.Search (Patient Chart) (R4)
- Location.Read (Organizational Directory) (R4)
- Location.Search (Organizational Directory) (R4)
- Practitioner.Read (Organizational Directory) (R4)
- Practitioner.Search (Organizational Directory) (R4)
- PractitionerRole.Read (Organizational Directory) (R4)
- PractitionerRole.Search (Organizational Directory) (R4)
- Organization.Read (Organizational Directory) (R4)
- Organization.Search (Organizational Directory) (R4)
Review the complete list of available scopes to determine which additional resources your implementation requires.
Application #2: Backend Systems App
Create an application with a "Backend Systems" context, select the Use Case of "CMS Prior Auth", and add the following Incoming and Outgoing scopes:
DTR
Outgoing:
- DTR Outgoing Questionnaire.$questionnaire-package
- DTR Outgoing ValueSet.$expand
- DTR Outgoing Questionnaire.$next-question
- DTR Outgoing Questionnaire.$log-questionnaire-errors
PAS
Incoming:
Outgoing:
- PAS Outgoing Claim.$submit
- PAS Outgoing Claim.$inquire
- PAS Outgoing Parameters.$submit-attachment
- PAS Claim Response Submit
Note: Epic payer systems making this connection will additionally need to download both applications from the connecting group.
Delegate for CRD/DTR/PAS Connecting with an Epic Payer
If your organization handles CRD, DTR, or PAS on behalf of an Epic payer under a delegation arrangement, you'll connect using the same applications and scopes as a payer system connecting with an Epic provider, since you're acting as the payer-side responder for the delegated component(s).
Application #1: Clinicians, Staff, or Administrative Users app
Create an application with a "Clinicians, Staff, or Administrative Users" context, select the Use Case of "CMS Prior Auth", and add the following Incoming and Outgoing scopes:
CRD
Required:
Incoming:
- ServiceRequest.Update (Prior Auth) (R4)
- MedicationRequest.Update (Prior Auth) (R4)
- ServiceRequest.Read (Prior Auth) (R4)
- ServiceRequest.Search (Prior Auth) (R4)
- Appointment.Read (Prior Auth) (R4)
- Appointment.Search (Prior Auth)
- MedicationRequest.Read (Prior Auth) (R4)
- MedicationRequest.Search (Prior Auth) (R4)
- Coverage.Read (Patient Insurance Information) (R4)
- Coverage.Search (Patient Insurance Information) (R4)
- Patient.Read (Demographics) (R4)
- Patient.Search (Demographics) (R4)
Outgoing:
Additional scopes to consider (will vary based on your implementation and the resources your CRD service needs to access):
Incoming:
- Encounter.Read (Patient Chart) (R4)
- Encounter.Search (Patient Chart) (R4)
- Location.Read (Organizational Directory) (R4)
- Location.Search (Organizational Directory) (R4)
- Practitioner.Read (Organizational Directory) (R4)
- Practitioner.Search (Organizational Directory) (R4)
- PractitionerRole.Read (Organizational Directory) (R4)
- PractitionerRole.Search (Organizational Directory) (R4)
- Organization.Read (Organizational Directory) (R4)
- Organization.Search (Organizational Directory) (R4)
Review the complete list of available scopes to determine which additional resources your implementation requires.
Application #2: Backend Systems App
Create an application with a "Backend Systems" context, select the Use Case of "CMS Prior Auth", and add the following Incoming and Outgoing scopes:
DTR
Outgoing:
- DTR Outgoing Questionnaire.$questionnaire-package
- DTR Outgoing ValueSet.$expand
- DTR Outgoing Questionnaire.$next-question
- DTR Outgoing Questionnaire.$log-questionnaire-errors
PAS
Incoming:
Outgoing:
- PAS Outgoing Claim.$submit
- PAS Outgoing Claim.$inquire
- PAS Outgoing Parameters.$submit-attachment
- PAS Claim Response Submit
Note: Delegates that are Epic instances making this connection will additionally need to download both applications from the connecting group, and should confirm with the delegating payer which of CRD, DTR, and PAS they are responsible for under the delegation arrangement.
Get Started
These connection practices have enabled many successful connections across our community. As every product has unique goals, we encourage you to review this approach with your customers to confirm the best fit.
If you're just getting started, check out our step-by-step Developer Guide.
Want a little extra help? Vendor Services offers an optional suite of benefits including the ability to request individualized assistance with your app's data exchange.
In addition, some product categories qualify for Toolbox support and designation on Showroom, which can accelerate implementation and enable you to highlight your product’s strengths. Explore the list of eligible categories and share your interest with us through the Technology Guidance form.
CMS-0057 Access Playbook
We have released 70+ APIs to support the CMS-0057 regulation and its goal of improving interoperability between payers, providers, and patients. These APIs enable secure, standardized access to payer-held data that is required for patient access, provider access, and payer-to-payer data exchange.
These APIs are designed to simplify how payer information is exchanged, making coverage and prior authorization processes more transparent and predictable while helping support timely access to care. Standardized APIs allow payer data to be exchanged electronically and in real time, reducing reliance on manual processes.
These capabilities also support patient access by enabling individuals to electronically access their own health and coverage information through their application of choice. Tapestry customers with Autodownloads turned on will automatically connect with patient access applications. Patients just need to authenticate with MyChart and then they will be able to access their own data.
For Epic customers, these APIs provide a scalable, standards-based way to exchange payer data without requiring payer-specific custom integrations. Customers benefit from fewer manual workflows, improved patient transparency, and an interoperability model that aligns with current and future federal requirements.
Patient Access
Patient Access enables individuals to use patient-facing applications to electronically retrieve their payer-held data through a defined set of patient-facing FHIR APIs. These applications connect to Epic payer systems to access data that is available through the patient access APIs.
Patient-facing apps allow patients to review the data being requested, grant access to the app, and view their own data. Patients can revoke that access at any time, giving them ongoing control over how their information is shared.
Automatic Client Distribution
Epic supports an auto-download capability for eligible patient-facing applications. When auto-download is enabled, qualifying apps are automatically made available to Epic payer environments without requiring manual customer configuration.
To create an application that qualifies for automatic client distribution, the app developer should:
- Create an app on Vendor Services or Epic on FHIR.
- Select "Patients" as the primary user.
- Select "Enable Autodownload".
- Select "CMS Patient Access API".
- Scope the filtered APIs.
- Click "Save".
Provider and Payer-to-Payer Access
Provider access and payer-to-payer access support system-to-system exchange of payer data. These use cases enable payers to share information with other payers and allow providers or third-party systems to access payer-held data required for coverage determination, prior authorization workflows, and continuity of care.
Client Registration
Provider and payer-to-payer access are enabled through a manual client registration process.
To create a client ID for either the provider or the payer-to-payer use case, the provider/payer organization should:
- Create an app on Vendor Services or Epic on FHIR.
- Select "Backend Systems" as the primary user.
- Select your use case:
- CMS Provider Access API.
- CMS Payer-to-Payer API.
- Scope the filtered APIs.
- Click "Save".
Configuration
After you create a client ID, you will need to work with individual Epic payer organizations so that they can configure your client ID in their system.
For payer-to-payer exchange, bidirectional communication requires both payer systems to be registered. When a non-Epic payer is involved, the non-Epic payer should create a client ID and provide it to the Epic payer so access can be configured.
Get Started
These connection practices have enabled many successful connections across our community. As every product has unique goals, we encourage you to review this approach with your customers to confirm the best fit.
If you're just getting started, check out our step-by-step Developer Guide.
Want a little extra help? Vendor Services offers an optional suite of benefits including the ability to request individualized assistance with your app's data exchange.
In addition, some product categories qualify for Toolbox support and designation on Showroom, which can accelerate implementation and enable you to highlight your product’s strengths. Explore the list of eligible categories and share your interest with us through the Technology Guidance form.
Radiation Therapy Treatment Management System Playbook
Radiation Therapy Treatment Management System Playbook
A radiation therapy Treatment Management System (TMS) is a central hub for patients’ radiotherapy treatment plans and manages sending those plans to treatment modalities (e.g., linear accelerators and brachytherapy systems) and receiving and storing records of those treatments. A TMS can focus on plan management, safety, and tracking, leaving other tasks like scheduling, note-taking, and charging to the EHR. This Blueprint describes the recommended integration between a TMS and Epic for smooth workflows between the two systems.
Getting information from Epic
- Use the Outgoing Patient Administration Interface (ADT) to receive patient information (MRNs, encounter IDs, demographics) from Epic.
- Use Patient.$match (Patient Match) (R4) to retrieve additional patient demographic information.
Sending information to Epic
- Use Exchange of Radiotherapy Treatment Summaries (XRTS) FHIR APIs to report treatment planning and delivery for each patient from the TMS to Epic.
- Refer to our XRTS FHIR API Tutorial for additional details.
Additional features
- If your product captures charges, use the Incoming Financial Transactions Interface to send dropped charges to Epic.
- If your product creates notes or other documents, use the Incoming Scanned Documents Interface to send these documents to Epic.
- If your product has user interface for clinicians, use SMART on FHIR EHR launch to enable single-sign-on behavior from Epic.
- If your product retrieves cancer staging information, use the Condition.Search (Problems) (R4) to retrieve cancer staging information from patient problem lists in Epic.
Get Started
These connection practices have enabled many successful connections across our community. As every product has unique goals, we encourage you to review this approach with your customers to confirm the best fit.
If you're just getting started, check out our step-by-step Developer Guide.
Want a little extra help? Vendor Services offers an optional suite of benefits including the ability to request individualized assistance with your app's data exchange.
In addition, some product categories qualify for Toolbox support and designation on Showroom, which can accelerate implementation and enable you to highlight your product’s strengths. Explore the list of eligible categories and share your interest with us through the Technology Guidance form.
XRTS FHIR API Tutorial
Overview
While some Treatment Management Systems(TMS) support limited data exchange using custom HL7 v2 interfaces for radiation treatments, the industry standard for this type of communication is now XRTS (Exchange of Radiotherapy Summaries), a FHIR implementation guide designed jointly by members of CodeX and IHE.
FHIR Resource Structure
The key elements of XRTS are variations on three FHIR resources: BodyStructure, ServiceRequest, and Procedure.
The XRTS profile of BodyStructure, Radiotherapy Volume, is used to describe a volume of patient anatomy which needs to be specifically identified as part of radiotherapy planning or delivery. The other resources point to Radiotherapy Volume to identify patient-specific targets of radiation.
The core of the XRTS model is a representation of radiotherapy treatment with three levels of specificity.
- A plan is the most specific: a single series of treatments with fixed details (total dose, fractionation, technique, and volumes to be treated).
- A phase is a container for a plan, so that if a plan adaptation must occur, when the plan is replaced, continuity is maintained by making the original plan and adapted plan part of the same phase.
- A course is a container for one or more phases which the oncologist considers related, such as multiple lines of treatment for a single disease or several treatments for related targets, like metastatic sites.
Typically, a patient’s radiotherapy regimen is captured in a single course and organized into one or more phases. In the simplest case, each phase is instantiated in just one plan (no change to dosing or fractionation, all fractions identical), but if plan adaptation is required, then the sequence of plans is collected within the phase that represents that one series of fractions over time.
These three levels of detail can be represented in three different stages of development:
- The prescribed stage is when an oncologist has declared an intention to treat a given patient with radiotherapy. At this stage, the course and phases may contain information about the disease and anatomy to be targeted, the expected treatment technique and fractionation, and so on.
- When a treatment plan is generated for the prescription, then the resources are in the planned stage. At this point, more definite detail is expected in the resources (dosing and fractionation, exact technique, etc.). A resource in the planned stage should contain a reference to the prescribed resource that it corresponds to (course to course, phase to phase; it is not expected that plan resources exist before the planned stage, though it is not prohibited).
- Once the first treatment starts, the resources are in the treated stage. Each treated resource carries information about what radiotherapy doses have actually been delivered, linking back to the planned resources corresponding to each.
In total, these six aspects work out into nine different representations:
| Prescribed | Planned | Treated | |
|---|---|---|---|
| Course | Course Prescription | ← Planned Course | ← Course Summary |
| Phase | Phase Prescription | ← Planned Phase | ← Treated Phase |
| Plan | Plan Prescription | ← Treatment Plan | ← Treated Plan |
The diagrams the FHIR implementation guide help to further clarify these relationships.
In FHIR, the prescribed and planned resources are instances of ServiceRequest, and the treated resources are instances of Procedure. The XRTS implementation guide describes in detail how variations on ServiceRequest and Procedure correctly represent each specific scenario and how Procedures and ServiceRequests may be reference one another because of their relationships. For instance, a Procedure may be based on a ServiceRequest (treatment as a fulfillment of a plan), and a ServiceRequest may be part of another ServiceRequest (a phase within a course). To indicate on each resource exactly what is meant, use the prescribed profile URLs and values for the category, code, and intent elements. These are the values that distinguish course, phase, and plan.
All XRTS APIs:
| BodyStructure | Create | Read | Search | Update |
| Procedure | Create | Read | Search | Update |
| ServiceRequest | Create | Read | Search | Update |
Workflow for Data Exchange
Basic Interactions
As part of XRTS, the resources listed above can be sent to Epic (FHIR create and update) and can then be retrieved from Epic (FHIR read and search). These resources include references to other resource types, like Patient, Practitioner (i.e., provider), and Location (e.g., department). These other resources will already exist within Epic, and you will receive them through the Outgoing Patient Administration Interface (ADT).
Use Patient.$match with shared demographic information (received through ADT) to get the patient’s FHIR ID and additional patient demographics, if desired. Use Practitioner.Search with shared practitioner information to get the practitioner’s FHIR ID and practitioner information. Use Location.Search with shared location information to get the location’s FHIR ID and location information. We recommend that you cache these existing FHIR resource IDs instead of looking them up for every interaction, because they are almost always static and only change in rare circumstances (like merging duplicate patient records).
Order of Operations
When a TMS first provides a set of resources to Epic, it’s necessary to send the resources in the right order, since some are dependent on others because of reference chains. For example, a TMS must know the resource ID of the Patient before executing a BodyStructure.Create, since the BodyStructure resource must contain a FHIR reference to the patient whose anatomy is described. Likewise, a TMS must create the BodyStructure before a ServiceRequest or Procedure since each must contain a reference to the BodyStructure that is being treated.
With your prerequisite identifiers established, call BodyStructure.Create first. When the create interaction is successfully executed, Epic will return its resource ID to your app, which you can cache with the volume in your database and use for all FHIR references to that object.
When creating a course, whether prescribed, planned, or treated, the course resource must be sent first, followed by its phases, followed by its plans. Each plan contains a reference to the phase that it belongs to, and each phase contains a reference to the course that it belongs to, so the resource must exist in Epic and have a resource ID assigned before you construct and send a resource that references it.
Usually, a treated-type resource also points to the planned-type resource which it fulfills, which also works only if the planned resource exists in Epic and has been assigned a resource ID before the treated resource is sent. (For emergency treatment where the standard treatment planning process is not used, it is acceptable to send the treated resources with no planned resources. However, anytime planned resources exist, the treated resources must include references to the planned resources that they correspond to.)
For update interactions, the order of operations only matters if the updated resource contains references to new resources. For instance, you can update multiple phases and plans in any order if you are only changing dose values and fractionation. But you cannot update a course to include a new target volume before creating the BodyStructure resource in Epic.
Expected Timing of Communication
Resources are generally expected to be sent to Epic approximately in real time after the relevant event occurs in the TMS:
- When an oncologist approves a prescription, create the target volumes, course, phases, and plans in Epic through XRTS so that the patient’s expected radiation is visible right away.
- When a treatment session is completed, create or update the treated course, phases, and plans in Epic through XRTS right away so that the record of the patient’s treatment progress is up to date and can be correctly included in, for example, notes that must be written for accreditation purposes.
- When a phase or course is completed, update the treated and planned resources with the appropriate status change so that clinicians can tell in Epic that treatment is ended.
App Developer Guidelines
Overview
As an app developer, it is important to be familiar with and practice principles for responsible healthcare app development. If your app connects to Epic, you and your apps are strongly encouraged to practice the App Developer Guidelines, detailed below. If you have any questions about these guidelines, please contact us at open.epic.com/Home/Contact.
App Developer Guidelines
Epic recommends apps adhere to the following principles:
- Safety. The app does not put patients or others at risk of harm.
- Security. The app does not introduce security vulnerabilities, cause security breaches, or increase the risk in either end users’ or Epic Community Members’ systems.
- Privacy & Data Use. The app respects the privacy of patients and their families, clinicians, other end users, and everyone else.
- Reliability. The app behaves as expected, delivering the right data at the right time. It is consistent and predictable.
- Scalability. The app is stable and does not negatively impact operations for users or Epic Community Members. The app performs as expected at scale and does not generate excessive or unexpected load on a user’s or Epic Community Member’s system.
- Data Integrity. The app does not corrupt or otherwise cause material inconsistencies in end users’ or Epic Community Members’ data(d)(2).
- System Integrity. The app does not cause the end users’ or Epic Community Members’ other systems to behave inaccurately or unexpectedly.
- Transparency & Honesty. The app and developer do not misrepresent products, product capabilities, business relationships, timelines, or anything else related to Epic or open.epic in any way.
- Intellectual Property. The app and developer protect the intellectual property of the developer, Epic, and the Epic Community Member.
1. Safety
-
Usability. The app reasonably adheres to usability standards that impact patient safety, specifically safety-enhanced design(g)(3) and accessibility-centered design(g)(5). Examples of usability standards and tools to consider include ISO 9241, NISTIR 7804-1, and those available on digital.gov.
- The app incorporates Epic Community Member feedback into product design decisions to fit the app into the user’s workflow as smoothly as possible.
-
Patient Search. If the app allows an end user to search for a patient record, the app collects enough information from the end user to uniquely identify the correct patient record or displays enough information to the end user to enable the end user to uniquely identify the correct patient record(g)(7).
- Epic strongly recommends apps require all of the following 3+1 demographics criteria:
- Patient First and Last Name,
- Legal Sex,
- Date of Birth, and
- At least one additional identifier such as MRN, address, phone number, or email.
- Refer to the Patient Searching and Matching tutorial for guidance on how best to implement patient searching or matching for a given app type.
- Epic strongly recommends apps require all of the following 3+1 demographics criteria:
- Patient Identity. If the app is launched within an Epic patient workspace for patient-specific workflows, the app maintains the patient identity within the session. If the app is launched separately for patient-specific workflows, the app prominently displays the patient’s identifying information to avoid any confusion by the end user about which patient’s record they are interacting with.
- Accurate Display. If the app displays patient data (e.g., medications, observations, conditions), the app does so accurately.
-
Data Separation. The app presents data in such a way that the end user is reasonably able to complete workflows without being required to remember information while jumping between screens/displays. Such a design may contribute to errors when making clinical decisions.
- The app ensures the user can visually confirm they are accessing the correct patient record.
- Updated Data. The app provides users with a way to see when data was last updated so they may recognize if there may be new information they are not yet seeing.
- TALLman. If the app assists clinicians with patient-care decisions, the app displays any medications from ISMP’s list of commonly confused drug names using TALLman lettering.
-
Selection Lists. If the app permits an end user to select options from a list, then the app makes obvious to end users that they are selecting from a list. Additionally:
- If the app displays only a portion of the list from which the end user may select, then the app makes obvious to the end user that additional options are available. This helps prevent end users from selecting a less desirable option from a shorter list than should have been considered or making decisions with incomplete information.
- Lists do not include irrelevant options that, if selected, could have negative outcomes.
- Consistency. The app uses a consistent user interface so end users know what to expect when moving between screens.
- Transparent Calculations. The app makes obvious to the end user whenever it stores or displays data that does not match what the end user entered (e.g., automatically converting weight from pounds to kilograms) or the factors that influence a calculation and how it should be interpreted.
- Reviewing and Correcting Data Entry. The app allows end users to review data that they enter into the app and make corrections as needed.
- Abbreviations. The app uses abbreviations appropriately and avoids those that could be misinterpreted or easily mistyped. (E.g., the app does not use “l” or “k” instead of “lb” or “kg” for weight entry. The “l” and “k” keys are next to each other on the keyboard.)
-
Manage Errors Gracefully. The app expects that end users or systems will act in error and gracefully manages errors, guiding end users to appropriate error resolution. Developers should review the list of possible errors and faults included in the documentation for each API and verify that the app is coded to appropriately handle those error conditions, including scenarios that should be theoretically impossible. In addition to the error conditions listed in the API documentation, ensure the app can handle any HTTP errors it may encounter as well. To the extent necessary to avoid unsafe circumstances:
- The app notifies end users of errors or potential errors that impact the proper or safe use of the app (e.g., if the data entered by an end user is unrealistic regarding magnitude, format, data type, etc., then the app notifies the end user of the potential error).
- The app notifies the right end user of the error or potential error at the right time in the right workflow.
- The app explains errors or potential errors to the end user in a clearly understandable manner (e.g., not an overly technical explanation).
- The app displays errors or potential errors in an internally consistent manner. For example, the app uses colors and symbols in error or potential error messages consistently.
- The app explains actionable steps that the end user may take to address the error or potential error.
- The app does not permit the end user to remain in a problematic error state.
-
Manage Interruptions Gracefully. The app is designed with the expectation that end users or systems will experience interruptions and gracefully manages such interruptions. To the extent necessary to avoid unsafe circumstances:
- The app manages workflow and connection interruptions, handling partially completed workflows or data entry in a manner that minimizes end user or system errors or potential errors.
- If the app may be accessed or viewed during a loss of connection and could display information that relies on the connection for updates, accuracy, or completeness, the app notifies the end user that the data displayed may be out of date.
- Critical Issues. The developer maintains processes with appropriately urgent timelines for addressing and notifying Epic Community Members of critical issues, such as potential patient safety concerns.
2. Security
-
Protect Data at Rest. The app encrypts data stored in non-volatile storage using industry-standard encryption algorithms, such as AES-128 or higher. If encryption keys must be written to disk, then:
- The app makes appropriate use of key storage functionality provided by the host platform/operating system.
- The app requires the administrative user to authenticate to gain access to the encryption keys.
- Protect Data in Transit. The app supports securing and sending/receiving data secured with the TLS 1.2 or higher encryption protocol. The app verifies that the server’s TLS certificate is valid and signed by a certificate authorized, recognized, and trusted by the host operating system. Data exchange between your app and Epic’s APIs and between your app and any other system should be secured with industry standard encryption while in transit(d)(9) and use authentication and authorization protocols(d)(1).
-
Minimize Use of Protected Health Information. The app does not request or store more protected health information than needed.
- The app is scoped for only the APIs required for the integration. Apps should not be scoped for unused APIs as this unnecessarily increases the amount of data that may be exposed to the app.
-
Single Sign-On and Authentication. The app supports single sign-on when appropriate. Best practice for authentication and authorizing access is to use OAuth 2.0. Use of other authentication mechanisms such as SAML, HTTP basic authentication, mutual TLS with client credentials or encrypted query strings with shared keys may be appropriate in limited scenarios but should be considered on a case-by-case basis. Other authentication mechanisms typically do not support fine-grained resource authorization, so that should be considered. The app complies with best practices related to the invalidation/rotation of security tokens and inactivity timeouts. For more guidance regarding OAuth 2.0 and Epic's recommended practices for implementing OAuth 2.0, review the OAuth 2.0 resources below:
- OAuth 2.0 Specification - This document is a technical specification for using OAuth 2.0 with Epic.
- OAuth 2.0 Tutorial - This tutorial provides guidance for defining your OAuth app architecture.
-
Client IDs. The app properly incorporates its assigned client ID into all API calls and uses of other technologies that support client IDs.
- The app keeps client identifiers confidential and does not disclose them to any other party or use them for any other purpose.
- Each app has its own unique client identifier.
- Apps that are confidential clients and using refresh tokens keep their client secret safe.
- Handling Authentication Credentials. The app protects authentication credentials provided by Epic or Epic Community Members, such as usernames, passwords, access tokens, or refresh tokens. Credentials used to access Community Members’ Epic software should be unique to each Epic Community Member and should only be used in conjunction with Epic APIs. If the app needs to persist this data to non-volatile storage, it uses approved secure storage functionality provided by the host platform/operating system.
- Handling User Credentials and Other Sensitive Data. If the app prompts the user for credentials, biometric data, or other sensitive information such as personally identifiable information, credit card numbers, or financial account information, the app protects this data. If the data must be written to non-volatile storage, it should never be stored in clear text. The app makes use of one-way hashing algorithms such as SHA-256 or secure storage functionality provided by the host platform/operating system to persist this data. The app should secure all data on an end-user’s device(d)(7)(d)(8) and enforce inactivity time-outs (d)(5).
- Software Implementation of Cryptography and Authentication. For performing low-level cryptography and authentication operations, the app leverages well-known, established software packages that are actively maintained and have published processes for reporting and responding to security vulnerabilities. Developers are strongly discouraged from implementing custom cryptography or authentication functionality.
-
Addresses Security Risks. The app accounts for commonly known security vulnerabilities, such as those described in OWASP Top 10 and addresses any applicable vulnerabilities. For example:
- All data entered by an end user should be strictly validated or escaped prior to rendering, passing to a database, or sending to an external API. Prior to invoking an API, the App validates that all user-supplied input values conform to the expected format described in the API documentation. The app takes reasonable steps to prevent a user from accidentally or purposefully entering obviously invalid data to be passed to an API.
- The app employs standard protective measures against cross-site scripting attacks.
- PHI-safe Non-Production Customer Connections. The app uses PHI-safe, production-like protections in all customer environments, even in non-production testing environments. Any connection to a customer's Epic environment, even non-production environments like POC and TST, has the potential to access PHI.
- HIPAA: Non-production customer connections to the app should meet data handling requirements for HIPAA.
- Access: Control and provisioning of access to customer non-production connections should be handled the same as production connections.
- Code and testing: The developer should have the same requirements for development and testing of code before it is deployed to both non-production and production customer connections.
- Change control: Change control, deployment, and release should be handled similarly between non-production and production, including access to introduce changes and deploy changes.
3. Privacy and Data Use
- Data Use Questionnaire. For a patient app, the developer has clearly, accurately, and completely responded to the Data Use Questionnaire. If the responses to the Data Use Questionnaire become out of date or inaccurate, then the Developer promptly submits updated and accurate responses by creating and distributing a new app.
-
Data Use Policy. The developer provides patient users and Epic Community Members with a clear and understandable data use or privacy policy that includes, at minimum, an accurate and truthful explanation of the following:
- Any data elements that the developer or app obtains from or writes to a Community Member’s Epic environment
- How and where the developer or app uses data
- Whether the developer or app retains data
- The length of time that the developer or app retains data
- Any secondary uses of data, including transfer of data to a third party or third-party product, or any access to data provided by the developer or app to any third party or third-party product
-
Obtain Consent. The developer obtains consent from patient users and Epic Community Members to obtain, write, or retain data and for any secondary use of or access to data, including transfer to or use by a third party or third-party product. The Developer obtains updated consent to obtain, write, or retain additional data and for additional secondary uses. The developer does not circumvent the display of any authentication or authorization mechanisms from Epic or any Epic Community Member.
A patient app provides patient users with options to give such consent, decline such consent and, if such consent has been given, to revoke such consent. If a patient app establishes a persistent connection to a Community Member’s Epic Environment on behalf of a patient user (e.g., by use of a refresh token), then the developer has a HIPAA-compliant Business Associate Agreement with the Epic Community Member, or the app informs the patient user of the period of time for which the app is seeking authorization and obtains the patient user’s consent to access, obtain, and use data for that period.
-
Appropriate Use. The developer accesses and uses data appropriately, as described below.
- The developer and app do not provide data or access to data to any third party or third-party product without consent from patient users and Epic Community Members.
- The developer and app do not use data for direct-to-consumer marketing or advertising without consent from patient users and Epic Community Members.
- The developer and app do not sell data to third parties.
- The developer and app may access only the data described in the developer’s data use or privacy policy, discussed above, and agreed to by the patient user and Epic Community Members.
- The developer and app use data only for the purposes described in the developer’s data use or privacy policy, discussed above, and agreed to by the patient user and Epic Community Members.
- Record Use. When the developer or app uses, retains, or distributes data, the developer or app documents who used, retained, or distributed what data, when they did so, and for what purpose they did so. The developer or app provides the patient user and Epic Community Member access to that documentation upon request. The developer does not prohibit Epic Community Members from sharing that documentation with Epic.
- Cease Use, Delete or Correct Data. The developer or app provides a method for patient users and Epic Community Members to stop the app from reading, writing, or retaining data and to delete or correct retained data. The developer or app provides clear and prominent notice to patient users and Epic Community Members of how to use these methods.
Note: Obligations related to patient users only apply if the app is a patient app.
4. Reliability
- Stability. Software must work. The app must not crash, hang, or lead to exhaustion of compute resources under typical use.
- Predictable behavior. Given the same inputs, the app yields consistent results, with no unexplained variability.
- No surprises. The app avoids “silent failures”. Every significant action leaves an observable trail (logs, audit records, or UI confirmation).
- Version consistency. Each release behaves as documented, with backward compatibility for APIs or interfaces unless deprecation is clearly communicated in advance.
- Monitoring & alerting. Apps include health checks, heartbeat monitoring, and robust logging. Developers work with Epic Community Members to monitor impact on the Community Member’s system.
- Business Continuity. Developers have redundancies in place such that users experience less than 1% downtime. Developers offer resources to mitigate the impact of disruptions to their service.
5. Scalability
-
System Impact. The app consumes no more than 1% of overall Epic operational database (ODB) system resources during peak hours and consumes no more than 5% of overall ODB resources during non-peak hours. Peak hours are typically 7:00 am to 7:00 pm local time, though such times may vary by Community Member.
- If the app makes a significant number of API calls, the developer or app should provide programmatic guardrails and be able to monitor and throttle API call volumes if necessary to mitigate system load impact.
-
Reasonable Initial Load Response Time. If the app is embedded within Epic user workflows, then the app has an average initial load response time (i.e., the amount of time from when the user first launches the app until it is ready for user interaction) of 1.5 seconds or less. If the app loads incrementally, then the app can be considered ready for interaction before completely loading, if the user can reasonably interact with the app at that time. If the app does not meet this threshold, then the app:
- Shows a loading indicator with its specific branding while loading.
- Has an average initial load response time of 3 seconds or less.
- The app’s load response times are not consistently greater than 5 seconds.
-
Document Expected Performance Impact. The documentation for the app clearly and prominently discloses the app’s expected performance impact to the Epic Community Member prior to planning a production go-live date.
- If the developer expects an increase in API traffic, they work with the Epic Community Member to review the potential impact and ensure the Epic Community Member system is prepared for the change.
For guidance on creating a performant app please see Designing an Efficient Application.
6. Data Integrity
- Recommended Configuration. In order to reduce the likelihood of adverse data integrity issues, the app conforms to all interface design and configuration recommendations provided by Epic.
-
Appropriate Methods of Data Exchange. The app uses only appropriate, as determined by Epic, industry-standard or Epic-published methods to obtain data from or write data to a Community Member’s Epic Environment.
- Writing data to a Community Member’s Epic Environment must be done in a manner that does not adversely affect the Community Member’s Epic Environment, and in some cases, there may be no such appropriate method.
- Software that reads data from or writes data to a user interface (i.e., risky robotic process automation) is highly susceptible to error, including because of normal software upgrades or configuration updates.
- Backward Compatibility. The app has backward compatibility when features are updated that could still reference older data structures.
7. System Integrity
-
Manage User Assumptions and Expectations. The app appropriately manages users’ assumptions and expectations of healthcare software to avoid negative outcomes. For example:
- If the app permits users to input data that is typically input and stored in Epic software, or if the app uses an API to look up data from Epic software and permits users to edit that data, then users are likely to assume or expect that the app will file the new or updated data to Epic.
- If the app facilitates part of a workflow, then users are likely to assume or expect the app to trigger downstream steps in the workflow (e.g., trigger a message to another end user, trigger an interface message, etc.).
- Imitation. The app does not imitate, bypass, or interfere with third-party products or Epic software in a way that may confuse users or lead users to believe that the app is another product or has the capabilities of another product when it does not.
- Testing in Non-Production. The app is thoroughly tested in a non-production environment before going live in an Epic Community Member’s production environment. Both expected workflows and edge cases are tested.
- Advertising. The app does not display advertisements of any nature within any Epic software user interface.
8. Transparency & Honesty
- Relationship with Epic. The developer accurately represents the app and developer’s relationship with Epic or Epic Community Members.
- App Status. The developer accurately represents the app and developer’s status in any Epic process including the app or developer’s status in the sales cycle or implementation with any Epic Community Member.
-
App Functionality. The developer accurately represents the app’s features and functionality, including:
- The developer’s progress designing, developing, testing, or enhancing the app.
- The app’s cleared or approved use under any applicable regulations (e.g., FDA clearance).
- The data that the app accesses from Epic systems, how the app or developer uses that data, any secondary uses that the app or developer make of the data, and any access to that data that the app or developer provide to other parties or products.
-
Relation to Epic Products. The app and developer accurately represent Epic products and their features and functionality including:
- Similar functionality that Epic’s products have to the app.
- The app’s and Epic products’ abilities to interface with each other.
- Cost. The app and developer accurately represent the apps’ total cost to the Epic Community Member or end user, including all license/sales, maintenance, subscription, implementation, training, hardware, and other fees.
- Accuracy. The app and developer do not otherwise misrepresent products, product capabilities, business relationships, timelines, or anything else related to Epic not specified above.
9. Intellectual Property
- Replication. The app does not copy source code, data structures, or user interfaces from another app or Epic product without the owner’s prior written permission.
- Third-Party Use. The app does not provide third parties or third-party products direct or indirect access to or use of the Epic Materials, Epic services, or Epic software.
- Third-Party Content Flag. The Epic Community shares clinical and operational content by periodically uploading content configuration to Epic’s Community Library. If the app includes content to be imported into an Epic environment, then the content import file appropriately marks proprietary content for exclusion from the Community Library uploads.
Footnotes
45 CFR 170.315 (d)(1) (Authentication, Access Control, Authorization): “Verify against a unique identifier(s) (e.g., username or number) that a user seeking access to electronic health information is the one claimed; and [...] establish the type of access to electronic health information a user is permitted based on the unique identifier(s) provided”.
45 CFR 170.315 (d)(2) (Auditable Events and Tamper-resistance): “The health IT records actions pertaining to electronic health information [...] when health IT is in use; changes to user privileges when health IT is in use; and records the date and time [each action occurs]. [...] The health IT records the audit log status [...] when the audit log status is changed and records the date and time each action occurs. [...] The health IT records the information [...] when the encryption status of locally stored electronic health information on end-user devices is changed and records the date and time each action occurs.”
45 CFR 170.315 (d)(5) (Automatic Access Time-out): “Automatically stop user access to health information after a predetermined period of inactivity. [...] Require user authentication in order to resume or regain the access that was stopped.”
45 CFR 170.315 (d)(7) (End-user Device Encryption): “Technology that is designed to locally store electronic health information on end-user devices must encrypt the electronic health information stored on such devices after use of the technology on those devices stops [or] technology is designed to prevent electronic health information from being locally stored on end-user devices after use of the technology on those devices stops.”
45 CFR 170.315 (d)(8) (Integrity): “Verify [...] upon receipt of electronically exchanged health information that such information has not been altered.”
45 CFR 170.315 (d)(9) (Trusted Connection): “Health IT needs to provide a level of trusted connection using either 1) encrypted and integrity message protection or 2) a trusted connection for transport.”
45 CFR 170.315 (g)(3) (Safety-enhanced Design): “User-centered design processes must be applied to each capability technology.”
45 CFR 170.315 (g)(5) (Accessibility-centered Design): “The use of a health IT accessibility-centered design standard or law in the development, testing, implementation and maintenance of that capability must be identified.”
45 CFR 170.315 (g)(7) (Application Access - Patient Selection): “The technology must be able to receive a request with sufficient information to uniquely identify a patient and return an ID or other token that can be used by an application to subsequently execute requests for that patient’s data.”
Developer Testing Guide
Developer Testing Guide
Our assortment of test harnesses and simulation tools are available to help you achieve a satisfactory proof-of-concept app for many types of data exchange prior to starting an implementation with an Epic customer. Depending on the technologies used to connect to Epic software, you’ll find different utility and applicability for each tool. This guide progresses through different stages of testing beginning with no-code Try It (returning results for individual APIs), progress to testing API calls in an API Testing Platform such as Bruno/Postman and then launching from Hyperdrive. All of these tools connect to our FHIR Developer Sandbox (“the Sandbox").
Epic Instances and Environments
Customers
Each of Epic’s customers has their own instance, which is a single deployment of Epic's software for an entire health system. Within each instance, there are multiple environments that each contain their own data and configuration for training, testing, reporting, production, and other purposes. Here is a general overview of a typical health system’s environment strategy:
- Proof of Concept (POC): Allows for access to initial build and validation of workflows. While this is usually where application build starts and later migrates up, the connectivity for API calls is not always set up in POC.
- Test (TST): Likely where most testing of your app will take place. Better data is available for testing as well as features and network architecture needed for connectivity that aren't always in POC, such as APIs, Interconnect, and interfaces.
- Production (PRD): Where all users' work and patient data is stored.
- Support (SUP): A nightly or, less commonly, weekly copy of PRD. Typically, only Hyperspace is available. It is meant to troubleshoot issues with production data without potentially affecting Production.
- Reporting (RPT): A near real-time copy of PRD and a data source for analytical reporting.
Depending on the customer, POC and TST environments might be refreshed at some point. Make sure to know these schedules before starting to test.
FHIR Developer Sandbox
Epic provides a single Sandbox environment for testing. We ship major version releases of our software each quarter (February, May, August, November) and the Sandbox will be upgraded to the current version within a few weeks of each quarter. During this upgrade, which typically lasts for 1 day, the Sandbox will be unavailable.
The Sandbox is refreshed every Sunday at approximately 8:00 PM Central Time from a static “Source” environment only available to Epic. If you attempt to connect around this time, you may see intermittent errors. Additionally, any data you wrote to the Sandbox from the prior week will be erased. Some developers take the strategy of running scripts on Monday mornings to create the data they need throughout the week for testing.
Each Epic environment has a unique endpoint for your app to use for authorization and API calls. A list of customer-provided endpoints for OAuth2 are published by Epic. Your app should generally be using the most normalized FHIR version applicable to the resource called.
Sandbox Base URL Endpoint: https://fhir.epic.com/interconnect-fhir-oauth/
| Sandbox Type | FHIR Base URL |
|---|---|
| fhir.epic.com Sandbox - R4 | https://fhir.epic.com/interconnect-fhir-oauth/api/FHIR/R4/ |
| fhir.epic.com Sandbox - STU3 | https://fhir.epic.com/interconnect-fhir-oauth/api/FHIR/STU3/ |
| fhir.epic.com Sandbox - DSTU2 | https://fhir.epic.com/interconnect-fhir-oauth/api/FHIR/DSTU2/ |
API Testing
Use Try It for quick exploration, then switch to an HTTP client to test a complete call.
FHIR API Specifications and Test Data
Explore the full catalog of APIs on open.epic. If you’re using FHIR APIs, you can dive right in to the API specifications through our FHIR developer toolbox and select an individual API to view its spec and Try It examples.
Anatomy of a FHIR API
Lets take an example such as Patient.Search (Demographics) (R4):
- Patient: First, you have the Resource. When we say FHIR allows “modular healthcare data exchange”, the resource is what we’re alluding to. It specifies what kind of data we’re exchanging. You can visit the HL7 FHIR website for additional information about published resources.
- .Search: Second, you have the action. This dictates how we’re exchanging that data. There are a handful of actions you can take with FHIR, but the main ones supported in Epic's implementation are Read—which gives you data about a resource, Search—which helps you find a resource you want to read, Create—which lets you write new data to Epic, Update—which lets you modify an existing resource, and Delete—which let’s you remove data in the context of a clinical decision support workflow. Most resources have both Read and Search, a handful of resources have Create, while Update and Delete are a bit more unique, so check that the action you want is available before planning around it.
- (Demographics): For some FHIR APIs, there is also a subresource which helps us narrow down the scope of some of the more broadly scoped FHIR resources. Subresources are important since it allows your application to more narrowly scope to a specific type of data housed in a give resource. This implementation also affords patients more flexibility in choosing which aspects of their data they want to share with your application. Not all FHIR resources have subresources.
- (R4): And lastly, the FHIR version. The number at the end can help you compare how recent two different standards are. The reason we create new standards is it allows us to update and expand resources without breaking previously established connections. When possible, we recommend working with the most recent or normative FHIR version available. The different versions won’t look fundamentally different from one another, though you’ll often get more data and functionality by going with the newest FHIR version.
At the top of a spec, you’ll see a General Information section that represents the information you’ll need to call the API including the URL template and HTTP method which you’ll use to structure the API call. You’ll want to grab these and paste them into your HTTP client. You’ll also see a Description of the API which explains how the API interacts with Epic’s data structure and any important considerations (e.g., You can't use the Encounter (Patient Chart) resource to find upcoming appointments. Instead, use the Appointment resource to retrieve information on upcoming appointments.)
As you continue to scroll, you’ll first see the native request elements so you know what data is expected to construct a successful call. Pay mind to the “Is Optional” column so you can determine what data is required initially to then later put into the “optional” or “conditional” fields. On certain specs, you’ll see a separate list of parameters that use a post-filtering mechanism. When responding to a request, the Epic FHIR server first retrieves all results that match your search (using any native search parameters you’ve provided), then filters down those results based on the additional post-filtered parameters you’ve specified.
For more information about post-filter parameters and related considerations, refer to the General Considerations topic of the FHIR Search Parameters resource.
When you’re ready to give it a go, use Try It on individual API specification pages to execute preconfigured requests and view responses without writing code. The Try It forms are configurable so you can adjust the parameters to query different results. A list of test patients is available to reference the availability of different resources on each record.
Find an API → click “Try It” in the top right of the spec page.
The information returned in any one API call can be used as inputs to other APIs. For example, a Patient.Search response may include a generalPractitioner element containing a FHIR ID that can be used with Practitioner.Read.
While Try It cases are convenient and a great way to have reliable test data to reference, they use a hardcoded test app. We ultimately recommend that you test your API calls with an HTTP client such as Bruno or Postman. If you're not quite sure that your URL is formatted correctly, you can expand the Raw Request from a Try It and copy this into your HTTP client.
Responsible Sandbox Testing
The sandbox has many concurrent app connections, and we strive to create high availability through our network architecture. Over time, we have noticed a few potential testing pitfalls that put strain on our Sandbox and may affect not just your testing, but others' testing as well.
- Schedule API calls for a limited window. If you schedule recurring calls, set an endpoint on that schedule and keep it to about a week. Disable the schedule once validated.
- Avoid infinite looping through records. Do not loop across all records in the Sandbox. Instead, select a specific subset/array of records to exercise.
Launching & Authorizing Your App with Epic
Prerequisites to Testing
- You have a registered application as described in our App Creation & Request Process Overview and know your Non-PRD client ID.
- If you are building an app that implements OAuth 2.0 as a form of SSO, you have reviewed the Securing your Application topic of the OAuth 2.0 Tutorial and chosen an appropriate SMART App Launch or OAuth 2.0 Library.
-
You have reviewed the steps in the Build Your Application topic of the OAuth 2.0 Tutorial, including selection of the relevant APIs for your data exchange use case.
- Note: There is a rolling sync between the Build Apps page and the Sandbox. You may need to wait up to 30 minutes for newly added APIs to be recognized in the Sandbox environment. This is a common source of 403 errors.
- You have reviewed the FHIR Tutorial and FHIR Search Parameters resource to gain further understanding of how to use FHIR APIs in a performant manner.
- You have reviewed the App Architecture Considerations topic of the OAuth 2.0 Tutorial and have implemented the relevant recommendations.
Standalone OAuth 2.0
SMART on FHIR is a healthcare IT specific standard implementing OAuth 2.0, designed to enable applications to be EHR agnostic. The sections below explain how to instantiate an EHR Launch, however, you can also connect to the Sandbox by implementing a standalone launch. You can use this workflow when you'd like to use OAuth 2.0 for SSO, but when you do not need to be launched from Epic. Your app initiates a login on its own, and Epic presents a login screen where the user can enter their credentials.
LaunchPad
- SMART on FHIR LaunchPad: SMART on FHIR (OAuth 2.0)→ Try It
- HTTP Get LaunchPad: HTTP GET→ Try It
LaunchPad is a lightweight way to validate your app launch from Epic without Hyperdrive. It’s easier to set up and ideal for quick tests of launch, authentication, and context passing. You can also use this tool to receive an access token for use with your HTTP client.
Hyperdrive
Hyperdrive, Epic’s new Windows client application, is a secure client application that includes an embedded browser based on Chromium. Hyperdrive is Epic’s native browser, created specifically for users to access Hyperspace activities and complete workflows while meeting the unique needs of a healthcare organization not found in typical browsers, such as connectivity to peripheral devices and heightened security measures for PHI.
The Hyperdrive client testing harness is a development tool that can help app developers simulate a variety of the common connection types with the Epic Hyperdrive client. The Hyperdrive test harness is particularly useful when your app requires interactions with the Hyperspace client through APIs or when embedding your app in the Hyperdrive client/browser (e.g., through a SMART on FHIR EHR launch). You can review the full list of supported use cases—including E-Signature, Login, Voice Recognition, Scan Acquisition, Scan Viewing, Scan Signature Deficiencies, FHIRcast, XML, Encoder, Web PACS, and SMART on FHIR—and their associated specifications on the Hyperdrive resource page.
When creating your app’s test plan, keep in mind that this is a testing tool to support common client integration use cases. This tool is not intended to provide access to full end user workflows, including Epic's UI. Refer to the steps published here to request credentials, download, and install the client test harness.
MyChart and Patient-Facing Apps
A list of MyChart account credentials is available in the test patients resource to facilitate patient-facing standalone OAuth2.
Backend Systems Apps
Backend apps (i.e., apps without direct end user or patient interaction) can also use OAuth2 through the client_credentials grant type. Epic's OAuth2 implementation for backend services follows the SMART Backend Services: Authorization Guide, though it currently differs from that profile in some respects.
Review our SMART Backend Services (Backend OAuth 2.0) Tutorial for the steps to connect to the Sandbox.
Testing with Epic Customers
For as much testing as you can achieve using our simulators and test harness, collaborating directly with an Epic customer to test and build out your app in one of their Non-PRD environments will be required. Beyond accounting for environment-specific variations like endpoints and the dynamic data points within APIs, the following necessitate customer involvement since they are not available on open.epic:
- Non-OAuth2 launches: Our Sandbox is exclusively configured with an OAuth2 security policy. If you must use Basic Authentication, Client Certificates, or SAML tokens (not recommended), work with a customer to establish the needed connectivity.
- Interface testing: The customer’s Interface team will set up the required interfaces and can contact their Epic EDI support for assistance. For general guidance on implementing interfaces, refer to the Getting Started with HL7 Interfaces tutorial.
- MyChart EHR Launch: If your patient-facing app is designed to be embedded or launched from MyChart after a patient has logged in, you can use the SMART on FHIR LaunchPad to validate successful completion of the OAuth2 flow. When you implement with a customer, their IT team will build out a custom MyChart menu item to be available to patients.
-
Mobile App Launches and Native Apps: Epic offers several iOS and Android mobile apps for patients and providers, including MyChart, Haiku, Canto, and Rover. All these apps have the same support for SMART on FHIR as their desktop platform counterparts. When you implement with a customer, their IT team will need to complete a nominal amount of application build to make your app available to users of these apps.
Starting in the August 2019 version of Epic, the Epic implementation of OAuth 2.0 supports PKCE and Epic recommends using PKCE for native mobile apps. See the Considerations for Native Apps topic in our OAuth 2.0 Specification, if applicable.
Troubleshooting & Assistance
If you run into technical issues with your app’s data exchange, first reference our Web App and Web Service Troubleshooting guide for possible solutions. If you're already working in collaboration with an Epic customer, you may also find a resolution by requesting support from their IT team.
If you encounter functional issues with any of the tools or notice something erroneous (e.g., a broken Try It), contact our open.epic team.
For more information about support—including options to receive individualized guidance and testing with workflows that would otherwise require collaboration with an Epic customer—visit our Developer Support page.
App Creation & Request Process Overview
Table of Contents
- Overview
- Creating, Activating, and Licensing an App
- Registering an App
- Marking an App as Ready for Production
- Facilitating Epic Community Member Downloads
- Managing Customer Specific Configuration
- Requesting an App
- Before Starting the Request Process
- Obtaining the open.epic API Subscription Agreement
- Downloading Records
- Confirm the Client ID was Downloaded
- Deactivate an App
Overview
Epic on FHIR enables Epic community members to download client records for applications registered on the Epic on FHIR website. If the app is in Showroom customers can find the app by doing a keyword search for the app or vendor name. In order to download client records, each Epic community member must have someone with the "Purchase Apps" security point to download an app's client record on behalf of the organization.
The steps below describe the process of:
- The app registration, creation, and activation process.
- An Epic community member signing the open.epic API Subscription Agreement.
- The community member downloading an Epic on FHIR app.
Creating, Activating, and Licensing an App
Registering an App
When a developer registers an app, the website creates an app record in the Epic database and assigns the app production and non-production client IDs. To register an app:
- Navigate to the Build Apps page
- Select "Create My First App" or if you already have apps created, select "Create"
- Complete the Create an App form by filling out:
- The app name
- The app consumer type
- Applicable APIs
- The default FHIR version
- Applicable redirect URIs
- Whether you'll use the confidential client profile (required for refresh tokens)
- Save
After the app has been Saved and Marked Ready for Sandbox, it will be in a Draft status. When a new draft app is made or changes are made to the app on the website, the changes may take up to 1 hour to sync with the Sandbox. To get started on testing, we recommend reviewing the Developer Testing Guide. For any issues that arise in testing, refer to our Troubleshooting tutorial
Recommendations for Scoping APIs to your App
When you design your app’s API scope, less can be more. Scoping too broadly raises red flags for healthcare organizations reviewing your app and for patients authorizing data access. Because your app is authorized to use all the APIs on your client ID, that list directly defines the types of patient data a customer could expose to your app.
Customers will closely review that list to understand the breadth of data your app could access. Because of their legal and regulatory obligations to protect patient privacy, security officers and privacy reviewers are obligated to protect that data, and may delay or reject apps that request more access than they clearly need. Patients, too, may hesitate to authorize apps that appear to overreach. If your app is authorized for APIs that it doesn’t use or doesn’t need for its use cases, organizations may ask you to create a new client ID that only includes the necessary APIs. Keeping your scope tightly aligned to your app’s actual use cases builds trust and helps your app move through customer review and adoption more smoothly.
Because Epic’s industry-standard and Public APIs are licensed directly to healthcare organizations (not to app developers), broad API scopes can also make your app appear more expensive to enable than it actually is. While fees are based on production usage, not on your client ID scope, the scope determines which APIs are available to your app and which licenses your customers may need. Even small amounts of over-scoping can create confusion about required licenses and perceived costs, slowing down customer decisions.
Epic recommends that healthcare organizations proactively request a licensing estimate and complete a security review based on your client ID’s scope. This ensures they consider both privacy and cost implications of the data your app could request.
If the scope of your integration expands in the future, you can always create a new client ID to enable additional APIs. Starting narrow helps customers onboard faster and simplifies their review.
Best Practices for API Scoping
- Scope narrowly and intentionally. Only include the APIs that are essential for your app’s functionality.
- Avoid “just in case” APIs. Extra APIs can create confusion during customer review and inflate the perceived cost of your app.
- Map each API to a clear use case. Be ready to explain why each API is required.
- Plan for growth. You can always expand your scope later if your app’s functionality grows.
Examples
- Some Medication FHIR APIs are part of the USCDI group, which most healthcare organizations already license. If you add additional Medication APIs outside of USCDI, your customer may need to license more APIs, increasing their costs.
- Epic supports many DocumentReference APIs, each with specific use cases. Scoping many or all of them is almost never necessary. If your app uses DocumentReference.Search, make sure it targets only the APIs you truly need.
Recommendations for Creating your App Listing
When you first create your app, customers can search for the app by client ID on the Epic on FHIR Download page and view your application name, summary, and thumbnail. If you choose to list your app on Connection Hub once you have your first live customer, there will be additional marketing fields that you may choose to fill out, which are described below.
Application Name
This is the name of your product. Keep your app name consistent throughout your app listing. Don’t include “Epic” in your app name. Don’t include any trademarks from other organizations without permission.
Public Documentation URL
This should be a public web page about your product. If you mention Epic in your public documentation, be sure to follow our Trademark Usage Guidelines.
Summary
The best summaries are 2-3 sentences and provide a high-level explanation of the product. The summary is meant to catch the reader’s interest, so avoid including too much detail here. You can go into more detail in the description.
The summary can be no longer than 500 characters, including spaces.
Description
The description should give the reader a clear understanding of what the product does and how it integrates with Epic. The best descriptions follow a Why, What, How format – Why a customer should want to use this product, What the product does, and How the product integrates with Epic. Consider splitting your description into multiple short paragraphs or using bullet points to improve readability.
The description can be no longer than 1,998 characters (including spaces).
Data Use Questionnaire
We highly encourage developers to fill out the Data Use Questionnaire if the app is Patient-facing to benefit mutual Customers of Developers and Epic. The answers you provide to the Data Use Questionnaire are displayed to a patient during the app authorization flow, The questionnaire responses can help the patient make an informed decision about whether they want to grant your app access to their data based on the data use practices of the app. Failure to answer the DUQ will result in a warning being shown to the patient when they are prompted to authorize your app.
Thumbnail
This should be the logo for your organization or product. The recommended image dimensions are 500 x 300.
Screenshots
This is your opportunity to show viewers what your app looks like and how it works. Consider adding captions to your images to explain the main purpose of the image. If your product does not have a user interface, consider including a data flow diagram describing your integration.
The screenshot height is 1080 pixels, and the recommended dimensions are 1920 x 1080. You can include up to 10 screenshots.
Marking an App as Ready for Production
After completing development and testing, you can mark your app Ready for Production use. The app cannot be used in any community member environments, either production or non-production, until the app has been marked Ready for Production. To mark your application Ready for Production:
- Navigate to the Build Apps page
- Select the app that will be activated
- Finalize details about the app
- Check the box to confirm compliance with the Terms and Conditions
- Click Save and Ready for Production
IMPORTANT! Neither you nor Epic can make updates to an app once it has been marked Ready for Production. With the exception of adding redirect URIs and modifying your JWK Set URLs, all technical changes will require you to build a new app.
Whether or not an app will auto-sync depends on whether it meets all auto-sync criteria. Apps that need to register client secrets or public keys that otherwise meet the auto-sync criteria will sync after a client secret or public key is provisioned to that organization via the "Review & Manage Downloads" button on the Build Apps tab. For all other apps, refer to the Facilitating Epic Community Member Downloads topic below.
Facilitating Epic Community Member Downloads
To allow an Epic community member to download an app, simply provide them with the Production or Non-Production Client ID from the app's detail page. Follow the steps in Managing Customer Specific Configuration to add any customer specific configurations when a community member requests the app.
Managing Customer Specific Configuration
When licensing your application to customers and depending on the configuration of your app, you will have options to specify customer configurations (e.g., redirect URLs and client credentials). To manage these settings:
- Navigate to the Build Apps page.
- Select Review and Manage Downloads for the relevant application.
- Select the relevant environment type. Note that you need to activate for Non-Production before you can activate for Production.
- Specify the necessary configurations following the recommendations below.
- Click Activate.
Customer Specific Endpoint URIs
If your app uses clinician- or patient-facing OAuth 2.0, you also have the option of specifying customer specific endpoint/redirect URIs when managing a download request. If you don't want to use the default URIs listed on your app, simply uncheck "Use app-level endpoint URIs" and enter the customer-specific URIs your app needs.
Provisioning Client Credentials
For backend apps or frontend confidential client apps, Epic recommends using a JWK Set URL (JKU) but you may upload a public key or client secret (frontend confidential client apps only). For apps that qualify for auto-synchronization functionality, a client credential must be set before the app can sync to the Epic community member's environment. For apps that do not meet auto-sync criteria, a client credential can be added once the community member has requested the app.
If using client secrets, you can use a client secret generated by the website or you can provide your own client secret. If using a public key, it should be exported to a base64 encoded X.509 certificate before being uploaded. Frontend confidential client apps must upload the key as a JSON Web Key Set (JWKS).
Epic requires JKUs for backend OAuth 2.0 apps following the timelines outlined on the OAuth 2.0 Tutorial document.
Epic recommends that you use a unique client credential for each community member and for production versus non-production.
Requesting an App
Before Starting the Request Process
Epic community members should do the following prior to the request process:
- Work closely with their Epic technical coordinator (TC) to research available integrations.
- Ensure the right Epic products and interfaces are in place to install an app.
- Evaluate potential costs of the app up front. In addition to developer's fees, consider other third-party software, hardware, and content costs, new interfaces, and additional license or subscription volume that may be triggered by the application.
When an Epic community member has committed to moving forward with an app registered on the Epic on FHIR website, they or the developer should organize a kickoff call to align key stakeholders on the goals, scope, processes, milestones, and timeline of the project. Key stakeholders include representatives from all three organizations: the developer, the Epic community member (e.g., operational sponsor, project manager, analyst, ECSA, network engineer), and Epic (e.g., the technical coordinator, TS who support affected applications, and, if applicable, the EDI representative). If you are not sure who from Epic to include, ask your Epic representative for assistance.
Including the right stakeholders from each organization at the start of the project enhances communication, sets the right expectations upfront, and helps identify and avoid potential issues before they impact the success of the project.
Epic does not endorse, certify, or verify the integrity, safety, performance, or practices of the developers who use Epic on FHIR or their software.
Obtaining the open.epic API Subscription Agreement
Community members who wish to use FHIR APIs with a third-party application registered on the Epic on FHIR website must sign the open.epic API Subscription Agreement. This agreement applies to the organization, not to individual apps, so this step is only required for organizations who have not previously integrated with an application that uses technology licensed under this agreement.
Downloading Client Records
To be able to download a client record, the following steps must have been completed:
- The developer has created an account on the Epic on FHIR website,
- The developer has registered their product on the Epic on FHIR website,
- The developer has marked their product Ready for Production use ("Production Ready" status), and
- The community member has signed the open.epic API Subscription Agreement.
From the Downloads page, community members can see apps which their organization has previously downloaded from the Epic on FHIR website. To download client records for additional apps, the community member's staff with the "Purchase Apps" security point can search using the app’s client ID, which must be obtained from the developer. Either the Production or Non-Production Client ID can be used.
The website will provide details about the app associated with the client ID and give the option to proceed with the download. If the app uses refresh tokens, the duration of the refresh token can also be specified at this time.
Any apps using backend OAuth 2.0 or the Confidential Client profile will need a JWT public key and/or a client secret uploaded to the website after you request a client ID download. This information is provided and uploaded by the app developer.
Confirm the Client ID was Downloaded
To confirm the client record was successfully downloaded, return to the Downloads page. The application should now appear on this page along with a request status. Apps using the confidential client profile or backend OAuth 2.0 will require app developer action. All other applications should have their download approved automatically. This download syncs the app's client record to the community member's Epic environments, allowing APIs listed on that client to be authorized by their server.
Epic community members can see the "Notes for Epic Customers" section at the top of the page for details on how to verify that a client record now exists in their Epic environments.
Deactivate an App
Apps that have not yet been deployed to any Production environment can be deactivated by the app developer by clicking the “Deactivate” button on the app's build page. Apps that have been activated for only a customer's Non-Production environment can be deactivated by the app developer in for that customer on the page where customer licenses are managed.
Once an app has been deployed to any Production environment, it cannot be deactivated. App developers must coordinate with customers live on the app to ensure it is safely uninstalled from workflows and then the customer can deactivate the app's client ID directly within their environments. Epic's recommendation is that app developers create their software to not exclusively rely on the client ID being disabled within customer environments to prevent unintentional or unexpected usage. This is particularly relevant for patient-facing applications that qualify for automatic client record distribution where coordination with individual customers is unrealistic.
User Context
Application User Context
Epic defines three different user contexts for an application:
- Patients
- Clinicians, Staff, or Administrative Users*
- Backend Systems
*The "Clinicians, Staff, or Administrative Users" context is commonly referred to as "Provider" context, so the rest of this tutorial uses that term.
Choosing a User Context
Most applications have an end user who is interacting with them, and these users determine the user context of your application. To choose the appropriate user context, consult this table:
| Primary User Type | User Has Epic Access | User Context |
|---|---|---|
| Patient | Yes | Patient |
| Patient | No | Backend System |
| Provider | Yes | Clinicians, Staff, or Administrative Users |
| Provider | No | Backend System |
| Background Process with No User Interaction | N/A | Backend System |
Multi-Context Applications
Your application might not fit neatly into one user context, and in that case it could be a good fit for a multi-context application. With multi-context applications, you register separate apps or clients with Epic, one for each user context you support (typically no more than three).
Limit APIs to the Required Application
When building a multi-context application, an app that has multiple Client IDs, you might have overlap with which APIs are called by each client. For example, both a provider-facing and backend application might need to search for patients with the same API. While this search can be valid, you should in general only include the APIs necessary on a specific application. We recommend this for a few reasons:
- On the principle of least access, you should only request access to precisely what your workflow requires, and no more.
- You decrease the work needed to install your application. By precisely defining the APIs you need, you are also limiting the security that Epic community member's need to enable for your application to function.
For example, if your backend component searches for patients, but your provider-facing component does not, then you should only add the patient-searching API to your backend component.
Limit Use of Backend Apps
Whenever possible, your application should avoid using a backend component so that Epic can conduct end-user specific security checks during your API calls. By using a backend component, rather than a patient or provider-facing component, those security checks are run on a background user rather than the specific user interacting with your app.
This means your application should always use the OAuth 2.0 token of the user who authorized the application when one is available. The exception is for specific APIs that are not supported for the user context of your end users. It might be appropriate to include a backend component to call these APIs, but ensure you have robust security within your application to control how end users can interact with these APIs from your system. Your security policies should include:
- Never sharing access tokens or authentication credentials with your end user's device or browser. This way, a malicious end user cannot impersonate your application. Your backend server should be the only entity making API calls.
- Having your own authentication and session management systems. For most use cases, only authenticated end users should be able to trigger APIs.
- Validating all end-user input before forwarding the input to an API.
Use Cases for Backend Apps
Below is a list of common use cases for backend applications:
- Book Anywhere integrations
- Printing and faxing
- Remote patient monitoring (RPM, patient unauthenticated)
- Personnel management
- Patient Integrated Voice Response (IVR)
- Public dashboards
- Patient chatbot (patient unauthenticated)
Creating a Multi-Context App with Epic on FHIR
To support a multi-context app, you will need to create separate applications for each intended context. This provides you with a set of production and non-production client identifiers for you to use with each context of your app. Each application needs to include the APIs that will be used in that specific context. For example, if there is an API that will be used in the provider context, but not in the patient context, list that API on only the provider context application record.
Use consistent names across multi-context application records. Names followed by their context can be useful to show which client IDs are associated with which contexts. For example, if "OurNewHealthApp" is the name of the multi-context integration, "OurNewHealthApp - Provider" could be the name of the application record designed for the provider context app.
Epic Community Member Downloads
To allow an Epic community member to download your multi-context app, you will need to provide them with the Production or Non-Production Client IDs for each of the applications that together support the full multi-context integration.
API Supported User Types
Overview
Epic has determined that some APIs are not appropriate to be called directly by end users or patients. For example, an API used as part of an administrative user's workflow is likely not appropriate for a patient-facing application because a patient should not be interacting with that data.
To reflect these use cases, Epic has assigned a list of supported user types to each Epic API and introduced validation for user type on all API calls.
User Type Validation
Starting in the May 2022 version of Epic, Epic community members can enable user type validation for their APIs that checks the user context of the application against the supported user types of the API being called. If the context of the user calling the API does not match the API's supported user types, then the API call fails.
When Does an API Support a Given User Type?
An API can support a combination of three possible user types, and when an API supports a given user type, it means the following:
- Patients: This API is appropriate to call directly based on input from Patients, and its output can be shown directly to the authorized patient.
- Provider: This API is appropriate to call directly based on input from Provider users, and its output can be shown directly to the authorized provider.
- Backend Systems: This API can be called by a backend system, and when called from a backend application, it must have its input and output validated rather than letting end users interact with it directly.
API and User Type in Your Application
If your application uses OAuth 2.0, then the API user type needs to match the user context you chose when building the application.
If your application uses an alternative authentication method (such as basic authentication), Epic cannot authenticate against a specific user regardless of the app's selected context. These API calls are therefore treated as a Backend System user type even if the app's user context is Patient or Provider.
Should I Edit My App's User Context?
If an API does not support your app's user context, first validate that your chosen user context matches your use case using the table above. If you can appropriately switch to a supported context, then update your app.
If it is not appropriate to switch the context of your app, another option is to create a multi-context application. For most applications, this means provisioning an additional backend component that interacts with as few APIs as needed.
Additional User Security Validation
Epic's user context validation is just one step in our API security checks. This means that a request might pass context validation but fail at a later step. For example, Epic assesses the security of the individual user associated with a request. If a user does not have the correct security within Epic, the call fails, and the Epic community member needs to assess the use case and update the user's security as appropriate.
Refer to our troubleshooting tutorial for help assessing why a given API call has failed.
OAuth 2.0 Tutorial
OAuth 2.0 Tutorial
Implementation Consideration: Starting in the May 2026 version of Epic, customers must manually configure the JWK Set URL (JKU) you specify for your backend OAuth 2.0 clients. This customer-specific configuration is referred to as the local JKU.
Update: Customers will be able to configure a local JWK using a static public key in .pem format that you provide, instead of using a JKU. If your app relies on static keys and your JWKs change, you will need to communicate the new keys directly to each customer to maintain functionality. For ease of key rotation and ongoing maintenance, Epic recommends supporting a JKU.
Refer to the following table for Epic versions when this requirement will take effect.|
Epic Version |
Epic Sandbox JKU Support |
Epic Customer JKU Support |
|
February 2025 and prior |
Optional |
Optional - Each customer can choose to enforce JKU support for backend OAuth apps. This enforcement is off by default. |
|
August 2025 |
Vendor Services and Epic on FHIR no longer allow new static key uploads for use in the sandbox. |
|
|
February 2026 |
Static keys no longer supported in the sandbox for backend OAuth. Vendor Services and Epic on FHIR websites no longer allow static key uploads for new apps or new customer download requests. Both sites still support rotating keys for existing live customers. |
Vendor Services and Epic on FHIR websites no longer allow static key uploads for new apps or new customer download requests. Both sites still support rotating keys for existing live customers. |
|
May 2026 |
Static keys are no longer supported in customer environments for backend OAuth. |
|
|
August 2026 |
Customers may configure local JWKs if provided .pem files. |
This tutorial complements and aims to replace the OAuth 2.0 Specification, which is mostly technical specs.
This tutorial focuses on the SMART App Launch framework, which is our recommended integration method for apps that meet all these criteria:
- Your application is UI-based, such as a web or native application
- Your end users have Epic credentials. Clinicians, staff, or administrative users use their Hyperspace credentials, while patients and their caretakers use their MyChart (Patient Portal) credentials
- You meet at least one of the following:
- You'd like to grant your users access to your application using their Epic credentials. In this case you're using OAuth 2.0 as a form of Single-Sign-On. This option may allow you to avoid having your own authentication system, where users would keep a separate login for your application.
- You'd like your application to launch from and optionally be embedded in Epic, and optionally receive contextual information at the time of launch such as the patient's ID.
If your application doesn't meet these criteria, but still wants to pull data from Epic, check out our Backend OAuth 2.0 Tutorial instead of this one. Otherwise, read on!
Your app may not fit cleanly into one workflow, so also consult our Choosing a User Context documentation to see if you need multiple components in your application.
Following this tutorial, you'll find information on:
- Choosing the right workflow for your use case
- Understanding how to secure your application using OAuth 2.0
- Building an application using a library
- Implementing a Standalone and/or EHR launch
- Reviewing common considerations for apps integrating with Epic
- Deploying your application at Epic Community Members
Choosing your Workflow
From criteria 3 above, there are 2 relevant workflows that the SMART App Launch is used for:
- Using OAuth 2.0 as a form of Single Sign-On (SSO)
- Launching from and optionally embedding in an Epic workflow
Depending on which workflows you'd like to use, consult the following table for next steps:
|
OAuth 2.0 for SSO |
Launch from Epic |
Next Steps |
|---|---|---|
|
Yes |
No |
Secure your Application using a Standalone launch, meaning your app initiates an Epic login page. |
|
Yes |
Yes |
Secure your Application using an EHR launch, meaning Epic initiates launching your app. This launch includes patient context and can optionally embed your app in Epic (for web apps, not native apps). |
|
No |
Yes |
Review our launching without SSO appendix |
Securing your Application
If you plan to use OAuth 2.0 for SSO, review this section with your security team. Using OAuth 2.0 incorrectly can introduce security vulnerabilities in your system.
If your application includes a database or protected business logic, you should already have authentication and session management systems in place. Your existing, protected app might function like this:
- A user submits a username and password to you.
- Your authentication system (on your web server) reviews the request.
- If the request is valid, your authentication system creates an authenticated user session, such as an HttpOnly Cookie or a token stored in your client-side.
- The user takes an action in your app, authenticated by their session cookie or token.
Your goal for integrating the SMART app launch into your app should be to replace your authentication system with the launch, where Epic authenticates the user. You should use the result of the launch to issue authenticated user sessions from your existing session system. This is illustrated below:

The labeled steps (a-d) are referenced in the session creation overview below.
Using a Library
Many OAuth 2.0 libraries are capable of or have documentation for integrating with your own session management system. Make sure you are using a server-side OAuth 2.0 library, and not a client-side one, so that you can securely issue sessions using the outcome of the launch. The library requirements below should guide you to a server-side library.
Session Creation from a Launch
Below is a high-level overview of how the SSO portion of the SMART app launch works (referencing labeled steps in the diagram above):
- (Optional) Epic initiates a launch to your app, including a launch token.
- You initiate an OAuth 2.0 authorization request.
- The user authenticates against Epic, and Epic redirects back to you with a one-time-use authorization code (step a). If your app is launched from Epic, your app will have a launch token to present in this request. In that case, the user doesn't re-authenticate.
- Your web server takes the code and sends it to Epic's token endpoint for review (step b).
-
If the token request succeeds (step c), your system creates
an authenticated user session and returns it to the user (step d).
- Epic can provide user identifiers to create or look up the user's account in your system.
- Epic can also provide contextual information like the patient or visit ID.
- The user takes an action in your app as usual, protected by their session. If the action requires data from Epic, your app can use the access token issued to it to retrieve the required data. We recommend storing this token on your server and making API calls from the server.
In step 4/b above, we recommend you redeem the authorization code directly from your web server, and use the result to immediately issue a user session. This contrasts with client-side libraries such as fhirclient, which redeem the authorization code from the user's browser. Use a server-side workflow instead, so you can trust the result to establish user sessions.
Building your Application
Choosing a Library
Using a SMART App Launch Library
A SMART app launch library needs to do all of the following:
- Run on your server, not the end-user's device.
- Support the EHR or standalone launch, depending on the launch type you chose above.
- Support private_key_jwt client authentication. We recommend this over client_secret_basic or client_secret_post.
- Support retrieving extra values from the token response. Use this option if you require a launch context beyond the standard patient and encounter identifiers.
Using an OAuth 2.0 Library
If you cannot find a SMART app launch library, here are OAuth 2.0 library requirements:
- Run on your server, not the end-user's device.
- Use an OAuth 2.0 Client Library or an OpenID Connect Relying Party library. Client refers to your role in the OAuth 2.0 flow, not whether you have a web server component.
- Support the authorization_code grant type.
- Support refresh_token grant type if you need >1 hour of API access.
- Support adding extra parameters to an authorize request ("aud" and "launch" parameters)
- Support private_key_jwt client authentication. We recommend this over client_secret_basic or client_secret_post.
- Support retrieving extra values from the token response so that you can retrieve any launch context including the standard patient and encounter identifiers.
Sample App Config
We've created a sample app to help you with initial development. The app has the following settings:
- User type: Clinicians, Staff, or Administrative Users
- Client ID: e3073934-68c1-4ca7-9b59-3d8b934187f1
-
Redirect URIs:
- http://localhost:3000/callback
- https://localhost/callback
- http://localhost:3000/epic-sandbox/callback
- https://localhost/epic-sandbox/callback
-
Incoming APIs:
- Practitioner.Read (R4)
- PractitionerRole.Search (R4)
- Patient.Read (R4)
- Encounter.Read (R4)
- Location.Read (R4)
- Location.Search (R4)
-
Private Key:
- Download a sample private key here. When registering your own app, as a security best practice, you should create your own key pair. The sample key is provided exclusively for use with testing in the sandbox and should never be used with a mutual customer for testing or production purposes.
- The attached key is an RSA key (ex: RS384 alg). If your library supports Elliptic Curve algorithms (ex: ES384 alg) we recommend using that algorithm instead (requires hosting a JWK Set URL).
Define your Architecture
After you've identified a library, answer the following questions to define your architecture:
- How will my system/library differentiate between different Epic community members? See the Supporting Multiple FHIR Servers topic below.
- How will my system/library discover the needed OAuth 2.0 endpoints? See the Endpoint Discovery topic below.
-
What client authentication does my library support?
- If it supports private_key_jwt (recommended), follow these steps to create private keys and public keys. On-premises apps will repeat this per installation.
- If it supports client_secret_basic (or _post), secret generation is covered in the Upload Your Credentials section below, and your implementation team will create separate secrets for every deployment of your app.
- Do not use "none" unless you use a launch without SSO.
-
How will my app be deployed?
- If your app is Cloud-Based and if you support private_key_jwt authentication, consider sharing private keys across Epic Community Members
- If your app is installed On-Premises, or if you use client secret authentication, you must use separate authentication credentials per install.
For example, the deployment strategies below use the following architectures:
Cloud-Based Architecture
- Different URL paths (on a single domain) per Epic Community Member
- private_key_jwt authentication
- A single private key shared across Epic Community Members, hosted on a single JWKS URL
On-Premises Architecture
- Different origins (in this case, subdomains) per Epic Community Member.
- private_key_jwt authentication
- Unique private keys per Epic Community Members, hosted on separate JWKS URLs (one on each origin)
Build your Application
Now that you've identified the URLs and client authentication for your system, build an application with those items so that Epic can verify requests from your application.
Build an application with the following settings:
-
Primary User Type. Choose one, depending on your use case.
- Patients - For patients and their caretakers authenticating with MyChart
- Clinicians, Staff, or Administrative Users - For users with Epic Hyperspace accounts
- Check "Incoming API"
-
Check "Use OAuth 2.0"
- In Epic on FHIR, this box is always selected.
-
Endpoint URI
- Enter the URIs for your development environments' OAuth 2.0 redirect_uris. Your library should have documentation on this value. Commonly, it ends in /callback.
- Only add URIs where your <hospital-system> is set to Epic's sandbox environment (example: "epic-sandbox"). When activating your app at an Epic community member, you'll be able to provide the community member's <hospital-system> value as a license-specific URI. This is covered in the Deploying your Application section.
- For EHR launched apps, do not include your launch URL unless it is the same value as your redirect_uri. Launch URLs are not checked against your registered app.
-
Incoming APIs
- For all apps, we recommend reviewing our default "FHIR resource IDs" below, and requesting the associated "FHIR API" for the ones you need (example "encounter" and "Encounter.Read (R4)").
- For patient-facing apps, we recommend the Patient.Read (R4) and RelatedPerson.Read (R4) APIs for use with Openid Connect.
- For clinician, staff and administrative user-facing apps, we recommend the Practitioner.Read (R4) API for use with Openid Connect.
- App FHIR Version. We recommend setting this to R4 for new apps. See our documentation on this topic.
-
Check "Is this app a confidential client?"
- We recommend all apps register as a confidential client, and then upload credentials in the next step.
- If your application launches without SSO, and specifically does not include a web server component at all, then you can keep this unchecked and skip the remaining setup. You are ready to test your app.
-
Upload your credentials.
- For private_key_jwt apps, upload your public keys as an JWKS URL (recommended) or an X509 certificate.
- For On-Premises apps, provide the keys for your development environment at this time. See the example On-Premises deployment below for considerations on private key management in production.
- For client_secret apps, generate a "Sandbox Client Secret" and copy the secret into your development environment. When deploying your app, a similar screen appears where you will create separate client secrets per install. You should not share secrets between Epic community member installs.
-
"Requires Persistent Access"
- Check this if your app needs more than one hour of API access. This is uncommon, especially if you only use APIs at the beginning of your workflow.
- If your app does need this access, check that your library supports the "refresh_token" grant type.
- This is only available if your app is a confidential client.
Now that you've configured your app, save it, and wait 30 minutes for your changes to sync. When testing your app against the sandbox, use the non-production client ID issued to you.
Implementing a Standalone Launch
Use the standalone launch workflow when you'd like to use OAuth 2.0 for SSO, but when you do not need to be launched from Epic. Your app initiates a login on its own, and Epic presents a login screen where the user can enter their credentials.
To start, make sure you've reviewed the
securing
and
building
your application sections above. Most OAuth 2.0 libraries can handle the
standalone launch out of the box. Here's a diagram of what a standalone launch flow looks like.
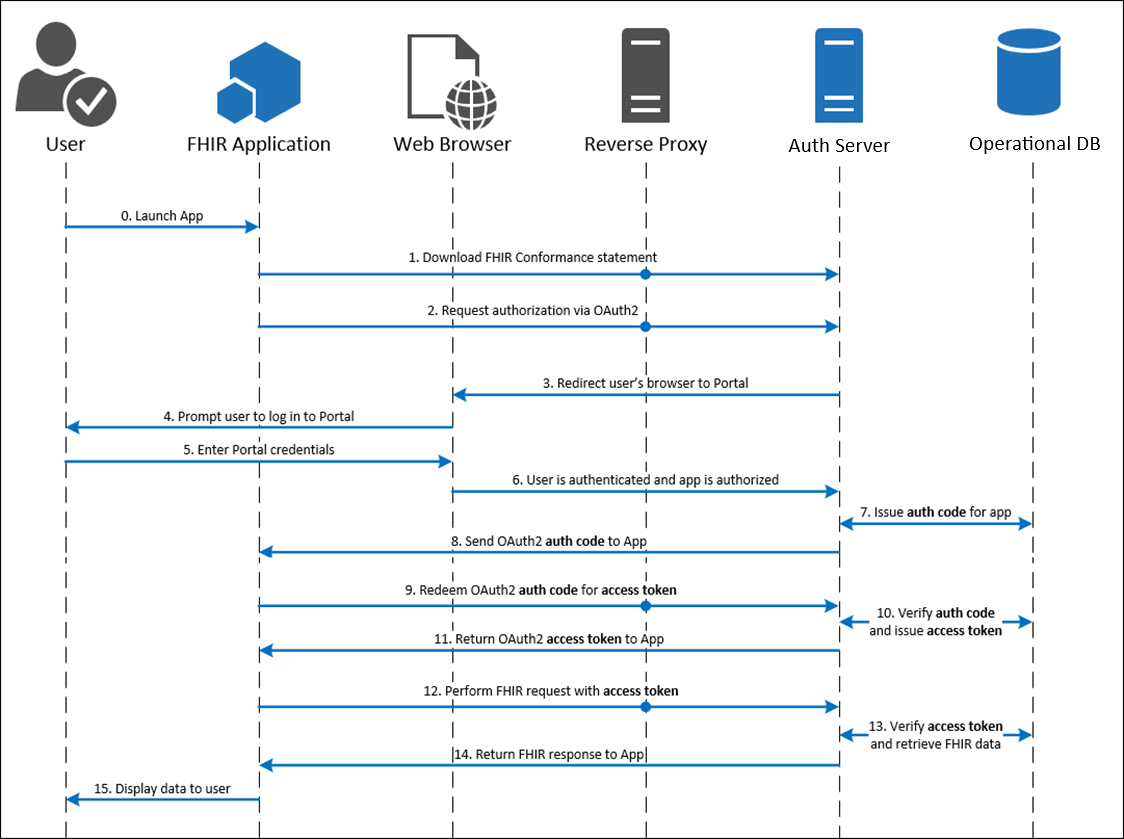
Test a Standalone Launch
If you are using the sample application setup above, your application should create an authorize request URL that looks like this, and should navigate the user's browser to this URL (newlines included for clarity, values are URL encoded):
https://fhir.epic.com/interconnect-fhir-oauth/oauth2/authorize?
    client_id=e3073934-68c1-4ca7-9b59-3d8b934187f1&
    scope=openid%20fhirUser&
    response_type=code&
    redirect_uri=http%3A%2F%2Flocalhost%3A3000%2Fepic-sandbox%2Fcallback&
    state=example-state-value-should-fail&
    code_challenge_method=S256&
    code_challenge=PHHQCoInTVWPbe78fWbQSftF5f6nn7hgskfLfEm4L6s&
    aud=https%3A%2F%2Ffhir.epic.com%2Finterconnect-fhir-oauth%2Fapi%2FFHIR%2FR4
Note a few things about this request:
-
aud
- The aud parameter is required for most workflows, and we recommend all apps include this parameter. Set this parameter to the FHIR base URL of the server you intend to call (the "iss" value). Starting in the August 2021 version of Epic, health care organizations can optionally configure their system to require the aud parameter for Standalone and EHR launch workflows if a launch context is included in the scope parameter. Starting in the May 2023 version of Epic, this parameter is required. The value to use is the base URL of the resource server the application intends to access, which is typically the FHIR server.
- Epic maintains a list of our Community Member's FHIR endpoints on epic.com
- This parameter is not required for standalone launches unless you request the "launch/patient" or "launch/encounter" scope. This means that traditional OAuth 2.0 and OpenID Connect clients do not need to include this parameter.
-
code_challenge and _method
- We recommend that all apps use PKCE. If you have a native app, see the Considerations for Native Apps in the appendix. Most OAuth 2.0 libraries should support PKCE for "authorization_code" grants
-
state
- The state parameter is set to a fake value in this example. Your library should auto-generate this for you, and the redirect back to your app should fail if the state does not match the generated one. This is used to mitigate login CSRF attacks. See RFC 6819 and the OWASP CSRF Cheat Sheet.
-
scope
- The scope parameter is set to "openid fhirUser" (space delimited list). Epic issues additional scopes based on the incoming APIs you configured on your application.
- Remember to add scope "launch" if you later add EHR Launch support. Do not add it for standalone launches.
A login screen appears where you need to enter your sandbox user's credentials. Ask your organization's administrator to share your sandbox username and password with you.
After you're able to successfully redeem the code for an access token, do one of the following:
- If your target workflow is the EHR launch, review the next section.
- Otherwise, if your target workflow is the standalone launch, continue to the Identifying the User section below
Implementing an EHR Launch
The EHR launch flow allows Epic to launch your application and inform it of
what user, patient and encounter was open at the time of launch. The user
authenticates at the beginning of their Epic workflow and can launch your app
without re-authenticating.
Here's a diagram of what an EHR launch flow looks like.
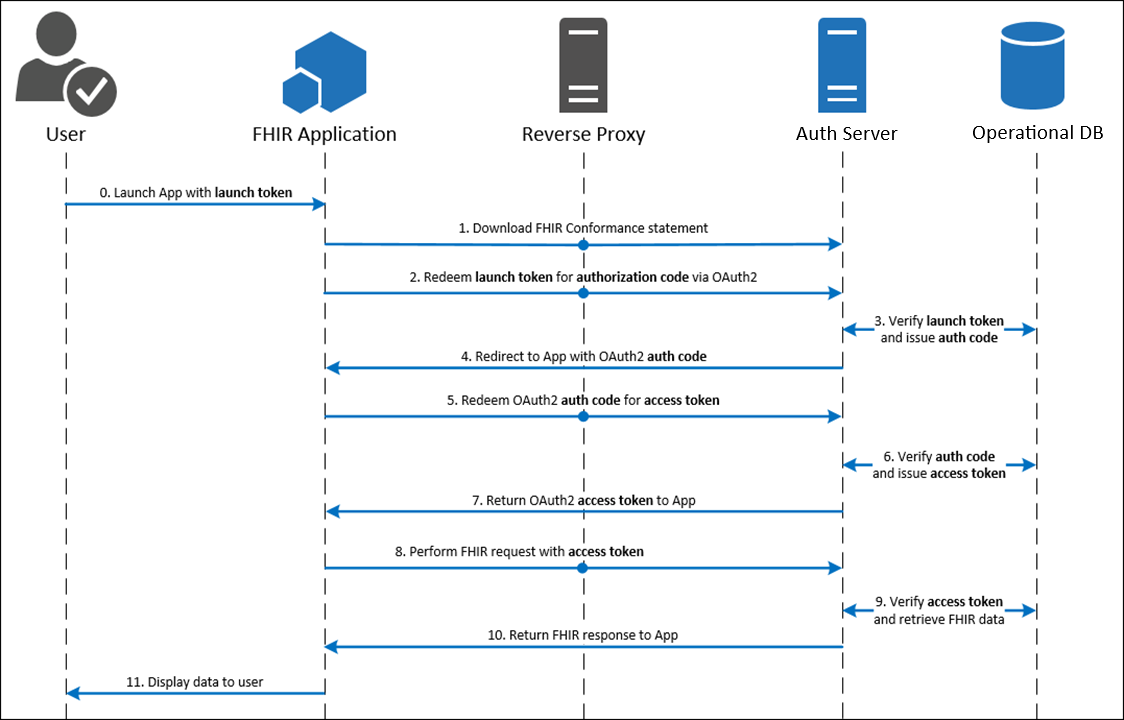
To start, make sure you've reviewed the securing and building your application sections above. If you chose an OAuth 2.0 library that does not explicitly support the EHR launch, you need to customize it as described below. If you chose an EHR Launch library, skip to the Specific Redirect URIs section.
Customize an OAuth 2.0 Library
If you cannot find an EHR launch library for your framework, we recommend customizing an OAuth 2.0 library as a starting point. In this case, you should implement the standalone launch first, and then customize it for an EHR launch. Then, we recommend turning off your standalone launch if you do not plan to use it in production. Do the following customizations:
Launch Endpoint
Your OAuth 2.0 library should create a redirect_uri for you, but you'll need to create a launch URL on your own. This endpoint is used for step 1 in the EHR launch sequence, where the user's browser navigates to an endpoint like this:
https://app.com/launch?
  iss=https%3A%2F%2Fehr%2Ffhir&
  launch=xyz123
This request has three main pieces:
- The URL of https://app.com/launch
- This is defined by you, and you provide this to an Epic community member to configure in their system.
- Note this URL does not include a "<hospital-system>" value. We recommend you have a shared launch URL across hospital systems, and use the "iss" parameter defined below to differentiate systems.
- The iss parameter
- This is also known as the FHIR base URL and uniquely identifies the Epic community member that is initiating the request.
- Your application should create an allowlist of iss values (AKA resource servers) to protect against phishing attacks. Rather than accepting any iss value in your application, only accept those you know belong to the organizations you integrate with.
- Epic maintains a list of our Community Member's FHIR endpoints on open.epic.com
- The launch parameter
- You should treat this as an opaque token, and just include it in your later request (covered below).
Additional Authorize Request Parameters
After you've validated the iss and launch parameters, your server will initiate an authorize request. You'll need to add the following parameters as defined in the SMART app launch "App asks for Authorization" step:
- aud - The iss value from the launch request.
- scope - We recommend using "launch openid fhirUser" (space-delimited list), but "launch" at least is required. Epic issues additional scopes based on the "Incoming APIs" you configured on your application.
- launch - The launch parameter provided by the EHR at the launch endpoint above.
Specific Redirect URIs
We recommend your launch URL be the same for all hospital systems, and that you have multiple redirect URIs each specific to one system. Your launch should use the "iss" to differentiate between health systems and redirect to their specific URI.
For example, your app may have the following endpoints:
- https://app.com/launch
- https://app.com/health-system-a/callback
- https://app.com/health-system-b/callback
A launch from health-system-a would look like this:
-
The health system will launch to:
- https://app.com/launch?iss=https%3A%2F%2Fsystem-a.fhir.com%2Fv1&launch=abc123
-
And when your server constructs an authorization request, it would use this
redirect_uri:
- https://app.com/health-system-a/callback
In this case, your server mapped on the "iss" value provided to choose the right <health-sytem> value.
Test an EHR Launch
Once you've built an application, you can test your integration with the Hyperdrive Client Testing Harness, which supports SMART on FHIR testing, and use that application's client ID in your test requests.
In either of these tools, you provide your launch URL and the tool will dynamically append the "iss" and "launch" parameters when you run a test.
A launch of the sample app above would look like this (newlines included for clarity, values are URL encoded):
http://localhost:3000/launch?
  launch=[omitted]&
  iss=https%3A%2F%2Ffhir.epic.com%2Finterconnect-fhir-oauth%2Fapi%2FFHIR%2FR4
In response, your app would navigate the user's browser to a new URL (newlines included for clarity, values are URL encoded). Note the redirect_uri includes "epic-sandbox", which is the <health-system> value this app chose for the sandbox's "iss". In addition, the request should include the "launch" scope, and also include the launch token presented above:
https://fhir.epic.com/interconnect-fhir-oauth/oauth2/authorize?
  client_id=e3073934-68c1-4ca7-9b59-3d8b934187f1&
  scope=launch%20openid%20fhirUser&
  response_type=code&
  redirect_uri=http%3A%2F%2Flocalhost%3A3000%2Fepic-sandbox%2Fcallback&
  state=example-state-value-should-fail&
  code_challenge_method=S256&
  code_challenge=PHHQCoInTVWPbe78fWbQSftF5f6nn7hgskfLfEm4L6s&
  aud=https%3A%2F%2Ffhir.epic.com%2Finterconnect-fhir-oauth%2Fapi%2FFHIR%2FR4
  launch=[omitted]
Note that Epic also supports POST-Based authorization for EHR Launches (but not standalone launches), allowing you to submit a traditional HTML form (second example here) for the authorize request. This moves the request parameters from the query string into the body of the form. If you use this method while embedded in Epic, you will need to allow the page to be embedded in an iframe.
Handling the State Parameter
We recommend following the SMART App Launch Framework's recommendation that the "state" parameter be an unpredictable value … with at least 122 bits of entropy (e.g., a properly configured random UUID is suitable), and not store any actual application state in the state parameter.
If you must store data in the "state" parameter, we recommend you use POST-Based authorization (discussed above). Large state values combined with Epic launch tokens may cause the request URL to exceed the authorization server's maximum URL length. By moving the data to a POST body, your request parameters do not contribute to the URL length.
Embedding Tips
If you are writing a web-based application that you intend to embed in Epic, you may find that your application may require minor modifications. We offer a simple testing harness to help you validate that your web application is compatible with the embeddable web application viewer in Epic. As embedding your application in Hyperspace may not behave the same as presenting it in a browser, ensure that your app works with the testing harness and that you can run multiple instances of the app at the same time within the same session (click the "Use Two Browsers" checkbox). Our launching & embedding document has more details, and we provide implementation options below.
Embedding in Multiple Tabs
Epic can embed multiple instances of your application by opening them in separate browser tabs. Given Epic can have multiple patients open at once, your app needs to handle having multiple browser tabs open at once, and remember what patient is open in each tab.
Rather than using HTML5 SessionStorage for tab segregation, you need to use a dedicated URL parameter representing the tab. You can then reference the launch session in that tab from the URL. There are several URL parameter options, such as:
- A path parameter (/app/{tabId})
- A query string parameter (/app?tabId={tabId})
- A URL fragment parameter (/app#tabId={tabId})
Most OAuth 2.0 libraries do not support tab-specific workflows out of the box, and you may need to customize the library to achieve this. This involves at least:
- Having the library redirect to a tab-specific URL after the launch.
- Securing the tab-specific data (patient context) behind your session management system.
Epic's Hyperspace browser does not support segregated session storage. If your app stores tab-specific data in session storage, you need to use the unique tabId from above to store off this data per tab. You can store/retrieve any data like this:
window.sessionStorage.setItem(tabId,"tab-specific-data")
window.sessionStorage.getItem(tabId) // Returns "tab-specific-data"
Other Browser Options
Epic community members can configure your app to launch in a floating window or the system default browser in case your app cannot support embedding. Note the system default browser is not recommended because switching between patients in Epic does not close your app. The user might not realize the open patient is different between Epic and your application, which might lead to them entering information or making care decisions based on a different patient.
Any apps that cannot support embedding in an iframe should attempt a floating window launch, and only use the system default browser as a fallback.
App Architecture Considerations
This section includes some common considerations for app developers, including:
- Supporting Multiple FHIR Servers - Since each Epic community member has their own copy of Epic.
- Endpoint Discovery - So you can limit your configuration to one or two URLs.
- Retrieving Launch Context - Outlines different ways Epic can share contextual data with your app.
- Identifying the User - Outlines Epic's support for sharing user identifiers and other user info.
Supporting Multiple FHIR Servers
Each Epic community member has a separate copy of Epic, and their own unique database of users and patients. This means that each Epic community member has their own authorization and servers, and that your app needs to differentiate between them. For example, patient records between different systems should not be mixed, because identifiers such as MRNs are not globally unique.
Defining your Endpoints
The two most common strategies we see for handling tenancy in apps are:
- Unique URL paths: https://app.com/<hospital-system>/app
- Unique subdomains: https://<hospital-system>.app.com/app
- Note that apps installed on-premises (hosted by Epic community members) likely have entirely different domains per community member.
Epic community members are most familiar with these strategies, and we recommend against using others such as query string parameters.
Multitenancy and ID Segregation
<hospital-system> is defined by you, and you can match this to your own tenant structure. You should always segregate data from different Epic community members, and keep in mind the following identifiers are not globally unique:
- FHIR IDs
- MRNs and other Epic internal identifiers
These IDs are only unique when stored off with an identifier-system, such as:
- FHIR ID + resource type + the FHIR Base URL
- ID + ID Concept + <hospital-system> - From our ID Types tutorial, OIDs are generally a combination of ID Concept and <hospital-system>
Endpoint Discovery
Epic maintains a list of our Community Member's FHIR endpoints on open.epic.com, where each <hospital-system> as defined above has one endpoint. The sandbox's R4 FHIR endpoint for example is:
https://fhir.epic.com/interconnect-fhir-oauth/api/FHIR/R4
Starting from this endpoint, you can manually edit or programmatically discover the other endpoints used by your library. Here are some examples:
- For the OAuth 2.0 authorize and token endpoints, you can use the programmatic methods mentioned here. If your app does programmatic discovery, cache these values on startup or pre-configure them, rather than making the request for every login.
- For the Openid Connect issuer endpoint, replace /api/FHIR/R4 with /oauth2. For example:
https://fhir.epic.com/interconnect-fhir-oauth/oauth2
Retrieving Launch Context
The SMART App Launch delivers patient context by adding parameters to the OAuth 2.0 token endpoint response. Your library needs to support retrieving these extra values from the token response, such as patient and encounter below:
  {
    "access_token": "[omitted]",
    "token_type": "Bearer",
    "expires_in": 3599,
    "id_token": "eyJhbGciOiJSUzI1NiIsImtpZCI6ImxpQ3VsVElhaXRVempmVWgyQXFOaU1ybzQ3WDlIY1ZjZDlYUGk4TERKS0E9IiwidHlwIjoiSldUIn0.eyJhdWQiOiJkODZhNjBiNi01MDExLTRjOTEtYTg2Yi1iYmM0YWNjZjkyZTIiLCJleHAiOjE2ODA3MjUyOTEsImZoaXJVc2VyIjoiaHR0cHM6Ly92ZW5kb3JzZXJ2aWNlcy5lcGljLmNvbS9pbnRlcmNvbm5lY3QtYW1jdXJwcmQtb2F1dGgvYXBpL0ZISVIvUjQvUHJhY3RpdGlvbmVyL2V0QnpNYVE0ZEhONU9wVC1DTUZEMzhRMyIsImlhdCI6MTY4MDcyNDk5MSwiaXNzIjoiaHR0cHM6Ly92ZW5kb3JzZXJ2aWNlcy5lcGljLmNvbS9pbnRlcmNvbm5lY3QtYW1jdXJwcmQtb2F1dGgvb2F1dGgyIiwibm9uY2UiOiI4ejloXzAwbzNVeGo4ZTA2dVhXdVhQSjBWZEo3OGdXTW1nTFREa2Q4aFlVIiwic3ViIjoiZXRCek1hUTRkSE41T3BULUNNRkQzOFEzIn0.N8Ru9dlHN4ephBvYcv6qslcF3lMpAQEMspQAm7vLk-S9NekO5L1Sup4H1e7sDGsiUtlyvV012lxj45RAN9iW8NbqbvYM3yjFeonm19rL6T5AOS09Yf694Mg-gFOLamGeCnhITm7UNaEWOvso1GoXCsoSujfR3jEPjDG5mEDf9ArWNLdoy6_mHG2xCGELhuk3B4NIDvsU_FKitpx-_lNm1-FZNoot2taRW3sMEj9bziIz8wKhtNYPY1lDwoAfbIww-t1umMQsZ3KPnCIqTKOcmiWj2nozJlOW7ouuyeJouSK7Qk-90N5UK5zgQTk_8unAYWYOd-5WClGzjCkzKC2DdQ",
    "refresh_token": "[omitted]",
    "scope": "user/AdverseEvent.Read user/AdverseEvent.read user/AllergyIntolerance.read user/AllergyIntolerance.write user/Appointment.read user/Binary.Read user/Binary.read user/BodyStructure.read user/CarePlan.read user/CareTeam.read user/Communication.read user/Communication.write user/Condition.read user/Condition.write user/Consent.read user/Coverage.read user/CriteriaReview.read user/CriteriaReview.write user/Device.read user/DiagnosticReport.read user/DiagnosticReport.write user/DocumentReference.Read user/DocumentReference.read user/DocumentReference.write user/Encounter.read user/Endpoint.read user/EpisodeOfCare.read user/ExplanationOfBenefit.Read user/ExplanationOfBenefit.read user/Flag.read user/Goal.read user/ImagingStudy.Read user/ImagingStudy.read user/Immunization.read user/List.read user/Location.read user/Medication.read user/MedicationRequest.read user/Observation.read user/Observation.write user/Organization.read user/Patient.read user/Patient.write user/Practitioner.read user/PractitionerRole.read user/Procedure.read user/ProcedureRequest.Read user/Questionnaire.read user/QuestionnaireResponse.Read user/QuestionnaireResponse.write user/RelatedPerson.Read user/RequestGroup.read user/ResearchStudy.Read user/ResearchStudy.read user/ReviewCollection.read user/ReviewCollection.write user/ServiceRequest.read user/Specimen.Read user/Specimen.read user/Substance.Read user/Substance.read user/Task.read user/Task.write user/ValueSet.Read fhirUser launch launch/encounter launch/patient offline_access openid",
    "__epic.dstu2.patient": "TLqtVI-V.rX88jQHUnHxO8Npvd9Gcuz5fFeZuNPSeURIB",
    "encounter": "eUAW2-QkdwCE7KH7awS8sfw3",
    "location": "eweKBcq8ruM-1MzZAX-A-0uj2rDm4SMniPONiaM5VGQk3",
    "loginDepartment": "e4W4rmGe9QzuGm2Dy4NBqVc0KDe6yGld6HW95UuN-Qd03",
    "need_patient_banner": "false",
    "patient": "eRp.HuKDlKB8MhAkzHFthQQ3",
    "smart_style_url": "https://fhir.epic.com/interconnect-fhir-oauth/api/epic/2016/EDI/HTTP/style/33500004931/I0YwRjJGNHwjQzEyMTI3fCMxQUFCRkZ8I0QzRDhERXwjODZCNTQwfCMwMDAwMDB8MHB4fDEwcHh8fEFyaWFsLCBzYW5zLXNlcmlmfCdTZWdvZSBVSScsIEFyaWFsLCBzYW5zLXNlcmlmfHw%3D.json"
  }
Epic supports a large library of context tokens, including these FHIR resource IDs (included by default):
|
Key |
FHIR API |
Explanation |
Available For |
|
patient |
Patient.Read |
Patient chart open during the launch |
Most contexts, except for dashboard-type launches |
|
encounter |
Encounter.Read |
Visit open during the launch |
Provider-facing contexts, where a visit is open during the launch |
|
location |
Location.Read |
Current location of the patient from the launched visit |
Same as encounter, see above |
|
loginDepartment |
Location.Read |
Department the provider logged into |
Only in launches from Hyperspace and provider-facing mobile apps |
|
appointment |
Appointment.Read |
Scheduled appointment that became the current visit |
Available if a visit is open during the launch, and if that visit began as a scheduled appointment |
Note that the tokens documented above are not always returned, and this is controlled by the specific workflow your app is used in. Limit the launch context your app requires to the minimum data needed and explain the context and expected workflow to your installing community members. For example, does your app need visit context, or just patient context?
Identifying the User
If you are using an Openid Connect Relying Party library, it handles user authentication by relying on the "iss" URL and "sub" claim.
Note the "iss" for an OIDC flow is not the same as the "iss" from the first step of an EHR launch. For example:
- Fhir "iss": https://fhir.epic.com/interconnect-fhir-oauth/api/FHIR/R4
- Openid Connect "iss": https://fhir.epic.com/interconnect-fhir-oauth/oauth2
One simple user account strategy is to record the user's "sub" as the primary key in a database dedicated to one Openid Connect Issuer (See Multitenancy and ID Segregation above). Using this system, you can create an account on-the-fly for anyone that can launch your app from Epic, optionally retrieving their demographics using the strategies below.
On-the-Fly Account Creation
If your app requests the "openid" and "fhirUser" scopes, your id_token includes a claim where you can retrieve additional demographics about the user by making an API call.
For example, a launch from the sandbox could return these claims (among other claims omitted):
{

  "fhirUser": "https://fhir.epic.com/interconnect-fhir-oauth/api/FHIR/R4/Practitioner/eUXiD4IyBLJFoR2VHOjfTdg3",

  "sub": "eUXiD4IyBLJFoR2VHOjfTdg3"

}
So, an app scoped for the Practitioner.Read (R4) API could make a GET request to this URL (using your access token). This resource returns name, email, gender, and NPI, among other identifiers such as employee record ID. Note that not all users have an NPI.
Below is an example "identifier" object showing a provider's NPI. You can use the "system" value of "urn:oid:2.16.840.1.113883.4.6" across all Epic community members because it is the global OID for NPI:
{

  "use": "usual",

  "type": {

    "text": "NPI"

  },

  "system": "urn:oid:2.16.840.1.113883.4.6",

  "value": "1627363736"

}
Here is an example object showing a user's employee record ID. Note the system value is an OID that will vary per Epic community member, and between non-production and production:
{
  "use": "usual",
  "type": {
    "text": "EXTERNAL"
  },
  "system": "urn:oid:1.2.840.114350.1.13.0.1.7.2.697780",
  "value": "FAMMD"
}
See our documentation for more information on making FHIR requests using your access token.
Deploying your Application
Your app should have been issued two client IDs: a non-production one and a production one. These client IDs are used for all your Epic community member installs, not just Epic's sandbox. Make sure that your app's production servers are using your production client ID.
Your application should use separate key pairs for non-production and production environments.
After your app is deployed and made available to Epic community members, you should see requests for your application within the website. Depending on your app's architecture, your implementation team will provide specific settings per every install, using the instructions below. Note, only non-production URLs (-np, as a convention) are shown, and you will repeat this setup with your production URLs (-p) and production client ID as well.
Example App Deployments
Below are 2 example app deployments, one for a Cloud-Based App and one for an On-Premises App. Review these to see what fields you should provide on the website when licensing your app for a given Community Member.
Cloud-Based App
This example assumes your application supports private_key_jwt authentication. If not, and if you are using client secrets, you must use different secrets for each Epic Community Member.
An example cloud-based application with two installing health systems might have the following list of endpoints:
- https://my-app-np.com/config/jwks.json
- https://my-app-np.com/app/launch
- https://my-app-np.com/app/health-system-a/callback
- https://my-app-np.com/app/health-system-b/callback
Note there is only one jwks.json (and a production one not listed) because the app can in principle protect a shared private key in the cloud. If you do not want to re-use private keys across Epic community members, review the On-Premises App model below.
Steps:
-
Make sure your app has an app-level JWK Set URL listed, because this is not
a download specific value for cloud-based apps. Your organization's
administrator should be able to edit this even after your application has
been activated. Click "edit" at the bottom of your build apps page to unlock
this field:

-
When provisioning, un-check and remove the app-level endpoint URIs, and just
supply the health system specific values:

-
When provisioning, select the "JWK Set URL" option and explicitly use the
app-level value. If the "JWK Set URL" option is not available, see step 4:
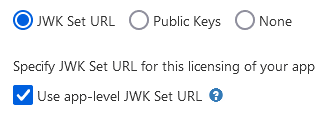
-
(Conditional) Provide your public key manually in
X509 format
if the JWK Set URL option is disabled based on the community member's Epic
version:

On-Premises App
An example on-premises (on prem) application with two installing health systems may have the following list of endpoints. Note there are multiple public key endpoints because on-premises apps should always have a JWK Set URL pointing at the community member's specific instance of your application, and its unique public key:
- https://health-system-a.my-app-np.com/config/jwks.json
- https://health-system-a.my-app-np.com/app/launch
- https://health-system-a.my-app-np.com/app/callback
- https://health-system-b.my-app-np.com/config/jwks.json
- https://health-system-b.my-app-np.com/app/launch
- https://health-system-b.my-app-np.com/app/callback
Steps:
-
When provisioning, un-check and remove the app-level endpoint URIs, and just
supply the health system specific values:
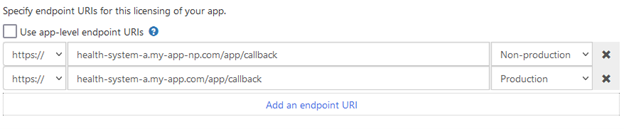
-
When provisioning, select the "JWK Set URL" option, un-check "Use app-level
JWK Set URL", and provide this health system's specific URL. If the "JWK Set
URL" option is not available, see step 3:
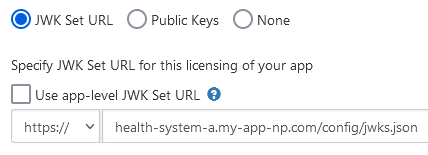
-
(Conditional) Provide your public key manually in
X509 format
if the JWK Set URL option is disabled based on the community member's Epic
version:
Appendix
Considerations for Native Apps
There are additional security considerations when launching a native app to sufficiently protect the authorization code from malicious apps running on the same device. There are a few options for how to implement this additional layer of security:
- Platform-specific link association: Android, iOS, Windows, and other platforms have introduced a method by which a native app can claim an HTTPS redirect URL, demonstrate ownership of that URL, and instruct the OS to invoke the app when that specific HTTPS URL is navigated to. Apple's iOS calls this feature "Universal Links"; Android, "App Links"; Windows, "App URI Handlers". This association of an HTTPS URL to native app is platform-specific and only available on some platforms.
- Proof Key for Code Exchange (PKCE): This is a standardized, cross-platform technique for public clients to mitigate the threat of authorization code interception. However, it requires additional support from the authorization server and app. PKCE is described in IETF RFC 7636 and supported starting in the August 2019 version of Epic. Note that the Epic implementation of this standard uses the S256 code_challenge_method. The "plain" method is not supported.
Starting in the August 2019 version of Epic, the Epic implementation of OAuth 2.0 supports PKCE, and Epic recommends using PKCE for native mobile app integrations. For earlier versions or in cases where PKCE cannot be used, Epic recommends the use of Universal Links/App Links in lieu of custom redirect URL protocol schemes.
private_key_jwt authentication
During an OAuth 2.0 flow, your server may be required to authenticate itself to the token endpoint. We recommend private_key_jwt authentication over client_secret_basic (and client_secret_post) for a few reasons:
- It uses asymmetric cryptography, so you never have to distribute your credential (private key).
- It simplifies deploying your application because private keys can be reused across Epic community members (for cloud-based apps).
- When your public key is hosted on a JWK Set URL, you can easily rotate your public (and private) keys to help you meet NIST's recommendations on private key rotation.
Comparison to Mutual TLS
private_key_jwt authentication is similar to mutual TLS in that both use asymmetric cryptography. Both techniques give you strong assurance of who the app is and do not require you to manually distribute a secret like a password.
The two techniques differ in a few key ways:
- Mutual TLS can use a certificate chain to validate the expected public key, whereas private_key_jwt relies on the app developer pre-registering a public key with Epic.
- With private_key_jwt authentication, the app authenticates only once per hour per launch. With mutual TLS, the app authenticates on every web service call.
- Mutual TLS is conducted at the transport layer, whereas private_key_jwt is conducted in the application layer (see the OSI Model).
Practically, mutual TLS is more difficult to maintain because Epic community members need to register public keys manually through their Client Systems team. With private_key_jwt, Epic handles authentication directly in the Epic database.
Launching Without SSO
Use Cases
You might want to launch your application from Epic but not use the launch to authenticate your users. In general, we see one of two use cases for this:
Re-authenticating on Launch
While not our recommended workflow, your app can re-authenticate users during the launch and just use the launch to provide access to patient data.
No Authentication
Your application does not include a component that needs protecting. Examples of un-protected applications include:
- Public calculators, where anyone can submit data to your server without authentication and see the results.
- Front-end data visualization apps, where data loaded from the EHR is processed on the user's device.
If your un-protected application does not require user or patient context, then you do not need to use the SMART App Launch at all. You can simply provide a static URL for your website or Native app that Epic Community Members can configure in their system. This does not require registration with Epic.
If your un-protected application requires user or patient context, then you should use the launch to avoid putting PHI and PII into the page's URL.
Choosing a Library without SSO
Our recommendation for these apps is to use the same infrastructure as an application using OAuth 2.0 for SSO. However, for applications with no web server component this added infrastructure may be more complex than you need.
As an alternative, you can use a client-side OAuth 2.0 library such as the common, opensource fhirclient library (for single-page-apps) or one from the AppAuth SDK (for native apps). Use caution when using these libraries because they cannot be used to protect your app's web server (if you have one). They only secure the connection between your client-side and the EHR's authorization server.
If you decide to use a client-side OAuth 2.0 library, you will not register credentials (public keys or client secrets) when building your app and will configure your library to use client authentication type "none." This is called out in the "Upload your credentials" step of the Building your Application section.
Persistent Access
If you are using a client-side OAuth 2.0 library, you cannot use the "refresh_token" grant type for persistent access to APIs (>1 hour of access). If you need persistent access, we recommend using a server-side OAuth 2.0 library with refresh tokens, where the refresh token is stored on your server and protected by your session management system.
If you cannot add a server component to your application, you can add dynamic client registration to your client-side only application and follow the directions here to use your initial access token to get persistent access. This app is only available for Patient-facing applications at this time.
SMART Scopes
SMART scopes are returned in the scope parameter of the OAuth 2.0 token endpoint response and determine which resources an application has permission to access and what actions the application is permitted to take. The scopes provided are based on the scopes that your app requested in your authorize request as well as the incoming APIs you have selected on your app page.
As of the November 2024 version of Epic, both SMART v1 and SMART v2 scope formatting are supported. In the August 2024 and prior versions, only SMART v1 scopes are supported.
The actions defined by SMART v1 scopes are .read and .write. SMART v2 scopes use CRUDS syntax and actions include: .c – create, .r – read, .u – update, .d – delete, and .s – search.
For example, the Observation.Create resource corresponds to either:
- SMART v1: {user-type}/Observation.write
- SMART v2: {user-type}/Observation.c
Which version should you select?
If your app uses SMART v1 scopes or if your app does not use SMART scopes at all, you should select SMART v1.
If your app uses SMART v2 scopes, you should select SMART v2.
Note: Prior to the November 2024 version of Epic, SMART v1 scope formatting will be returned regardless of the SMART Scope Version selected on your app page. If your app uses SMART scopes and your customer is on a version of Epic earlier than November 2024, you must support SMART v1 scopes.
OAuth 2.0 Specification
Implementation Consideration: Starting in the May 2026 version of Epic, customers must manually configure the JWK Set URL (JKU) you specify for your backend OAuth 2.0 clients. This customer-specific configuration is referred to as the local JKU.
Update: Customers will be able to configure a local JWK using a static public key in .pem format that you provide, instead of using a JKU. If your app relies on static keys and your JWKs change, you will need to communicate the new keys directly to each customer to maintain functionality. For ease of key rotation and ongoing maintenance, Epic recommends supporting a JKU.
Refer to the following table for Epic versions when this requirement will take effect.|
Epic Version |
Epic Sandbox JKU Support |
Epic Customer JKU Support |
|
February 2025 and prior |
Optional |
Optional - Each customer can choose to enforce JKU support for backend OAuth apps. This enforcement is off by default. |
|
August 2025 |
Vendor Services and Epic on FHIR no longer allow new static key uploads for use in the sandbox. |
|
|
February 2026 |
Static keys no longer supported in the sandbox for backend OAuth. Vendor Services and Epic on FHIR websites no longer allow static key uploads for new apps or new customer download requests. Both sites still support rotating keys for existing live customers. |
Vendor Services and Epic on FHIR websites no longer allow static key uploads for new apps or new customer download requests. Both sites still support rotating keys for existing live customers. |
|
May 2026 |
Static keys are no longer supported in customer environments for backend OAuth. |
|
|
August 2026 |
Customers may configure local JWKs if provided .pem files. |
Using OAuth 2.0
Applications must secure and protect the privacy of patients and their data. To help meet this objective, Epic supports using the OAuth 2.0 framework to authenticate and authorize applications.
Why OAuth 2.0?
OAuth 2.0 enables you to develop your application without having to build a credential management system. Instead of exposing login credentials to your application, your application and an EHR's authorization server exchange a series of authorization codes and access tokens. Your application can access protected patient data stored in an EHR's database after it obtains authorization from the EHR's authorization server.
Before You Get Started
To use OAuth 2.0 to authorize your application's access to patient information, some information needs to be shared between the authorization server and your application:
client_id: Theclient_ididentifies your application to authentication servers within the Epic community and allows you to connect to any organization.redirect_uri: Theredirect_uriconfirms your identity and is used to validate and redirect authentication requests that originate from your application. Epic's implementation allows for multipleredirect_uris.- Note that a
redirect_uriis not needed for backend services using the client_credentials grant type. - An https protocol is required for use in a production environment, but http protocol-based redirect_uris are allowed for development and testing.
- Registered redirect_uris must not contain anything in the fragment (i.e. anything after #).
- Note that a
- Credentials: Some apps, sometimes referred to as confidential clients, can use credentials registered for a given EHR system to obtain authorization to access the system without a user or a patient implicitly or explicitly authorizing the app. Examples of this are apps that use refresh tokens to allow users to launch the app outside of an Epic client without needing to log in every time they use the app, and backend services that need to access resources without a specific person launching the app, for example, fetching data on a scheduled basis.
You can register your application for access to both the sandbox and Epic organizations here. You'll provide information to us, including one or more redirect_uris, and Epic will generate a client_id for you.
Apps can be launched from within an existing EHR or patient portal session, which is called an EHR launch. Alternatively, apps can be launched standalone from outside of an existing EHR session. Apps can also be backend services where no user is launching the app.
EHR launch (SMART on FHIR): The app is launched by the EHR calling a launch URL specified in the EHR's configuration. The EHR launches the launch URL and appends a launch token and the FHIR server's endpoint URL (ISS parameter) in the query string. The app exchanges the launch token, along with the client identification parameters to get an authorization code and eventually the access token.
- See the Embedded Launch section of this guide for more details.
Standalone launch: The app launches directly to the authorize endpoint outside of an EHR session and requests context from the EHR's authorization server.
- See the Standalone Launch section of this guide for more details.
Backend services: The app is not authorized by a specific person and likely does not have a user interface, and therefore calls EHR web services with system-level authorization.
- See the Backend Services section of this guide for more details.
Desktop integrations through Subspace: The app requests access to APIs directly available on the EHR's desktop application via a local HTTP server.
- See the Subspace Communication Framework specification for more details.
Note: For all requests to OAuth 2.0 endpoints, your application must not include the same parameter more than once.
Starting in the August 2019 version of Epic, the Epic implementation of OAuth 2.0 supports PKCE and Epic recommends using PKCE for native mobile app integrations. For earlier versions or in cases where PKCE cannot be used, Epic recommends the use of Universal Links/App Links in lieu of custom redirect URL protocol schemes.
The app you build will list both a production Client ID and a non-production Client ID. While testing in the Epic on FHIR sandbox, use the non-production Client ID.
The base URL for the Current Sandbox environment is:
https://fhir.epic.com/interconnect-fhir-oauth/EHR Launch (SMART on FHIR)
Contents
- Step 1: Your Application is Launched from the Patient Portal or EHR
- Step 2: Your Application Retrieves the Conformance Statement or SMART Configuration
- Step 3: Your Application Requests an Authorization Code
- Step 4: EHR's Authorization Server Reviews The Request
- Step 5: Your Application Exchanges the Authorization Code for an Access Token
- OpenID Connect id_tokens
- Validating the OpenID Connect JSON Web Token
- Step 6: Your Application Uses FHIR APIs to Access Patient Data
- Step 7: Use a Refresh Token to Obtain a New Access Token
How It Works
The app is launched by the EHR calling a launch URL specified in the EHR's configuration. The EHR launches the launch URL and appends a launch token and the FHIR server's endpoint URL (ISS parameter) in the query string. The app exchanges the launch token, along with the client identification parameters to get an authorization code and eventually the access token.
Step 1: Your Application is Launched from the Patient Portal or EHR
Your app is launched by the EHR calling the launch URL which is specified in the EHR's configuration. The EHR sends a launch token and the FHIR server's endpoint URL (ISS parameter).
Note: If you are writing a web-based application that you intend to embed in Epic, you may find that your application may require minor modifications. We offer a simple testing harness to help you validate that your web application is compatible with the embeddable web application viewer in Epic. As embedding your application in Hyperspace may not behave the same as presenting it in a browser, ensure that your app works with the testing harness and that you can run multiple instances of the app at the same time within the same session.
-
launch: This parameter is an EHR generated token that signifies that an active EHR session already exists. This token is one-time use and will be exchanged for the authorization code.- See the Epic-Issued OAuth 2.0 Tokens appendix section for details on handling launch codes.
-
iss: This parameter contains the EHR's FHIR endpoint URL, which an app can use to find the EHR's authorization server.- Your application should create an allowlist of iss values (AKA resource servers) to protect against phishing attacks. Rather than accepting any iss value in your application, only accept those you know belong to the organizations you integrate with.
Step 2: Your Application Retrieves the Conformance Statement or SMART Configuration
To determine which authorize and token endpoints to use in the EHR launch flow, you should make a GET request to the metadata endpoint which is constructed by taking the iss provided and appending /metadata. Alternatively, when communicating with Epic organizations using the August 2021 version or Epic or later, you can make a GET request to the SMART configuration endpoint by taking the iss and appending /.well-known/smart-configuration.
If no Accept header is sent, the metadata response is XML-formatted and the smart-configuration response is JSON-formatted. An Accept header can be sent with a value of application/json, application/xml, and the metadata endpoint additionally supports application/fhir+json and application/json+fhir to specify the format of the response.
Metadata Example
Here's an example of what a full metadata request might look like.
GET https://fhir.epic.com/interconnect-fhir-oauth/api/FHIR/DSTU2/metadata HTTP/1.1
Accept: application/fhir+json
Here is an example of what the authorize and token endpoints would look like in the metadata response.
"extension": [
{
"url": "http://fhir-registry.smarthealthit.org/StructureDefinition/oauth-uris",
"extension": [
  {
    "url": "authorize",
    "valueUri": "https://fhir.epic.com/interconnect-fhir-oauth/oauth2/authorize"
  },
  {
    "url": "token",
    "valueUri": "https://fhir.epic.com/interconnect-fhir-oauth/oauth2/token"
  }
]
}
]
Metadata Example with Dynamic Client Registration (starting in the November 2021 version of Epic)
Here's an example of what a full metadata request might look like. By including an Epic Client ID, clients authorized to perform dynamic client registration can then determine which endpoint to use when performing dynamic client registration. Note that this capability is only supported for STU3 and R4 requests.
GET https://fhir.epic.com/interconnect-fhir-oauth/api/FHIR/R4/metadata HTTP/1.1
Accept: application/fhir+json
Epic-Client-ID: 0000-0000-0000-0000-0000
Here is an example of what the authorize, token, and dynamic registration endpoints would look like in the metadata response.
"extension": [
{
"url": "http://fhir-registry.smarthealthit.org/StructureDefinition/oauth-uris",
"extension": [
  {
    "url": "authorize",
    "valueUri": "https://fhir.epic.com/interconnect-fhir-oauth/oauth2/authorize"
  },
  {
    "url": "token",
    "valueUri": "https://fhir.epic.com/interconnect-fhir-oauth/oauth2/token"
  },
  {
    "url": "register",
    "valueUri": https://fhir.epic.com/interconnect-fhir-oauth/oauth2/register
  }
]
}
]
Here's an example of what a smart-configuration request might look like.
GET https://fhir.epic.com/interconnect-fhir-oauth/api/FHIR/R4/.well-known/smart-configuration HTTP/1.1
Accept: application/json
Here is an example of what the authorize and token endpoints would look like in the smart-configuration response.
"authorization_endpoint": "https://fhir.epic.com/interconnect-fhir-oauth/oauth2/authorize",
"token_endpoint": "https://fhir.epic.com/interconnect-fhir-oauth/oauth2/token",
"token_endpoint_auth_methods_supported": [
    "client_secret_post",
    "client_secret_basic",
    "private_key_jwt"
]
Retrieving Conformance Statement: Additional Header Requirements
In some cases when making your request to the metadata endpoint, you'll also need to include additional headers to ensure the correct token and authorize endpoints are returned. This is because in Epic, it is possible to configure the system such that the FHIR server's endpoint URL, provided in the iss parameter, is overridden on a per client ID basis. If you do not send the Epic-Client-ID HTTP header with the appropriate production or non-production client ID associated with your application in your call to the metadata endpoint, you can receive the wrong token and authorize endpoints. Additional CORS setup might be necessary on the Epic community member's Interconnect server to allow for this header.
Starting in the November 2021 version of Epic, by including an Epic Client ID, clients authorized to perform dynamic client registration can then determine which endpoint to use when performing dynamic client registration. Note that this capability is supported for only STU3 and R4 requests.
Here's an example of what a full metadata request might look like with the additional Epic-Client-ID header.
GET https://fhir.epic.com/interconnect-fhir-oauth/api/FHIR/R4/metadata HTTP/1.1
Accept: application/fhir+json
Epic-Client-ID: 0000-0000-0000-0000-0000
Step 3: Your Application Requests an Authorization Code
Your application now has a launch token obtained from the initial EHR launch
as well as the authorize endpoint obtained from the metadata query. To
exchange the launch token for an authorization code, your app needs to either
make an HTTP GET or POST request to the authorize endpoint that contains the
parameters below. POST requests are supported for EHR launches in Epic version
November 2020 and later, and are not currently supported for standalone
launches.
For POST requests, the parameters should be in the body of the request and should be sent as Content-Type "application/x-www-form-urlencoded". For GET requests, the parameters should be appended in the querystring of the request. It is Epic's recommendation to use HTTP POST for EHR launches to overcome any size limits on the request URL.
In either case, the application must redirect the User-Agent (the user's browser) to the authorization server by either submitting an HTML Form to the authorization server (for HTTP POST) or by redirecting to a specified URL (for HTTP GET). The request should contain the following parameters.
response_type: This parameter must contain the value "code".client_id: This parameter contains your web application's client ID issued by Epic.redirect_uri: This parameter contains your application's redirect URI. After the request completes on the Epic server, this URI will be called as a callback. The value of this parameter needs to be URL encoded. This URI must also be registered with the EHR's authorization server by adding it to your app listing.scope: This parameter describes the information for which the web application is requesting access. Starting with the Epic 2018 version, a scope of "launch" is required for EHR launch workflows. Starting with the November 2019 version of Epic, OpenID Connect scopes are supported, specifically the "openid" scope is supported for all apps and the "fhirUser" scope is supported by apps with the R4 (or greater) SMART on FHIR version selected.launch: This parameter is required for EHR launch workflows. The value to use will be passed from the EHR.aud: Starting in the August 2021 version of Epic, health care organizations can optionally configure their system to require the aud parameter for EHR launch workflows if a launch context is included in the scope parameter. Starting in the May 2023 version of Epic, this parameter will be required. The value to use is the FHIR base URL of the resource server the application intends to access, which is typically the FHIR server returned by the iss.state: This optional parameter is generated by your app and is opaque to the EHR. The EHR's authorization server will append it to each subsequent exchange in the workflow for you to validate session integrity. While not required, this parameter is recommended to be included and validated with each exchange in order to increase security. For more information see RFC 6819 Section 3.6.- Note: Large
statevalues in combination with launch tokens that are JWTs (see above) may cause the query string for the HTTP GET request to the authorization endpoint to exceed the Epic community member web server's max query string length and cause the request to fail. You can mitigate this risk by:- Following the SMART App Launch Framework's recommendation that the
stateparameter bean unpredictable value ... with at least 122 bits of entropy (e.g., a properly configured random uuid is suitable)
, and not store any actual application state in thestateparameter. - Using a POST request. If you use this approach, note that you might still need to account for a large state value in the HTTP GET redirect back to your own server.
- Following the SMART App Launch Framework's recommendation that the
- Note: Large
Additional parameters for native mobile apps (available starting in the August 2019 version of Epic):
code_challenge: This optional parameter is generated by your app and used for PKCE. This is the S256 hashed version of the code_verifier parameter, which will be used in the token request.code_challenge_method: This optional parameter indicates the method used for the code_challenge parameter and is required if using that parameter. Currently, only the S256 method is supported.
Here's an example of an authorization request using HTTP GET. You will replace the [redirect_uri], [client_id], [launch_token], [state], [code_challenge], and [audience] placeholders with your own values.
https://fhir.epic.com/interconnect-fhir-oauth/oauth2/authorize?scope=launch&response_type=code&redirect_uri=[redirect_uri]&client_id=[client_id]&launch=[launch_token]&state=[state]&code_challenge=[code_challenge]&code_challenge_method=S256&aud=[audience]This is an example HTTP GET from the SMART on FHIR launchpad:
https://fhir.epic.com/interconnect-fhir-oauth/oauth2/authorize?scope=launch&response_type=code&redirect_uri=https%3A%2F%2Ffhir.epic.com%2Ftest%2Fsmart&client_id=d45049c3-3441-40ef-ab4d-b9cd86a17225&launch=GwWCqm4CCTxJaqJiROISsEsOqN7xrdixqTl2uWZhYxMAS7QbFEbtKgi7AN96fKc2kDYfaFrLi8LQivMkD0BY-942hYgGO0_6DfewP2iwH_pe6tR_-fRfiJ2WB_-1uwG0&state=abc123&aud=https%3A%2F%2Ffhir.epic.com%2Finterconnect-fhir-oauth%2Fapi%2Ffhir%2Fdstu2And here's an example of what the same request would look like as an HTTP Post:
POST https://fhir.epic.com/interconnect-fhir-oauth/oauth2/authorize HTTP/1.1
Content-Type: application/x-www-form-urlencoded

scope=launch&response_type=code&redirect_uri=https%3A%2F%2Ffhir.epic.com%2Ftest%2Fsmart&client_id=d45049c3-3441-40ef-ab4d-b9cd86a17225&launch=GwWCqm4CCTxJaqJiROISsEsOqN7xrdixqTl2uWZhYxMAS7QbFEbtKgi7AN96fKc2kDYfaFrLi8LQivMkD0BY-942hYgGO0_6DfewP2iwH_pe6tR_-fRfiJ2WB_-1uwG0&state=abc123&aud=https%3A%2F%2Ffhir.epic.com%2Finterconnect-fhir-oauth%2Fapi%2Ffhir%2Fdstu2
Step 4: EHR's Authorization Server Reviews the Request
The EHR's authorization server reviews the request from your application. If approved, the authorization server redirects the browser to the redirect URL supplied in the initial request and appends the following querystring parameter.
-
code: This parameter contains the authorization code generated by Epic, which will be exchanged for the access token in the next step.- See the Epic-Issued OAuth 2.0 Tokens appendix section for details on handling authorization codes.
-
state: This parameter will have the same value as the earlier state parameter. For more information, refer to Step 3.
Here's an example of what the redirect will look like if Epic's authorization server accepts the request:
https://fhir.epic.com/test/smart?code=yfNg-rSc1t5O2p6jVAZLyY00uOOte5KM1y3YUxqsJQnBKEMNsYqOPTyVqcCH3YXaPkLztO9Rvf7bhLqQTwALHcHN6raxpTbR1eVgV2QyLA_4K0HrJO92et3qRXiXPkj7&state=abc123Step 5: Your Application Exchanges the Authorization Code for an Access Token
After receiving the authorization code, your application trades the code for a JSON object containing an access token and contextual information by sending an HTTP POST to the token endpoint using a Content-Type header with value of "application/x-www-form-urlencoded". For more information, see RFC 6749 section 4.1.3.
Access Token Request: Non-confidential Clients
The following parameters are required in the POST body:
-
grant_type: For the EHR launch flow, this should contain the value "authorization_code". -
code: This parameter contains the authorization code sent from Epic's authorization server to your application as a querystring parameter on the redirect URI as described above. -
redirect_uri: This parameter must contain the same redirect URI that you provided in the initial access request. The value of this parameter needs to be URL encoded. -
client_id: This parameter must contain the application's client ID issued by Epic that you provided in the initial request. -
code_verifier: This optional parameter is used to verify against your code_challenge parameter when using PKCE. This parameter is passed as free text and must match the code_challenge parameter used in your authorization request once it is hashed on the server using the code_challenge_method. This parameter is available starting in the August 2019 version of Epic.
Here's an example of what an HTTP POST request for an access token might look like:
POST https://fhir.epic.com/interconnect-fhir-oauth/oauth2/token HTTP/1.1
Content-Type: application/x-www-form-urlencoded

grant_type=authorization_code&code=yfNg-rSc1t5O2p6jVAZLyY00uOOte5KM1y3YUxqsJQnBKEMNsYqOPTyVqcCH3YXaPkLztO9Rvf7bhLqQTwALHcHN6raxpTbR1eVgV2QyLA_4K0HrJO92et3qRXiXPkj7&redirect_uri=https%3A%2F%2Ffhir.epic.com%2Ftest%2Fsmart&client_id=d45049c3-3441-40ef-ab4d-b9cd86a17225
The authorization server responds to the HTTP POST request with a JSON object that includes an access token. The response contains the following fields:
-
access_token: This parameter contains the access token issued by Epic to your application and is used in future requests.- See the Epic-Issued OAuth 2.0 Tokens appendix section for details on handling access tokens.
-
token_type: In Epic's OAuth 2.0 implementation, this parameter always includes the valuebearer. -
expires_in: This parameter contains the number of seconds for which the access token is valid. -
scope: This parameter describes the access your application is authorized for. -
id_token: Returned only for applications that have requested an openid scope. See below for more info on OpenID Connect id_tokens. This parameter follows the guidelines of the OpenID Connect (OIDC) Core 1.0 specification. It is signed but not encrypted. -
patient: This parameter identifies provides the FHIR ID for the patient, if a patient is in context at time of launch. -
epic.dstu2.patient: This parameter identifies the DSTU2 FHIR ID for the patient, if a patient is in context at time of launch. -
encounter: This parameter identifies the FHIR ID for the patient's encounter, if in context at time of launch. The encounter token corresponds to the FHIR Encounter resource. -
location: This parameter identifies the FHIR ID for the encounter department, if in context at time of launch. The location token corresponds to the FHIR Location resource. -
appointment: This parameter identifies the FHIR ID for the patient's appointment, if appointment context is available at time of launch. The appointment token corresponds to the FHIR Appointment resource. -
loginDepartment: This parameter identifies the FHIR ID of the user's login department for launches from Hyperspace. The loginDepartment token corresponds to the FHIR Location resource. -
state: This parameter will have the same value as the earlier state parameter. For more information, refer to Step 3.
Note that you can include additional fields in the response if needed based on the integration configuration. For more information, refer to the Launching your app topic. Here's an example of what a JSON object including an access token might look like:
{
"access_token": "Nxfve4q3H9TKs5F5vf6kRYAZqzK7j9LHvrg1Bw7fU_07_FdV9aRzLCI1GxOn20LuO2Ahl5RkRnz-p8u1MeYWqA85T8s4Ce3LcgQqIwsTkI7wezBsMduPw_xkVtLzLU2O",
"token_type": "bearer",
"expires_in": 3240,
"scope": "openid Patient.read Patient.search ",
"id_token": "eyJhbGciOiJSUzI1NiIsImtpZCI6IktleUlEIiwidHlwIjoiSldUIn0.eyJhdWQiOiJDbGllbnRJRCIsImV4cCI6RXhwaXJlc0F0LCJpYXQiOklzc3VlZEF0LCJpc3MiOiJJc3N1ZXJVUkwiLCJzdWIiOiJFbmRVc2VySWRlbnRpZmllciJ9",
"__epic.dstu2.patient": "T1wI5bk8n1YVgvWk9D05BmRV0Pi3ECImNSK8DKyKltsMB",
"patient": "T1wI5bk8n1YVgvWk9D05BmRV0Pi3ECImNSK8DKyKltsMB",
"appointment": "eVa-Ad1SCIenVq8CYQVxfKwGtP-DfG3nIy9-5oPwTg2g3",
"encounter": "eySnzekbpf6uGZz87ndPuRQ3",
"location": "e4W4rmGe9QzuGm2Dy4NBqVc0KDe6yGld6HW95UuN-Qd03",
"loginDepartment": "e4W4rmGe9QzuGm2Dy4NBqVc0KDe6yGld6HW95UuN-Qd03",
"state": "abc123",
}
At this point, authorization is complete and the web application can access the protected patient data it requests using FHIR APIs.
Access Token Request: Frontend Confidential Clients
Consult Standalone Launch: Access Token Request for Frontend Confidential Clients for details on how to obtain an access token if your app is a confidential client.
OpenID Connect id_tokens
Epic started supporting the OpenID Connect id_token in the access token response for apps that request the openid scope since the November 2019 version of Epic.
A decoded OpenID Connect id_token JWT will have these headers:
| Header | Description |
|---|---|
alg |
The JWT authentication algorithm. Currently only RSA 256 is supported in id_token JWTs so this will always be RS256. |
typ |
This is always set to JWT. |
kid |
The base64 encoded SHA-256 hash of the public key. |
A decoded OpenID Connect id_token JWT will have this payload:
| Claim | Description | Remarks |
|---|---|---|
iss |
Issuer of the JWT. This is set to the token endpoint that should be used by the client. | Starting in the May 2020 version of Epic, the iss will be set to the OAuth 2.0 server endpoint, e.g. https://<Interconnect Server URL>/oauth2. For Epic versions prior to May 2020, it is set to the OAuth 2.0 token endpoint, e.g. https://<Interconnect Server URL>/oauth2/token. |
sub |
STU3+ FHIR ID for the resource representing the user launching the app. | For Epic integrations, the sub and fhirUser claims reference one of the following resources depending on the type of workflow:
|
fhirUser |
Absolute reference to the FHIR resource representing the user launching the app. See the HL7 documentation for more details. | The fhirUser claim will only be present if app has the R4 (or greater) SMART on FHIR version selected, and requests both the openid and fhirUser scopes in the request to the authorize endpoint. See the remark for the sub claim above for more information about what the resource returned in these claims represents. |
aud |
Audiences that the ID token is intended for. This will be set to the client ID for the application that was just authorized during the SMART on FHIR launch. | |
iat |
Time integer for when the JWT was created, expressed in seconds since the "Epoch" (1970-01-01T00:00:00Z UTC). | |
exp |
Expiration time integer for this authentication JWT, expressed in seconds since the "Epoch" (1970-01-01T00:00:00Z UTC). | This is set to the current time plus 5 minutes. |
preferred_username |
The user's LDAP/AD down-level logon name. | This claim is supported in Epic version February 2021 and later. The preferred_username claim will be present only if the app requests both the openid and profile scopes in the request to the authorize endpoint. |
nonce |
The nonce for this client session. | The nonce claim will be present only if it was specified in the authorization request. This is an identifier for the client session. For more information about the nonce, refer to the Authentication Request section of the OpenID specification. |
Here is an example decoded id_token that could be returned if the app has the R4 (or greater) SMART on FHIR version selected, and requests both the openid and fhirUser scopes in the request to the authorize endpoint:
{
"alg": "RS256",
"kid": "liCulTIaitUzjfUh2AqNiMro47X9HcVcd9XPi8LDJKA=",
"typ": "JWT"
}
{
"aud": "de5dae1a-4317-4c25-86f1-ed558e85529b",
"exp": 1595956317,
"fhirUser": "https://fhir.epic.com/interconnect-fhir-oauth/oauth2/api/FHIR/R4/Practitioner/exfo6E4EXjWsnhA1OGVElgw3",
"iat": 1595956017,
"iss": "https://fhir.epic.com/interconnect-fhir-oauth/oauth2",
"sub": "exfo6E4EXjWsnhA1OGVElgw3"
}
Here is an example decoded id_token that could be returned if the app requests at least the openid scope in the request to the authorize endpoint, but either doesn't request the fhirUser claim or doesn't meet the criteria outlined above for receiving the fhirUser claim:
{
"alg": "RS256",
"kid": "liCulTIaitUzjfUh2AqNiMro47X9HcVcd9XPi8LDJKA=",
"typ": "JWT"
}
{
"aud": "de5dae1a-4317-4c25-86f1-ed558e85529b",
"exp": 1595956317,
"iat": 1595956017,
"iss": "https://fhir.epic.com/interconnect-fhir-oauth/oauth2",
"sub": "exfo6E4EXjWsnhA1OGVElgw3"
}
Validating the OpenID Connect JSON Web Token
When completing the OAuth 2.0 authorization workflow with the openid scope, the JSON Web Token (JWT) returned in the id_token field will be cryptographically signed. The public key to verify the authenticity of the JWT can be found at https://<Interconnect Server URL>/api/epic/2019/Security/Open/PublicKeys/530005/OIDC, for example https://fhir.epic.com/interconnect-fhir-oauth/api/epic/2019/Security/Open/PublicKeys/530005/OIDC.
Starting in the May 2020 version of Epic, metadata about the server's OpenID Connect configuration, including the jwks_uri OIDC public key endpoint, can be found at the OpenID configuration endpoint https://<Interconnect Server URL>/oauth2/.well-known/openid-configuration, for example https://fhir.epic.com/interconnect-fhir-oauth/oauth2/.well-known/openid-configuration.
Starting in the August 2021 version of Epic, metadata about the server's OpenID Connect configuration can also be found at the FHIR endpoint https://<Interconnect Server URL>/api/FHIR/R4/.well-known/openid-configuration, for example https://fhir.epic.com/interconnect-fhir-oauth/api/FHIR/R4/.well-known/openid-configuration.
Step 6: Your Application Uses FHIR APIs to Access Patient Data
With a valid access token, your application can now access protected patient data from the EHR database using FHIR APIs. Queries must contain an Authorization header that includes the access token presented as a Bearer token.
Here's an example of what a valid query looks like:
GET https://fhir.epic.com/interconnect-fhir-oauth/api/FHIR/DSTU2/Patient/T1wI5bk8n1YVgvWk9D05BmRV0Pi3ECImNSK8DKyKltsMB HTTP/1.1
Authorization: Bearer Nxfve4q3H9TKs5F5vf6kRYAZqzK7j9LHvrg1Bw7fU_07_FdV9aRzLCI1GxOn20LuO2Ahl5RkRnz-p8u1MeYWqA85T8s4Ce3LcgQqIwsTkI7wezBsMduPw_xkVtLzLU2O
Step 7: Use a Refresh Token to Obtain a New Access Token
Refresh tokens are not typically needed for embedded (SMART on FHIR) launches because users are not required to log in to Epic during the SMART on FHIR launch process, and the access token obtained from the launch process is typically valid for longer than the user needs to use the app.
Consult the Standalone Launch: Use a Refresh Token to Obtain a New Access Token for details on how to use a refresh token to get a new an access token if your app uses refresh tokens.
Standalone Launch
Contents
- How It Works
- Step 1: Your Application Requests an Authorization Code
- Step 2: EHR's Authorization Server Authenticates the User and Authorizes Access
- Step 3: Your Application Exchanges the Authorization Code for an Access Token
- Step 4: Your Application Uses FHIR APIs to Access Patient Data
- Step 5: Use a Refresh Token to Obtain a New Access Token
- Offline Access for Native and Browser-Based Applications
How It Works
The app launches directly to the authorize endpoint outside of an EHR session and requests context from the EHR's authorization server.
Step 1: Your Application Requests an Authorization Code
Your application would like to authenticate the user using the OAuth 2.0 workflow. To initiate this process, your app needs to link (using HTTP GET) to the authorize endpoint and append the following querystring parameters:
response_type: This parameter must contain the value "code".client_id: This parameter contains your web application's client ID issued by Epic.redirect_uri: This parameter contains your application's redirect URI. After the request completes on the Epic server, this URI will be called as a callback. The value of this parameter needs to be URL encoded. This URI must also be registered with the EHR's authorization server by adding it to your app listing.state: This optional parameter is generated by your app and is opaque to the EHR. The EHR's authorization server will append it to each subsequent exchange in the workflow for you to validate session integrity. While not required, this parameter is recommended to be included and validated with each exchange in order to increase security. For more information see RFC 6819 Section 3.6.scope: This parameter describes the information for which the web application is requesting access. Starting with the November 2019 version of Epic, the "openid" and "fhirUser" OpenID Connect scopes are supported. While scope is optional in Epic's SMART on FHIR implementation, it's required for testing in the sandbox. Providing scope=openid is sufficient.aud: Starting in the August 2021 version of Epic, health care organizations can optionally configure their system to require the aud parameter for Standalone and EHR launch workflows if a launch context is included in the scope parameter. Starting in the May 2023 version of Epic, this parameter will be required. The value to use is the base URL of the resource server the application intends to access, which is typically the FHIR server.
Additional parameters for native mobile apps (available starting in the August 2019 version of Epic):
code_challenge: This optional parameter is generated by your app and used for PKCE. This is the S256 hashed version of the code_verifier parameter, which will be used in the token request.code_challenge_method: This optional parameter indicates the method used for the code_challenge parameter and is required if using that parameter. Currently, only the S256 method is supported.
Here's an example of an authorization request using HTTP GET. You will replace the [redirect_uri], [client_id], [state], and [audience] placeholders with your own values.
https://fhir.epic.com/interconnect-fhir-oauth/oauth2/authorize?response_type=code&redirect_uri=[redirect_uri]&client_id=[client_id]&state=[state]&aud=[audience]&scope=[scope]This is an example link:
https://fhir.epic.com/interconnect-fhir-oauth/oauth2/authorize?response_type=code&redirect_uri=https%3A%2F%2Ffhir.epic.com%2Ftest%2Fsmart&client_id=d45049c3-3441-40ef-ab4d-b9cd86a17225&state=abc123&aud=https%3A%2F%2Ffhir.epic.com%2Finterconnect-fhir-oauth%2Fapi%2Ffhir%2Fdstu2&scope=openidStep 2: EHR's Authorization Server Authenticates the User and Authorizes Access
The EHR's authorization server reviews the request from your application, authenticates the user (sample credentials found here), and authorizes access. If approved, the authorization server redirects the browser to the redirect URL supplied in the initial request and appends the following querystring parameter.
code: This parameter contains the authorization code generated by Epic, which will be exchanged for the access token in the next step.- See the Epic-Issued OAuth 2.0 Tokens appendix section for details on handling authorization codes.
state: This parameter will have the same value as the earlier state parameter. For more information, refer to Step 1.
Here's an example of what the redirect will look like if Epic's authorization server accepts the request:
https://fhir.epic.com/test/smart?code=yfNg-rSc1t5O2p6jVAZLyY00uOOte5KM1y3YUxqsJQnBKEMNsYqOPTyVqcCH3YXaPkLztO9Rvf7bhLqQTwALHcHN6raxpTbR1eVgV2QyLA_4K0HrJO92et3qRXiXPkj7&state=abc123Step 3: Your Application Exchanges the Authorization Code for an Access Token
After receiving the authorization code, your application trades the code for a JSON object containing an access token and contextual information by sending an HTTP POST to the token endpoint using a Content-Type header with value of "application/x-www-form-urlencoded". For more information, see RFC 6749 section 4.1.3.
Access Token Request: Non-confidential Clients
The following parameters are required in the POST body:
grant_type: For the Standalone launch flow, this should contain the value "authorization_code".code: This parameter contains the authorization code sent from Epic's authorization server to your application as a querystring parameter on the redirect URI as described above.redirect_uri: This parameter must contain the same redirect URI that you provided in the initial access request. The value of this parameter needs to be URL encoded.client_id: This parameter must contain the application's client ID issued by Epic that you provided in the initial request.-
code_verifier: This optional parameter is used to verify against your code_challenge parameter when using PKCE. This parameter is passed as free text and must match the code_challenge parameter used in your authorization request once it is hashed on the server using the code_challenge_method. This parameter is available starting in the August 2019 version of Epic.
Here's an example of what an HTTP POST request for an access token might look like:
POST https://fhir.epic.com/interconnect-fhir-oauth/oauth2/token HTTP/1.1
Content-Type: application/x-www-form-urlencoded

grant_type=authorization_code&code=yfNg-rSc1t5O2p6jVAZLyY00uOOte5KM1y3YUxqsJQnBKEMNsYqOPTyVqcCH3YXaPkLztO9Rvf7bhLqQTwALHcHN6raxpTbR1eVgV2QyLA_4K0HrJO92et3qRXiXPkj7&redirect_uri=https%3A%2F%2Ffhir.epic.com%2Ftest%2Fsmart&client_id=d45049c3-3441-40ef-ab4d-b9cd86a17225
The authorization server responds to the HTTP POST request with a JSON object that includes an access token. The response contains the following fields:
access_token: This parameter contains the access token issued by Epic to your application and is used in future requests.- See the Epic-Issued OAuth 2.0 Tokens appendix section for details on handling access tokens.
token_type: In Epic's OAuth 2.0 implementation, this parameter always includes the valuebearer.expires_in: This parameter contains the number of seconds for which the access token is valid.scope: This parameter describes the access your application is authorized for.id_token: Returned only for applications that have requested an openid scope. See above for more info on OpenID Connect id_tokens. This parameter follows the guidelines described earlier in this document.patient: For patient-facing workflows, this parameter identifies the FHIR ID for the patient on whose behalf authorization to the system was granted.- The patient's FHIR ID is not returned for provider-facing standalone launch workflows.
-
epic.dstu2.patient: For patient-facing workflows, this parameter identifies the DSTU2 FHIR ID for the patient on whose behalf authorization to the system was granted.- The patient's FHIR ID is not returned for provider-facing standalone launch workflows.
Note that you can pass additional parameters if needed based on the integration configuration. Here's an example of what a JSON object including an access token might look like:
{
"access_token": "Nxfve4q3H9TKs5F5vf6kRYAZqzK7j9LHvrg1Bw7fU_07_FdV9aRzLCI1GxOn20LuO2Ahl5RkRnz-p8u1MeYWqA85T8s4Ce3LcgQqIwsTkI7wezBsMduPw_xkVtLzLU2O",
"token_type": "bearer",
"expires_in": 3240,
"scope": "Patient.read Patient.search ",
"patient": "T1wI5bk8n1YVgvWk9D05BmRV0Pi3ECImNSK8DKyKltsMB"
}
At this point, authorization is complete and the web application can access the protected patient data it requested using FHIR APIs.
Access Token Request: Frontend Confidential Clients
There are two authentication options available for confidential apps that can keep authentication credentials secret:
Access Token Request: Frontend Confidential Clients with Client Secret Authentication
After receiving the authorization code, your application trades the code for a JSON object containing an access token and contextual information by sending an HTTP POST to the token endpoint using a Content-Type header with value of "application/x-www-form-urlencoded". For more information, see RFC 6749 section 4.1.3.
The Epic on FHIR website can generate a client secret (effectively a password) for your app to use to obtain refresh tokens, and store the hashed secret for you, or Epic community members can upload a client secret hash that you provide them when they activate your app for their system. If you provide community members a client secret hash to upload, you should use a unique client secret per Epic community member and per environment type (non-production and production) for each Epic community member.
The following parameters are required in the POST body:
grant_type: This should contain the valueauthorization_code.code: This parameter contains the authorization code sent from Epic's authorization server to your application as a querystring parameter on the redirect URI as described above.redirect_uri: This parameter must contain the same redirect URI that you provided in the initial access request. The value of this parameter needs to be URL encoded.
Note: The client_id parameter is not passed in the the POST body if you use client secret authentication, which is different from the access token request for apps that do not use refresh tokens. You will instead pass an Authorization HTTP header with client_id and client_secret URL encoded and passed as a username and password. Conceptually the Authorization HTTP header will have this value: base64(client_id:client_secret).
For example, using the following client_id and client_secret:
client_id: d45049c3-3441-40ef-ab4d-b9cd86a17225
URL encoded client_id: d45049c3-3441-40ef-ab4d-b9cd86a17225 Note: base64 encoding Epic's client IDs will have no effect
client_secret: this-is-the-secret-2/7
URL encoded client_secret: this-is-the-secret-2%2F7
Would result in this Authorization header:
Authorization: Basic base64Encode{d45049c3-3441-40ef-ab4d-b9cd86a17225:this-is-the-secret-2%2F7}or
Authorization: Basic ZDQ1MDQ5YzMtMzQ0MS00MGVmLWFiNGQtYjljZDg2YTE3MjI1OnRoaXMtaXMtdGhlLXNlY3JldC0yJTJGNw==Here's an example of what a valid HTTP POST might look like:
POST https://fhir.epic.com/interconnect-fhir-oauth/oauth2/token HTTP/1.1
Content-Type: application/x-www-form-urlencoded
Authorization: Basic ZDQ1MDQ5YzMtMzQ0MS00MGVmLWFiNGQtYjljZDg2YTE3MjI1OnRoaXMtaXMtdGhlLXNlY3JldC0yJTJGNw==

grant_type=authorization_code&code=yfNg-rSc1t5O2p6jVAZLyY00uOOte5KM1y3YUxqsJQnBKEMNsYqOPTyVqcCH3YXaPkLztO9Rvf7bhLqQTwALHcHN6raxpTbR1eVgV2QyLA_4K0HrJO92et3qRXiXPkj7&redirect_uri=https%3A%2F%2Ffhir.epic.com%2Ftest%2Fsmart
The authorization server responds to the HTTP POST request with a JSON object that includes an access token and a refresh token. The response contains the following fields:
refresh_token: This parameter contains the refresh token issued by Epic to your application and can be used to obtain a new access token. For more information on how this works, see Step 5.- See the Epic-Issued OAuth 2.0 Tokens appendix section for details on handling refresh tokens.
access_token: This parameter contains the access token issued by Epic to your application and is used in future requests.- See the Epic-Issued OAuth 2.0 Tokens appendix section for details on handling access tokens.
token_type: In Epic's OAuth 2.0 implementation, this parameter always includes the valuebearer.expires_in: This parameter contains the number of seconds for which the access token is valid.scope: This parameter describes the access your application is authorized for.-
id_token: Returned only for applications that have requested an openid scope. See above for more info on OpenID Connect id_tokens. This parameter follows the guidelines of the OpenID Connect (OIDC) Core 1.0 specification. It is signed but not encrypted. -
patient: For patient-facing workflows, this parameter identifies the FHIR ID for the patient on whose behalf authorization to the system was granted.- The patient's FHIR ID is not returned for provider-facing standalone launch workflows.
-
epic.dstu2.patient: For patient-facing workflows, this parameter identifies the DSTU2 FHIR ID for the patient on whose behalf authorization to the system was granted.- The patient's FHIR ID is not returned for provider-facing standalone launch workflows.
-
encounter: This parameter identifies the FHIR ID for the patient's encounter, if in context at time of launch. The encounter token corresponds to the FHIR Encounter resource.- The encounter FHIR ID is not returned for standalone launch workflows.
-
location: This parameter identifies the FHIR ID for the ecounter department, if in context at time of launch. The location token corresponds to the FHIR Location resource.- The location FHIR ID is not returned for standalone launch workflows.
-
appointment: This parameter identifies the FHIR ID for the patient's appointment, if appointment context is available at time of launch. The appointment token corresponds to the FHIR Appointment resource.- The appointment FHIR ID is not returned for standalone launch workflows.
-
loginDepartment: This parameter identifies the FHIR ID of the user's login department for launches from Hyperspace. The loginDepartment token corresponds to the FHIR Location resource.- The loginDepartment FHIR ID is not returned for standalone launch workflows.
Note that you can pass additional parameters if needed based on the integration configuration. Here's an example of what a JSON object including an access token and refres token might look like:
{
"access_token": "Nxfve4q3H9TKs5F5vf6kRYAZqzK7j9LHvrg1Bw7fU_07_FdV9aRzLCI1GxOn20LuO2Ahl5RkRnz-p8u1MeYWqA85T8s4Ce3LcgQqIwsTkI7wezBsMduPw_xkVtLzLU2O",
"refresh_token": "H9TKs5F5vf6kRYAZqzK7j9L_07_FdV9aRzLCI1GxOn20LuO2Ahl5R1MeYWqA85T8s4sTkI7wezBsMduPw_xkLzLU2O",
"token_type": "bearer",
"expires_in": 3240,
"scope": "Patient.read Patient.search ",
"patient": "T1wI5bk8n1YVgvWk9D05BmRV0Pi3ECImNSK8DKyKltsMB"
}
At this point, authorization is complete and the web application can access the protected patient data it requested using FHIR APIs.
Access Token Request: Frontend Confidential Clients with JSON Web Token (JWT) Authentication
After receiving the authorization code, your application trades the code for a JSON object containing an access token and contextual information by sending an HTTP POST to the token endpoint using a Content-Type header with value of "application/x-www-form-urlencoded". For more information, see RFC 6749 section 4.1.3.
You can use a one-time use JSON Web Token (JWT) to authenticate your app to the authorization server and obtain an access token and/or refresh token. There are several libraries for creating JWTs. See jwt.io for some examples. You'll pre-register a JSON Web Key Set or JWK Set URL for a given Epic community member environment on the Epic on FHIR website and then use the corresponding private key to create a signed JWT. Frontend apps using JWT authentication must use a JSON Web Key Set or JWK Set URL as static public keys are not supported.
See the Creating a Public Private Key Pair for JWT Signature and the Creating a JWT sections for details on how to create a signed JWT.
The following parameters are required in the POST body:
grant_type: This should contain the valueauthorization_code.code: This parameter contains the authorization code sent from Epic's authorization server to your application as a querystring parameter on the redirect URI as described above.redirect_uri: This parameter must contain the same redirect URI that you provided in the initial access request. The value of this parameter needs to be URL encoded.client_assertion_type: This should be set tourn:ietf:params:oauth:client-assertion-type:jwt-bearer.client_assertion: This will be the one-time use JSON Web Token (JWT) your app generated using the steps mentioned above.
Here's an example of what a valid HTTP POST might look like:
POST https://fhir.epic.com/interconnect-fhir-oauth/oauth2/token HTTP/1.1
Content-Type: application/x-www-form-urlencoded

grant_type=authorization_code&client_assertion_type=urn%3Aietf%3Aparams%3Aoauth%3Aclient-assertion-type%3Ajwt-bearer&code=yfNg-rSc1t5O2p6jVAZLyY00uOOte5KM1y3YUxqsJQnBKEMNsYqOPTyVqcCH3YXaPkLztO9Rvf7bhLqQTwALHcHN6raxpTbR1eVgV2QyLA_4K0HrJO92et3qRXiXPkj7&redirect_uri=https%3A%2F%2Ffhir.epic.com%2Ftest%2Fsmart&client_assertion=eyJhbGciOiJSUzM4NCIsInR5cCI6IkpXVCJ9.eyJpc3MiOiJkNDUwNDljMy0zNDQxLTQwZWYtYWI0ZC1iOWNkODZhMTcyMjUiLCJzdWIiOiJkNDUwNDljMy0zNDQxLTQwZWYtYWI0ZC1iOWNkODZhMTcyMjUiLCJhdWQiOiJodHRwczovL2ZoaXIuZXBpYy5jb20vaW50ZXJjb25uZWN0LWZoaXItb2F1dGgvb2F1dGgyL3Rva2VuIiwianRpIjoiZjllYWFmYmEtMmU0OS0xMWVhLTg4ODAtNWNlMGM1YWVlNjc5IiwiZXhwIjoxNTgzNTI0NDAyLCJuYmYiOjE1ODM1MjQxMDIsImlhdCI6MTU4MzUyNDEwMn0.dztrzHo9RRwNRaB32QxYLaa9CcIMoOePRCbpqsRKgyJmBOGb9acnEZARaCzRDGQrXccAQ9-syuxz5QRMHda0S3VbqM2KX0VRh9GfqG3WJBizp11Lzvc2qiUPr9i9CqjtqiwAbkME40tioIJMC6DKvxxjuS-St5pZbSHR-kjn3ex2iwUJgPbCfv8cJmt19dHctixFR6OG-YB6lFXXpNP8XnL7g85yLOYoQcwofN0k8qK8h4uh8axTPC21fv21mCt50gx59XgKsszysZnMDt8OG_G4gjk_8JnGHwOVkJhqj5oeg_GdmBhQ4UPuxt3YvCOTW9S2vMikNUnxrhdVvn2GVg
The authorization server responds to the HTTP POST request with a JSON object that includes an access token and a refresh token. The response contains the following fields:
refresh_token: If your app is configured to receive refresh tokens, this parameter contains the refresh token issued by Epic to your application and can be used to obtain a new access token. For more information on how this works, see Step 5.- See the Epic-Issued OAuth 2.0 Tokens appendix section for details on handling refresh tokens.
access_token: This parameter contains the access token issued by Epic to your application and is used in future requests.- See the Epic-Issued OAuth 2.0 Tokens appendix section for details on handling access tokens.
token_type: In Epic's OAuth 2.0 implementation, this parameter always includes the valuebearer.expires_in: This parameter contains the number of seconds for which the access token is valid.scope: This parameter describes the access your application is authorized for.-
id_token: Returned only for applications that have requested an openid scope. See above for more info on OpenID Connect id_tokens. This parameter follows the guidelines of the OpenID Connect (OIDC) Core 1.0 specification. It is signed but not encrypted. -
patient: For patient-facing workflows, this parameter identifies the FHIR ID for the patient on whose behalf authorization to the system was granted.- The patient's FHIR ID is not returned for provider-facing standalone launch workflows.
-
epic.dstu2.patient: For patient-facing workflows, this parameter identifies the DSTU2 FHIR ID for the patient on whose behalf authorization to the system was granted.- The patient's FHIR ID is not returned for provider-facing standalone launch workflows.
-
encounter: This parameter identifies the FHIR ID for the patient's encounter, if in context at time of launch. The encounter token corresponds to the FHIR Encounter resource.- The encounter FHIR ID is not returned for standalone launch workflows.
-
location: This parameter identifies the FHIR ID for the encounter department, if in context at time of launch. The location token corresponds to the FHIR Location resource.- The location FHIR ID is not returned for standalone launch workflows.
-
appointment: This parameter identifies the FHIR ID for the patient's appointment, if appointment context is available at time of launch. The appointment token corresponds to the FHIR Appointment resource.- The appointment FHIR ID is not returned for standalone launch workflows.
-
loginDepartment: This parameter identifies the FHIR ID of the user's login department for launches from Hyperspace. The loginDepartment token corresponds to the FHIR Location resource.- The loginDepartment FHIR ID is not returned for standalone launch workflows.
Note that you can pass additional parameters if needed based on the integration configuration. Here's an example of what a JSON object including an access token might look like:
{
  "access_token": "Nxfve4q3H9TKs5F5vf6kRYAZqzK7j9LHvrg1Bw7fU_07_FdV9aRzLCI1GxOn20LuO2Ahl5RkRnz-p8u1MeYWqA85T8s4Ce3LcgQqIwsTkI7wezBsMduPw_xkVtLzLU2O",
  "refresh_token": "H9TKs5F5vf6kRYAZqzK7j9L_07_FdV9aRzLCI1GxOn20LuO2Ahl5R1MeYWqA85T8s4sTkI7wezBsMduPw_xkLzLU2O",
  "token_type": "bearer",
  "expires_in": 3240,
  "scope": "Patient.read Patient.search ",
  "patient": "T1wI5bk8n1YVgvWk9D05BmRV0Pi3ECImNSK8DKyKltsMB"
}
At this point, authorization is complete and the web application can access the protected patient data it requested using FHIR APIs.
Step 4: Your Application Uses FHIR APIs to Access Patient Data
With a valid access token, your application can now access protected patient data from the EHR database using FHIR APIs. Queries must contain an Authorization header that includes the access token presented as a Bearer token.
Here's an example of what a valid query looks like:
GET https://fhir.epic.com/interconnect-fhir-oauth/api/FHIR/DSTU2/Patient/T1wI5bk8n1YVgvWk9D05BmRV0Pi3ECImNSK8DKyKltsMB HTTP/1.1
Authorization: Bearer Nxfve4q3H9TKs5F5vf6kRYAZqzK7j9LHvrg1Bw7fU_07_FdV9aRzLCI1GxOn20LuO2Ahl5RkRnz-p8u1MeYWqA85T8s4Ce3LcgQqIwsTkI7wezBsMduPw_xkVtLzLU2O
Step 5: Use a Refresh Token to Obtain a New Access Token
If your app uses refresh tokens (i.e. it can securely store credentials), then you can use a refresh token to request a new access token when the current access token expires (determined by the expires_in field from the authorization response from step 3).
There are two authentication options available for confidential apps that can keep authentication credentials secret:
Using Refresh Tokens: If You Are Using Client Secret Authentication
Your application trades the refresh_token for a JSON object containing a new access token and contextual information by sending an HTTP POST to the token endpoint using a Content-Type HTTP header with value of "application/x-www-form-urlencoded". For more information, see RFC 6749 section 4.1.3.
The Epic on FHIR website can generate a client secret (effectively a password) for your app when using refresh tokens, and store the hashed secret for you, or Epic community members can upload a client secret hash that you provide them when they activate your app for their system. If you provide community members a client secret hash to upload, you should use a unique client secret per Epic community member and per environment type (non-production and production) for each Epic community member.
The following parameters are required in the POST body:
grant_type: This parameter always contains the valuerefresh_token.refresh_token: The refresh token received from a prior authorization request.
An Authorization header using HTTP Basic Authentication is required, where the username is the URL encoded client_id and the password is the URL encoded client_secret.
For example, using the following client_id and client_secret:
client_id: d45049c3-3441-40ef-ab4d-b9cd86a17225
URL encoded client_id: d45049c3-3441-40ef-ab4d-b9cd86a17225 Note: base64 encoding Epic's client IDs will have no effect
client_secret: this-is-the-secret-2/7
URL encoded client_secret: this-is-the-secret-2%2F7
Would result in this Authorization header:
Authorization: Basic base64Encode{d45049c3-3441-40ef-ab4d-b9cd86a17225:this-is-the-secret-2%2F7}or
Authorization: Basic ZDQ1MDQ5YzMtMzQ0MS00MGVmLWFiNGQtYjljZDg2YTE3MjI1OnRoaXMtaXMtdGhlLXNlY3JldC0yJTJGNw==Here's an example of what a valid HTTP POST might look like:
POST https://fhir.epic.com/interconnect-fhir-oauth/oauth2/token HTTP/1.1
Authorization: Basic ZDQ1MDQ5YzMtMzQ0MS00MGVmLWFiNGQtYjljZDg2YTE3MjI1OnRoaXMtaXMtdGhlLXNlY3JldC0yJTJGNw==
Content-Type: application/x-www-form-urlencoded

grant_type=refresh_token&refresh_token=j12xcniournlsdf234bgsd
The authorization server responds to the HTTP POST request with a JSON object that includes the new access token. The response contains the following fields:
access_token: This parameter contains the new access token issued.token_type: In Epic's OAuth 2.0 implementation, this parameter always includes the valuebearer.expires_in: This parameter contains the number of seconds for which the access token is valid.scope: This parameter describes the access your application is authorized for.
An example response to the previous request may look like the following:
{
"access_token": "57CjhZEdiTcCh1nqIwQUw5rODOLP3bSTnMEGNYbBerSeNn8hIUm6Mlc5ruCTfQawjRAoR8sYr8S_7vNdnJfgRKfD6s8mOqPnvJ8vZOHjEvy7l3Ra9frDaEAUBbN-j86k",
"token_type": "bearer",
"expires_in": 3240,
"scope": "Patient.read Patient.search"
}
Using Refresh Tokens: If You Are Using JSON Web Token Authentication
Your application trades the refresh_token for a JSON object containing a new access token and contextual information by sending an HTTP POST to the token endpoint using a Content-Type HTTP header with value of "application/x-www-form-urlencoded". For more information, see RFC 6749 section 4.1.3.
You can use a one-time use JSON Web Token (JWT) to authenticate your app to the authorization server to exchange the refresh token for a new access token. There are several libraries for creating JWTs. See jwt.io for some examples. You'll pre-register a JSON Web Key Set or JWK Set URL for a given Epic community member environment on the Epic on FHIR website and then use the corresponding private key to create a signed JWT. Frontend apps using JWT authentication must use a JSON Web Key Set or JWK Set URL as static public keys are not supported.
See the Creating a Public Private Key Pair for JWT Signature and the Creating a JWT sections for details on how to create a signed JWT.
The following parameters are required in the POST body:
grant_type: This should contain the valuerefresh_token.refresh_token: The refresh token received from a prior authorization request.client_assertion_type: This should be set tourn:ietf:params:oauth:client-assertion-type:jwt-bearer.client_assertion: This will be the one-time use JSON Web Token (JWT) your app generated using the steps mentioned above.
Here's an example of what a valid HTTP POST might look like:
POST https://fhir.epic.com/interconnect-fhir-oauth/oauth2/token HTTP/1.1
Content-Type: application/x-www-form-urlencoded

grant_type=refresh_token&client_assertion_type=urn%3Aietf%3Aparams%3Aoauth%3Aclient-assertion-type%3Ajwt-bearer&client_assertion=eyJhbGciOiJSUzM4NCIsInR5cCI6IkpXVCJ9.eyJpc3MiOiJkNDUwNDljMy0zNDQxLTQwZWYtYWI0ZC1iOWNkODZhMTcyMjUiLCJzdWIiOiJkNDUwNDljMy0zNDQxLTQwZWYtYWI0ZC1iOWNkODZhMTcyMjUiLCJhdWQiOiJodHRwczovL2ZoaXIuZXBpYy5jb20vaW50ZXJjb25uZWN0LWZoaXItb2F1dGgvb2F1dGgyL3Rva2VuIiwianRpIjoiZjllYWFmYmEtMmU0OS0xMWVhLTg4ODAtNWNlMGM1YWVlNjc5IiwiZXhwIjoxNTgzNTI0NDAyLCJuYmYiOjE1ODM1MjQxMDIsImlhdCI6MTU4MzUyNDEwMn0.dztrzHo9RRwNRaB32QxYLaa9CcIMoOePRCbpqsRKgyJmBOGb9acnEZARaCzRDGQrXccAQ9-syuxz5QRMHda0S3VbqM2KX0VRh9GfqG3WJBizp11Lzvc2qiUPr9i9CqjtqiwAbkME40tioIJMC6DKvxxjuS-St5pZbSHR-kjn3ex2iwUJgPbCfv8cJmt19dHctixFR6OG-YB6lFXXpNP8XnL7g85yLOYoQcwofN0k8qK8h4uh8axTPC21fv21mCt50gx59XgKsszysZnMDt8OG_G4gjk_8JnGHwOVkJhqj5oeg_GdmBhQ4UPuxt3YvCOTW9S2vMikNUnxrhdVvn2GVg
The authorization server responds to the HTTP POST request with a JSON object that includes the new access token. The response contains the following fields:
access_token: This parameter contains the new access token issued.token_type: In Epic's OAuth 2.0 implementation, this parameter always includes the valuebearer.expires_in: This parameter contains the number of seconds for which the access token is valid.scope: This parameter describes the access your application is authorized for.
An example response to the previous request may look like the following:
{
  "access_token": "57CjhZEdiTcCh1nqIwQUw5rODOLP3bSTnMEGNYbBerSeNn8hIUm6Mlc5ruCTfQawjRAoR8sYr8S_7vNdnJfgRKfD6s8mOqPnvJ8vZOHjEvy7l3Ra9frDaEAUBbN-j86k",
  "token_type": "bearer",
  "expires_in": 3240,
  "scope": "Patient.read Patient.search"
}
Offline Access for Native and Browser-Based Applications
For a native client app (for example, an iOS mobile app or a Windows desktop app) or a browser-based app (for example, a single-page application) to use the confidential app profile in the SMART App Launch framework, that app needs to use "additional technology (such as dynamic client registration and universal redirect_uris) to protect the secret." If you have a native client or browser-based app, you can register a dynamic client to integrate with Epic using the steps below.
Step 1: Get the initial access token you'll use to register a dynamic client
Your app uses a flow like the one described above for a Standalone Launch. Note your application will specifically not be using a client secret, and will use its initial client ID issued by Epic.
The end-result of this flow is your app obtaining an initial access token (defined in RFC 7591) used for registering a client instance (step 2). This token is intentionally one-time-use and should be used for registration immediately.
Step 2: Register the dynamic client
To register the dynamic client, your application needs to:
- Generate a public-private key pair on the user’s phone or computer.
- Native apps can use the same strategies as backend apps to generate key sets
- Browser-based apps can use the WebCrypto API
- Securely store that device-specific key pair on the user’s device.
- Browser-based apps using WebCrypto should follow key storage recommendations
- Use the access token from step 1 to register a dynamic client using the OAuth 2.0 Dynamic Client Registration Protocol.
The client ID and private key should be associated with the Epic environment they are communicating with. Identify the Epic environment with its OAuth 2.0 server URL. If this is a backend integration or a subspace integration, the environment health system identifier (HSI) can be used to identify the environment instead.
This request must have two elements:
software_id: This parameter must contain the application’s client ID issued by Epic.jwks: This parameter contains a JSON Web Key Set containing the public key from the key pair your application generated in step 2A.
Here’s an example of what an HTTP POST request to register a dynamic client might look like:
POST https://fhir.epic.com/interconnect-fhir-oauth/oauth2/register HTTP/1.1
Content-Type: application/json
Authorization: Bearer Nxfve4q3H9TKs5F5vf6kRYAZqzK7j9LHvrg1Bw7fU_07_FdV9aRzLCI1GxOn20LuO2Ahl5RkRnz-p8u1MeYWqA85T8s4Ce3LcgQqIwsTkI7wezBsMduPw_xkVtLzLU2O

{
    "software_id": "d45049c3-3441-40ef-ab4d-b9cd86a17225",
    "jwks": {
        "keys": [{
                "e": "AQAB",
                "kty": "RSA",
                "n": "vGASMnWdI-ManPgJi5XeT15Uf1tgpaNBmxfa-_bKG6G1DDTsYBy2K1uubppWMcl8Ff_2oWe6wKDMx2-bvrQQkR1zcV96yOgNmfDXuSSR1y7xk1Kd-uUhvmIKk81UvKbKOnPetnO1IftpEBm5Llzy-1dN3kkJqFabFSd3ujqi2ZGuvxfouZ-S3lpTU3O6zxNR6oZEbP2BwECoBORL5cOWOu_pYJvALf0njmamRQ2FKKCC-pf0LBtACU9tbPgHorD3iDdis1_cvk16i9a3HE2h4Hei4-nDQRXfVgXLzgr7GdJf1ArR1y65LVWvtuwNf7BaxVkEae1qKVLa2RUeg8imuw",
            }
        ]
    }
}
The EHR stores your app's public key, issues it a dynamic client ID, and returns a response that might look like:
HTTP/1.1 201 Created
Content-Type: application/json

{
    "redirect_uris": [
        " https://fhir.epic.com/test/smart"
    ],
    "token_endpoint_auth_method": "none",
    "grant_types": [
        "urn:ietf:params:oauth:grant-type:jwt-bearer"
    ],
    "software_id": " d45049c3-3441-40ef-ab4d-b9cd86a17225",
    "client_id": "G65DA2AF4-1C91-11EC-9280-0050568B7514",
    "client_id_issued_at": 1632417134,
    "jwks": {
        "keys": [{
                "kty": "RSA",
                "n": "vGASMnWdI-ManPgJi5XeT15Uf1tgpaNBmxfa-_bKG6G1DDTsYBy2K1uubppWMcl8Ff_2oWe6wKDMx2-bvrQQkR1zcV96yOgNmfDXuSSR1y7xk1Kd-uUhvmIKk81UvKbKOnPetnO1IftpEBm5Llzy-1dN3kkJqFabFSd3ujqi2ZGuvxfouZ-S3lpTU3O6zxNR6oZEbP2BwECoBORL5cOWOu_pYJvALf0njmamRQ2FKKCC-pf0LBtACU9tbPgHorD3iDdis1_cvk16i9a3HE2h4Hei4-nDQRXfVgXLzgr7GdJf1ArR1y65LVWvtuwNf7BaxVkEae1qKVLa2RUeg8imuw",
                "e": "AQAB"
            }
        ]
    }
}
Step 3: Get an access token you can use to retrieve FHIR resources
Now that you have registered a dynamic client with its own credentials, there are two ways you can get an access token to make FHIR calls. We recommend that you use the JWT bearer flow. In the JWT bearer flow, the client issues a JWT with its client ID as the "sub" (subject) claim, indicating the access token should be issued to the users who registered the client. It is also possible to use the SMART standalone launch sequence again to get a refresh token and then use the refresh token flow. Note that both flows involve your app making a JSON Web Token and signing it with its private key.
Generate a JSON Web Token
Your app follows the guidelines below to create a JWT assertion using its new private key.
To get an access token, your confidential app needs to authenticate itself. Your dynamic client uses the private key it generated in step 2 to sign a JWT.
Here’s an example of the JWT body:
{
    "sub": "G00000000-0129-A6FA-7EDC-55B3FB6E85F8",
    "aud": "https://fhir.epic.com/interconnect-fhir-oauth/oauth2/token",
    "jti": "3fca7b08-e5a1-4476-9e4b-4e17f0ad7d1d",
    "nbf": 1639694983,
    "exp": 1639695283,
    "iat": 1639694983,
    "iss": "G00000000-0129-A6FA-7EDC-55B3FB6E85F8"
}
And here’s the final encoded JWT:
eyJhbGciOiJSUzI1NiIsImtpZCI6ImJXbGphR0ZsYkNBOE15QnNZWFZ5WVE9PSIsInR5cCI6IkpXVCJ9.eyJzdWIiOiJHMDAwMDAwMDAtMDEyOS1BNkZBLTdFREMtNTVCM0ZCNkU4NUY4IiwiYXVkIjpbImh0dHBzOi8vdnMtaWN4LmVwaWMuY29tL0ludGVyY29ubmVjdC1DdXJyZW50LUZpbmFsLVByaW1hcnkvIl0sImp0aSI6IjNmY2E3YjA4LWU1YTEtNDQ3Ni05ZTRiLTRlMTdmMGFkN2QxZCIsIm5iZiI6MTYzOTY5NDk4MywiZXhwIjoxNjM5Njk1MjgzLCJpYXQiOjE2Mzk2OTQ5ODMsImlzcyI6IkcwMDAwMDAwMC0wMTI5LUE2RkEtN0VEQy01NUIzRkI2RTg1RjgifQ.UyW_--xpDdfB3EbxQ1KwRRuNDGIb034Y9mpExaaYyoVVkfz3ophzueIFMRrcdqTWmH96Ivx7O-fnjvHkb9iv1ELGVS_UYZy-JNb7r5VHDhdEYoRJzomYQzAyZutK9CJuJQZSvJeQLOXFoFN-fuCHIUBmSoTY5FDGy8gmq_a5fD_L-PnrXCD6SyP663s8kP-cFWh1iuXP0pjg8EMuFFEwgSo-chvv6RO4LIBebqkkv5qkgO_nrcXVJpxu42FDNrP2618q2Rw7sdIaewDw_I5026T4jNSoJXT12dHurqzedvC20exOO2MA6Vh1o2iVyzIfPE1EnEf-hk4WRFtQTUlqCQStep 3a: Get an access token using the JWT bearer flow
For the duration the user selected when approving your app to get an authorization code in step 1, your app can get an access token whenever it needs using the JWT bearer authorization grant described in RFC 7523 Section 2.1.
Recall that in the JWT bearer flow, the client issues a JWT to itself with a "sub" (subject) claim that indicates the user on whose behalf the client acts. Because the dynamic client your app registered in step 2 is bound to the user who logged in during the SMART standalone launch sequence in step 1, the server only accepts a JWT where the subject is the user bound to that client.
Your app posts the JWT it issued itself in the Generate a JSON Web Token step to the server to get an access token. The following parameters are required in the POST body:
grant_type: This parameter contains the static valueurn:ietf:params:oauth:grant-type:jwt-bearer.assertion: This parameter contains the JWT your app generated above.client_id: This parameter contains the dynamic client ID assigned in step 2.
Here’s an example of an HTTP POST request for an access token. You will replace the [assertion] and [client_id] placeholders with your own values.
POST https://fhir.epic.com/interconnect-fhir-oauth/oauth2/token HTTP/1.1
Content-Type: application/x-www-form-urlencoded

grant_type=urn%3Aietf%3Aparams%3Aoauth%3Agrant-type%3Ajwt-bearer&assertion=[assertion]&client_id=[client_id]
The authorization server responds to the HTTP POST request with a JSON object that includes an access token. The response contains the following fields:
access_token: This parameter contains the access token issued by Epic to your application and is used in future requests.- See the Epic-Issued OAuth 2.0 Tokens appendix section for details on handling access tokens.
token_type: In Epic's OAuth 2.0 implementation, this parameter always includes the value bearer.expires_in: This parameter contains the number of seconds for which the access token is valid.epic.dstu2.patient: This parameter identifies the DSTU2 FHIR ID for the patient, if a patient is in context at time of launch.scope: This parameter describes the access your application is authorized for.patient: This parameter identifies provides the FHIR ID for the patient.
Note that you can include additional fields in the response if needed based on the integration configuration. For more information, refer to Launching your apptopic. Here's an example of what a JSON object including an access token might look like:
{
    "access_token": "eyJhbGciOiJSUzI1NiIsInR5cCI6IkpXVCJ9.eyJhdWQiOiJ1cm46R1RNUUFDVVI6Y2UuZ3RtcWFjdXIiLCJjbGllbnRfaWQiOiJHMDAwMDAwMDAtMDEyOS1BNkZBLTdFREMtNTVCM0ZCNkU4NUY4IiwiZXBpYy5lY2kiOiJ1cm46ZXBpYzpzMmN1cmd0IiwiZXBpYy5tZXRhZGF0YSI6ImVTMUF1dng4NlhRanRmVExub2loeks4QVRjdU5OUDFnRHhCRklvR0EyVUhHdlpDRE5PYjVZQ3NFZVhlUjExa1UyTjBHaHIwZjIwcE5yQnJ0V1JUa0l4d3VoVnlYeEVYUjQwVGlkdXNKdTk5ZmZRLWsybjFJWEY4X2I0SS11a054IiwiZXBpYy50b2tlbnR5cGUiOiJhY2Nlc3MiLCJleHAiOjE2Mzk2OTg1ODgsImlhdCI6MTYzOTY5NDk4OCwiaXNzIjoidXJuOkdUTVFBQ1VSOmNlLmd0bXFhY3VyIiwianRpIjoiYzQ1YzU4NjUtY2E3Ny00YWVlLTk3NDEtY2YzNzFiNDlhY2FkIiwibmJmIjoxNjM5Njk0OTg4LCJzdWIiOiJlRmdDY3E4cW1PeXY1b3FEcUFyUS5MQTMifQ.G0Z3PBv4ldpTqkjBjNUnvRYeVnNzT8qvLsGAVN8S9YibJGGCH_Txd6Ph1c9yB2hlQW3dw9IkaAvxxlUuclGMzmtyPXeo8wcWC07t_0vVasS-Ya9VjeDtR1hO8rcqEgV1DhKZ1jsEbzlRvKuZvONew0gL25ug6dOolNXcPcluzK6sxEyf2UoosX-W3nsU0iYZPJI-mf7lMEbsMUOSY8CR-77uBap3suxxHy03BwtkAXP0GwW0KSjOVe7_bsxX9k4DEhWyZuEOgDjEhONQFe2TeuWgUcI2KQeK5HjzmxN3dp56rCZ8zlhlukgw-C0F2IDbkZ5on7g7rl8lm29I7_kq9g",
    "token_type": "Bearer",
    "expires_in": 3600,
    "scope": "patient/Immunization.Read patient/Immunization.read patient/Patient.read patient/Practitioner.read patient/PractitionerRole.read launch/patient offline_access",
    "state": "oYK9nyFdUgTb1n_hMHZESDea",
    "patient": "eUYSU3eH0lceii-4SYNvpPw3",
    "__epic.dstu2.patient": "TJR7HfYCw58VnihLrp.axehccg-4IcjmZd3lw7Spm1F8B"
}
Step 3b: Alternate flow with refresh tokens
If you completed Step 3A, you do not need to complete this step. This is an alternate workflow to the JWT bearer flow. We strongly recommend that you use the JWT bearer flow above so you can provide a smoother user experience in which the user only needs to authenticate once. To get a refresh token, your app would need to go through the Standalone Launch sequence a second time. The first time (see Step 1: Get the access token you'll use to register a dynamic client) you were using the public app profile and weren't issued a refresh token. Now that you have registered a dynamic client with its own credentials, you can use the confidential-asymmetric app profile.
Get an authorization code
This is the same as the Get an authorization code step from Step 1 except:
- The
client_idshould be that of your dynamic client - Your token request will resemble a backend services grant, using the following parameters:
client_assertion– set to a JWT signed with your dynamic client’s private keyclient_assertion_type– set tourn:ietf:params:oauth:client-assertion-type:jwt-bearer- An additional parameter per grant_type (
codeorrefresh_token) described below
Note that the user will once again need to log in.
Exchange the authorization code for an access token
When your app makes this request to the token, it needs to authenticate itself to be issued a refresh token. It uses the JWT it generated to authenticate itself per RFC 7523 section 2.2. This request will look like the JWT bearer request except the grant type is authorization_code instead of urn:ietf:params:oauth:grant-type:jwt-bearer and it includes the PKCE code verifier like the access token request you made before registering the dynamic client.
In response to this request, you’ll get an access token and a refresh token.
Use the refresh token to get subsequent access tokens
When the access token expires, your app can generate a new JWT and use the refresh token flow to get a new access token. This request will look like the JWT bearer request except the grant type is refresh_token instead of urn:ietf:params:oauth:grant-type:jwt-bearer.
SMART Backend Services (Backend OAuth 2.0)
Contents
- Building a Backend OAuth 2.0 App
- Complete Required Epic Community Member Setup to Audit Access from Your Backend Application
- Using a JWT to Obtain an Access Token for a Backend Service
Overview
Backend apps (i.e. apps without direct end user or patient interaction) can also use OAuth 2.0 authentication through the client_credentials OAuth 2.0 grant type. Epic's OAuth 2.0 implementation for backend services follows the SMART Backend Services: Authorization Guide, though it currently differs from that profile in some respects. Application vendors pre-register a public key for a given Epic community member on the Epic on FHIR website and then use the corresponding private key to sign a JSON Web Token (JWT) which is presented to the authorization server to obtain an access token.
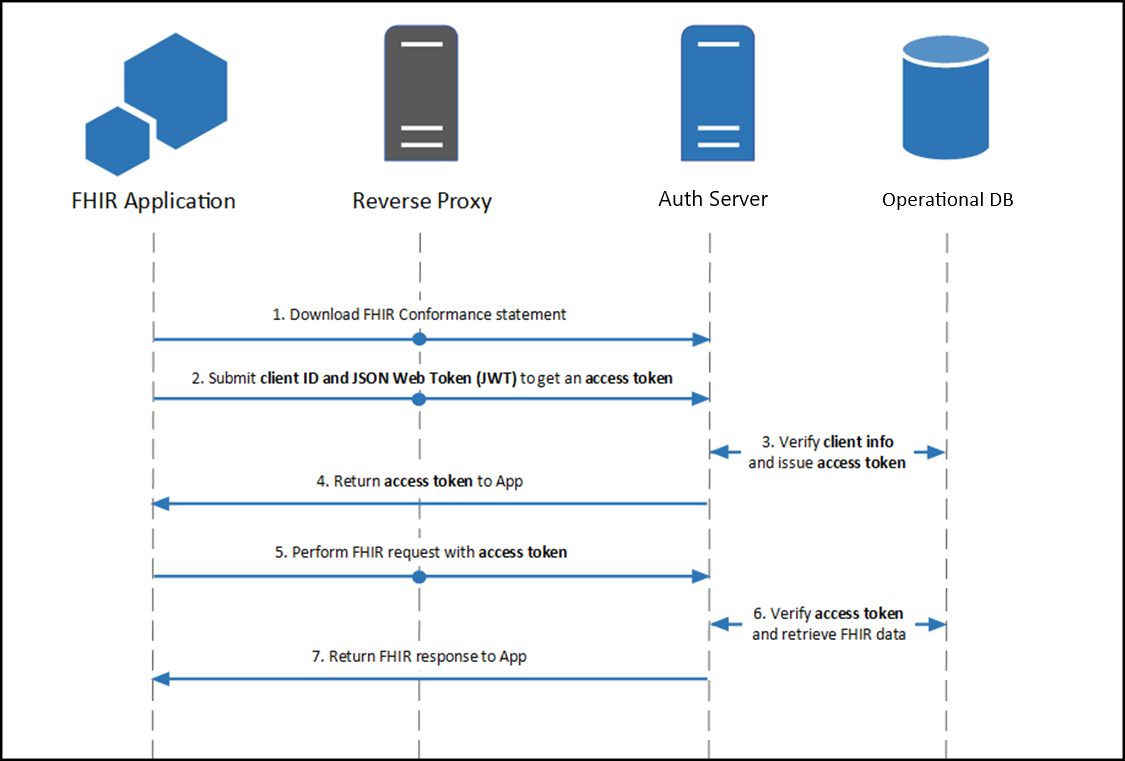
Building a Backend OAuth 2.0 App
To use the client_credentials OAuth 2.0 grant type to authorize your backend application's access to patient information, two pieces of information need to be shared between the authorization server and your application:
- Client ID: The client ID identifies your application to authentication servers within the Epic community and allows you to connect to any organization.
- Public key: The public key is used to validate your signed JSON Web Token to confirm your identity.
You can register your application for access to both the sandbox and Epic organizations here. You'll provide information, including a JSON Web Key set URL (JWK Set URL or JKU) that hosts a public key used to verify the JWT signature. Epic will generate a client ID for you. Your app will need to have both the Backend Systems radio button selected and the Use OAuth 2.0 box checked in order to register a JKU for backend OAuth 2.0.
Complete Required Epic Community Member Setup to Audit Access from Your Backend Application
Note: This build is not needed in the sandbox. The sandbox automatically maps your client to a user, removing the need for this setup.
When performing setup with an Epic community member, their Epic Client Systems Administrator (ECSA) will need to map your client ID to an Epic user account that will be used for auditing web service calls made by your backend application. Your app will not be able to obtain an access token until this build is completed.
Using a JWT to Obtain an Access Token for a Backend Service
You will generate a one-time use JSON Web Token (JWT) to authenticate your app to the authorization server and obtain an access token that can be used to authenticate your app's web service calls. There are several libraries for creating JWTs. See jwt.io for some examples.
Step 1: Creating the JWT
See the Creating a Public Private Key Pair for JWT Signature and the Creating a JWT sections for details on how to create a signed JWT.
Step 2: POSTing the JWT to Token Endpoint to Obtain Access Token
Your application makes a HTTP POST request to the authorization server's OAuth 2.0 token endpoint to obtain access token. The following form-urlencoded parameters are required in the POST body:
grant_type: This should be set toclient_credentials.client_assertion_type: This should be set tourn:ietf:params:oauth:client-assertion-type:jwt-bearer.client_assertion: This should be set to the JWT you created above.
Here is an example request:
POST https://fhir.epic.com/interconnect-fhir-oauth/oauth2/token HTTP/1.1
Content-Type: application/x-www-form-urlencoded

grant_type=client_credentials&client_assertion_type=urn%3Aietf%3Aparams%3Aoauth%3Aclient-assertion-type%3Ajwt-bearer&client_assertion=eyJhbGciOiJSUzM4NCIsInR5cCI6IkpXVCJ9.eyJpc3MiOiJkNDUwNDljMy0zNDQxLTQwZWYtYWI0ZC1iOWNkODZhMTcyMjUiLCJzdWIiOiJkNDUwNDljMy0zNDQxLTQwZWYtYWI0ZC1iOWNkODZhMTcyMjUiLCJhdWQiOiJodHRwczovL2ZoaXIuZXBpYy5jb20vaW50ZXJjb25uZWN0LWZoaXItb2F1dGgvb2F1dGgyL3Rva2VuIiwianRpIjoiZjllYWFmYmEtMmU0OS0xMWVhLTg4ODAtNWNlMGM1YWVlNjc5IiwiZXhwIjoxNTgzNTI0NDAyLCJuYmYiOjE1ODM1MjQxMDIsImlhdCI6MTU4MzUyNDEwMn0.dztrzHo9RRwNRaB32QxYLaa9CcIMoOePRCbpqsRKgyJmBOGb9acnEZARaCzRDGQrXccAQ9-syuxz5QRMHda0S3VbqM2KX0VRh9GfqG3WJBizp11Lzvc2qiUPr9i9CqjtqiwAbkME40tioIJMC6DKvxxjuS-St5pZbSHR-kjn3ex2iwUJgPbCfv8cJmt19dHctixFR6OG-YB6lFXXpNP8XnL7g85yLOYoQcwofN0k8qK8h4uh8axTPC21fv21mCt50gx59XgKsszysZnMDt8OG_G4gjk_8JnGHwOVkJhqj5oeg_GdmBhQ4UPuxt3YvCOTW9S2vMikNUnxrhdVvn2GVg
And here is an example response body assuming the authorization server approves the request:
{
"access_token": "i82fGhXNxmidCt0OdjYttm2x0cOKU1ZbN6Y_-zBvt2kw3xn-MY3gY4lOXPee6iKPw3JncYBT1Y-kdPpBYl-lsmUlA4x5dUVC1qbjEi1OHfe_Oa-VRUAeabnMLjYgKI7b",
"token_type": "bearer",
"expires_in": 3600,
"scope": "Patient.read Patient.search"
}- Note: See the Epic-Issued OAuth 2.0 Tokens appendix section for details on handling access tokens.
JSON Web Tokens (JWTs)
Contents
- Creating a Public Private Key Pair for JWT Signature
- Creating a JWT
- JSON Web Key Sets
- Hosting a JWK Set URL
- Providing Multiple Public Keys
Background
JSON Web Tokens (JWTs) can be used for some OAuth 2.0 workflows. JWTs are required to be used by the client credentials flow used by backend services, and can be used, as an alternative to client secrets, for apps that use the confidential client profile or refresh tokens. You will generate a one-time use JWT to authenticate your app to the authorization server and obtain an access token that can be used to authenticate your app's web service calls, and potentially a refresh token that can be used to get another access token without a user needing to authorize the request. There are several libraries for creating JWTs. See jwt.io for some examples.Creating a Public Private Key Pair for JWT Signature
There are several tools you can use to create a key pair. As long as you can export your public key to a base64 encoded X.509 certificate (backend clients) or JSON Web Key Set (frontend confidential clients) for registration on the Epic on FHIR website, or you can host it on a properly formatted JWK Set URL, the tool you use to create the key pair and file format used to store the keys is not important. If your app is hosted by Epic community members ("on-prem" hosting) instead of cloud hosted, you should have unique key pairs for each Epic community member you integrate with. In addition, you should always use unique key pairs for non-production and production systems.
Here are examples of two tools commonly used to generate key pairs:
Creating a Public Private Key Pair: OpenSSL
You can create a new private key named privatekey.pem using OpenSSL with the following command:
openssl genrsa -out /path_to_key/privatekey.pem 2048
Make sure the key length is at least 2048 bits.
For backend apps, you can export the public key to a base64 encoded X.509 certificate named publickey509.pem using this command:
openssl req -new -x509 -key /path_to_key/privatekey.pem -out /path_to_key/publickey509.pem -subj '/CN=myapp'
Where '/CN=myapp' is the subject name (for example the app name) the key pair is for. The subject name does not have a functional impact in this case but it is required for creating an X.509 certificate.
For frontend confidential clients, refer to JSON Web Key Sets.
Creating a Public Private Key Pair: Windows PowerShell
You can create a key pair using Windows PowerShell with this command, making sure to run PowerShell as an administrator:
New-SelfSignedCertificate -Subject "MyApp"
Note that the Epic on FHIR website is extracting the public key from the certificate and discarding the rest of the certificate information, so it's not 'trusting' the self-signed certificate per se.
The subject name does not have a functional impact in this case, but it is required for creating an X.509 certificate. Note that this is only applicable to backend apps. For frontend confidential clients, refer to JSON Web Key Sets.
You can export the public key using either PowerShell or Microsoft Management Console.
If you want to export the public key using PowerShell, take note of the certificate thumbprint and storage location printed when you executed the New-SelfSignedCertificate command.
PS C:\dir> New-SelfSignedCertificate -Subject "MyApp"

PSParentPath: Microsoft.PowerShell.Security\Certificate::LocalMachine\MY

Thumbprint                                Subject
----------                                -------
3C4A558635D67F631E5E4BFDF28AE59B2E4421BA  CN=MyApp
Then export the public key to a X.509 certificate using the following commands (using the thumbprint and certificate location from the above example):
PS C:\dir> $cert = Get-ChildItem -Path Cert:\LocalMachine\My\3C4A558635D67F631E5E4BFDF28AE59B2E4421BA
PS C:\dir> Export-Certificate -Cert $cert -FilePath newpubkeypowerShell.cer
Export the binary certificate to a base64 encoded certificate:
PS C:\dir> certutil.exe -encode newpubkeypowerShell.cer newpubkeybase64.cer
If you want to export the public key using Microsoft Management Console, follow these steps:
- Run (Windows + R) > mmc (Microsoft Management Console).
- Go to File > Add/Remove SnapIn.
-
Choose Certificates > Computer Account > Local Computer. The exact location here depends on the certificate store that was used to create and store the keys when you ran the
New-SelfSignedCertificatePowerShell command above. The store used is displayed in the printout after the command completes. -
Then back in the main program screen, go to Personal > Certificates and find the key pair you just created in step 1. The "Issue To" column will equal the value passed to
-Subjectduring key creation (e.g. "MyApp" above). - Right click on the certificate > All Tasks > Export.
- Choose option to not export the private key.
- Choose to export in base-64 encoded X.509 (.CER) format.
- Choose a file location.
Finding the Public Key Certificate Fingerprint (Also Called Thumbprint)
The public key certificate fingerprint (also known as thumbprint in Windows software) is displayed for JWT signing public key certificates that are uploaded to the Epic on FHIR website. There are a few ways you can find the fingerprint for a public key certificate:
-
If you created the public key certificate using Windows PowerShell using the steps above, the thumbprint was displayed after completing the command. You can also print public keys and their thumbprints for a given certificate storage location using the
Get-ChildItemPowerShell command.For example, run
Get-ChildItem -Path Cert:\LocalMachine\Myto find all certificate thumbprints in the local machine storage. - You can follow the steps here to find the thumbprint of a certificate in Microsoft Management Console.
-
You can run this OpenSSL command to print the public key certificate fingerprint that would be displayed on the Epic on FHIR website, replacing openssl_publickey.cert with the name of your public key certificate:
$ openssl x509 -noout -fingerprint -sha1 -inform pem -in openssl_publickey.certNote that the output from this command includes colons between bytes which are not shown on the Epic on FHIR website.
Creating a JWT
The JWT should have these headers:
| Header | Description |
|---|---|
alg |
The JWT authentication algorithm. Epic supports the following RSA signing algorithms for all confidential clients: RS256, RS384, and RS512. For clients that register a JSON Web Key Set URL, Epic also supports the following Elliptic Curve algorithms: ES256, ES384. Epic does not support manual upload of Elliptic Curve public keys, and we recommend new apps use a JWK Set URL and Elliptic Curve keys. |
typ |
If provided, this should always be set to JWT. |
kid |
For apps using
JSON Web Key Sets
(including
dynamically registered
clients), we recommend setting this value to the kid of the target public key from your key set. |
jku |
For apps using JSON Web Key Set URLs, optionally set this value to the URL you registered on your application |
The JWT header should be formatted as follows:
{
"alg": "RS384",
"typ": "JWT"
}
The JWT should have these claims in the payload:
| Claim | Description | Remarks |
|---|---|---|
iss |
Issuer of the JWT. This is the app's client_id, as determined during registration on the Epic on FHIR website, or the client_id returned during a
dynamic registration
|
This is the same as the value for the sub claim. |
sub |
Issuer of the JWT. This is the app's client_id, as determined during registration on the Epic on FHIR website, or the client_id returned during a
dynamic registration
|
This is the same as the value for the iss claim. |
aud |
The FHIR authorization server's token endpoint URL. This is the same URL to which this authentication JWT will be posted. See below for an example POST. | It's possible that Epic community member systems will route web service traffic through a proxy server, in which case the URL the JWT is posted to is not known to the authorization server, and the JWT will be rejected. For such cases, Epic community member administrators can add additional audience URLs to the allowlist, in addition to the FHIR server token URL if needed. |
jti |
A unique identifier for the JWT. | The jti must be no longer than 151 characters and cannot be reused during the JWT's validity period, i.e., before the exp time is reached. In the November 2024 version of Epic and later, this value must be a string. |
exp |
Expiration time integer for this authentication JWT, expressed in seconds since the "Epoch" (1970-01-01T00:00:00Z UTC). | The exp value must be in the future and can be no more than 5 minutes in the future at the time the access token request is received. |
nbf |
Time integer before which the JWT must not be accepted for processing, expressed in seconds since the "Epoch" (1970-01-01T00:00:00Z UTC). | The nbf value cannot be in the future, cannot be more recent than the exp value, and the exp - nbf difference cannot be greater than 5 minutes. |
iat |
Time integer for when the JWT was created, expressed in seconds since the "Epoch" (1970-01-01T00:00:00Z UTC). | The iat value cannot be in the future, and the exp - iat difference cannot be greater than 5 minutes. |
Note: No JWT should contain more than 100 claims or be larger than 8 KB.
Here's an example JWT payload:
{
"iss": "d45049c3-3441-40ef-ab4d-b9cd86a17225",
"sub": "d45049c3-3441-40ef-ab4d-b9cd86a17225",
"aud": "https://fhir.epic.com/interconnect-fhir-oauth/oauth2/token",
"jti": "f9eaafba-2e49-11ea-8880-5ce0c5aee679",
"exp": 1583524402,
"nbf": 1583524102,
"iat": 1583524102
}
The header and payload are then base64 URL encoded, combined with a period separating them, and cryptographically signed using the private key to generate a signature. Conceptually:
signature = RSA-SHA384(base64urlEncoding(header) + '.' + base64urlEncoding(payload), privatekey)The full JWT is constructed by combining the header, body and signature as follows:
base64urlEncoding(header) + '.' + base64urlEncoding(payload) + '.' + base64urlEncoding(signature)A fully constructed JWT looks something like this:
eyJhbGciOiJSUzM4NCJ9.eyJpYXQiOjE3MDc0MjQzMzYsImlzcyI6IjAxZjBlMzllLTIyY2MtNGFiNS05NTE0LWMyN2Y5Mzg0NzFjOCIsInN1YiI6IjAxZjBlMzllLTIyY2MtNGFiNS05NTE0LWMyN2Y5Mzg0NzFjOCIsImF1ZCI6Imh0dHBzOi8vdmVuZG9yc2VydmljZXMuZXBpYy5jb20vaW50ZXJjb25uZWN0LWFtY3VycHJkLW9hdXRoL29hdXRoMi90b2tlbiIsImV4cCI6MTcwNzQyNDYzNiwianRpIjoiMGIyZjZmMTQtMThkZS01NTU1LWJkMjUtZTNkMzg0ZmEwZTVkIn0.hE8DAq72XjJWNci5JFEuN5TrLh9W1UZP4H904GTIhggZNnNxtJLvUPKPrpf9PYgMZmgHb6peVR5MMUnQRtFHLZsH_C2v9ridfIA8BgWBL5eNiXcriUM9rIEvHwImgbKyPQUY_a0D7BCXiLqdjMAdEZe_afxCQBW0I7EsGqbpA0agayhLIDrlhcfCtdBrGyBlwW2zlUjTUo8Rj2o59tL90w6mVykeZIsJfcLQF4jeSfNOko-908mha_Gga6szWCqxlCr5ed9i6mjRSUQByG-GAFnCIhPULeedCHEgb9WF2NC0cImjK92jGSM6i43Y19uHvCFYMEkBMDaDK7WQigm3ygJSON Web Key Sets
Applications using JSON Web Token (JWT) authentication can provide their public keys to Epic as a JSON Web Key (JWK) Set. Epic accepts keys of type RSA or EC. EC is only support for JWKS returned from a JWKS URL and is not supported for static JWKS uploaded directly. When using a JWKS URL we recommend including the kid values in your keys and in the headers of your assertions. Note that when uploading a static JWKS directly, only the "kty", "e" and "n" properties will be saved from the uploaded keys. Other fields typically present in a JWKS like "kid" or "alg" can exist in the uploaded JWKS without an error but they will be discarded upon save.
In the example key set below, the "RSA" key can be used with the RS256, RS384 or RS512 signing algorithms. The "EC" key can only be used with the "ES384" algorithm because it specifies a curve of P-384. The algorithm is determined when you first generate the key, like in the example above.
        {
            "keys": [
                { "kty":"RSA", "e": "AQAB", "kid": "d1fc1715-3299-43ec-b5de-f943803314c2", "n": "uPkpNCkqbbismKNwKguhL0P4Q40sbyUkUFcmDAACqBntWerfjv9VzC3cAQjwh3NpJyRKf7JvwxrbELvPRMRsXefuEpafHfNAwj3acTE8xDRSXcwzQwd7YIHmyXzwHDfmOSYW7baAJt-g_FiqCV0809M9ePkTwNvjpb6tlJu6AvrNHq8rVn1cwvZLIG6KLCTY-EHxNzsBblJYrZ5YgR9sfBDo7R-YjE8c761PSrBmUM4CAQHtQu_w2qa7QVaowFwcOkeqlSxZcqqj8evsmRfqJWoCgAAYeRIsgKClZaY5KC1sYHIlLs2cp2QXgi7rb5yLUVBwpSWM4AWJ_J5ziGZBSQYB4sWWn8bjc5-k1JpUnf88-UVZv9vrrkMJjNam32Z6FNm4g49gCVu_TH5M83_pkrsNWwCu1JquY9Z-eVNCsU_AWPgHeVZyXT6giHXZv_ogMWSh-3opMt9dzPwYseG9gTPXqDeKRNWFEm46X1zpcjh-sD-8WcAlgaEES6ys_O8Z" },
                { "kty":"EC", "kid": "iTqXXI0zbAnJCKDaobfhkM1f-6rMSpTfyZMRp_2tKI8", "crv": "P-384", "x": "C1uWSXj2czCDwMTLWV5BFmwxdM6PX9p-Pk9Yf9rIf374m5XP1U8q79dBhLSIuaoj", "y": "svOT39UUcPJROSD1FqYLued0rXiooIii1D3jaW6pmGVJFhodzC31cy5sfOYotrzF" }
            ]
        }
Key Identifier Requirements
Epic recommends your application provide the kid field in JWK Sets and in your JWT Headers when using a JWKS URL, since Epic can use the identifier to find your intended key. Epic does not require your key identifiers to be thumbprints, and will accept any value that is unique within your key set.
Hosting a JWK Set URL
Starting in the February 2024 version of Epic, customers can require back-end apps using JWT authentication to use a JSON Web Key Set URL (JKU) to provide public keys to Epic for JWT verification. All customers will require either this or .pem files when they upgrade to the May 2026 version of Epic. JWK Set URLs streamline implementation and make key rotation feasible by providing a centralized and trusted place where Epic community members can retrieve your public keys.
Implementation Consideration: Starting in the May 2026 version of Epic, customers must manually configure your specified the JKU for back-end OAuth 2.0 clients in their system. This is referred to as the local JKU. In August 2026, they will have the option to alternatively upload a static key via .pem file.
App-Level vs Licensing Specific JWK Set URLs
You can provide an app-level JWK Set URL when building your app for use in the sandbox environments. For security reasons, we require you at least have different URLs for non-production and production. We also recommend that you use a different set of JWK Set URLs for each Epic community member, and that key sets are not shared between different JWK Set URLs. However, this is not required, and reusing JWK URLs across customers may be appropriate for cloud-based apps that can re-use a single private key (without making a copy).
However, if your application is hosted by Epic community members ("on-prem", applications), then you must provide different JWK Set URLs for every licensed community member. There are 2 reasons on-prem applications should use distinct URLs:
- These applications require physically separate servers, and cannot share a private key across installations without copying and transporting the key (a security risk)
- Attempting to aggregate multiple public keys behind one URL is a security risk if those keys are in physically different places. If any one of your server environments is compromised, it can be used to impersonate any other instance of your application
Non-Production and Production Keys
Vendor Services and Epic on FHIR will not allow non-production JWK Set URLs to be registered as production JWK Set URLs for new apps and new app versions.
Your application should use separate key pairs for non-production and production environments. If both JWK Set URLs host the same public key, the corresponding private key can authenticate your application to either environment. This means a compromise of your non-production key material, where access controls are typically less rigorous, could be used to obtain production access tokens with your app's authorized scopes.
Private keys should not be stored in plaintext configuration files, environment variables, or source code repositories in any environment. Use your hosting provider's key management service (such as AWS KMS, Azure Key Vault, GCP Cloud KMS, etc.) or a hardware security module where available.
Registering a JWK Set URL
When building or licensing an application that will authenticate against Epic, you are prompted to optionally upload non-production and production JWK Set URLs to your app. When registering these URLs, be sure of the following:
- Are secured with TLS
- Are publicly accessible
- Do not require authentication
- Will not change over time
- Are responsive
Epic will verify points 1-3 whenever you provide a JWK Set URL
There are separate non-production and production URLs because we recommend you use separate key sets for each.
Note that in addition to registering different URLs, you should ensure the public keys hosted at each URL are themselves different. Distinct URLs that serve the same underlying key set still allow the same private key to authenticate to both production and non-production environments, which leaves production vulnerable if the non-production private key is compromised.
Key Rotation
Before rotating your keys, remove any static public keys from your existing downloads
One benefit of JWK Set URLs is that your application can rotate its key as needed, and Epic can dynamically fetch the updated keys. It is a best practice to periodically rotate your private keys, and if you choose to do so, we recommend the following strategy:
- Create your new public-private key pair ahead of time
- Add your new public key to your JWK Set in addition to the existing one
- Start using your new private key for signing JWTs
- Once you are certain your system is no longer using the old private key, wait 5 minutes (the maximum JWT expiration time) remove the old public key from your JWK Set
In between steps 3 and 4, Epic will notice you are using a new private key and will automatically fetch the new key set. Every time you present a JWT to Epic we will check your JWK Set URL at most once, and only if the cached keys are expired or did not verify your JWT
Epic's default and maximum cache time is 29 hours, but your endpoint can override the default by using the Cache-Control HTTP response header. This is most useful during development and testing when you may want to update your non-production public keys ad-hoc, or to test the availability of your server from Epic. You could for instance respond with "Cache-Control": "no-store" to stop Epic from storing your keys at all. This is not recommended for production usage since you lose the performance benefits of caching.
Using separate key pairs per environment allows you to rotate non-production and production keys on independent schedules whereas shared key pairs make independent rotation not possible.
Providing Multiple Public Keys
How
Apps can provide multiple public keys to an Epic community member by providing a JWK Set URL that contains multiple keys.
Do not host more than 100 public keys on a single JKU. Epic does not support this.
Why Not?
In general, the only reason to provide multiple public keys on one JWK Set URL is if your system spans multiple separate servers or cloud environments, and so you cannot share a private key between them. If you can re-use a key without making copies of it, then you should re-use that key and focus on protecting it with the best policy available (For example, using your hosting provider's key store or using a Trusted Platform Module).
Use Cases
Example use cases:
- Having multiple isolated testing environments, where you may provide multiple non-production public keys (one for each environment)
- On-premises applications with multiple servers hosted by a given community member. In this case you would provide multiple production public keys (one for each server)
Appendix
Epic-Issued OAuth 2.0 Tokens
Starting in the May 2020 version of Epic, Epic community members can enable a feature that makes all OAuth 2.0 tokens and codes into JSON Web Tokens (JWTs) instead of opaque tokens. This feature increases the length of these tokens significantly and is enabled in the sandbox. Developers should ensure that app URL handling does not truncate OAuth 2.0 tokens and codes.
The format of these tokens is helpful for troubleshooting, but Epic strongly recommends against relying on these tokens being JWTs. This same feature can be turned off by Epic community members, and Epic may need to change the format of these tokens in the future.
In general, if the "aud" parameter of a JWT is not your app's client ID, you should not be decoding it programmatically. For the 5 types of JWTs mentioned in this tutorial, here's a breakdown of their audience (aud) and issuers (iss):
| JWT Scenario | Audience (aud) | Issuer (iss) |
|---|---|---|
| Launch Token | Authorization server | Authorization server |
| Authorization Code | Authorization server | Authorization server |
| Access Token | Authorization server | Authorization server |
| Openid Connect ID Token | The app's client_id | Authorization server |
| Client Assertion | Authorization server | The app's client_id |
Trusting an OAuth 2.0 Token
A common question that developers ask is how an app can "trust" an OAuth 2.0 token without cryptographically verifying it. Our answer is that your app should never trust a token by itself and should rely on the authorization server to verify a given token. When redeeming an authorization code for an access token, your app can trust that if the request succeeded that the authorization code was valid, and you can then create a session in your application. The only exception is an openid connect id_token, which is designed to be verified by the client application.
Epic-Issued OAuth 2.0 Tokens
Starting in the May 2020 Epic version, Epic community members can enable a feature that makes all OAuth 2.0 tokens and codes into JSON Web Tokens (JWTs) instead of opaque tokens. This feature increases the length of these tokens significantly and is enabled in the vendorservices.epic.com sandbox. Developers should ensure that app URL handling does not truncate OAuth 2.0 tokens and codes.
The format of these tokens is helpful for troubleshooting, but Epic strongly recommends against relying on these tokens being JWTs. This same feature can be turned off by Epic community members, and Epic may need to change the format of these tokens in the future.
In general, if the "aud" parameter of a JWT is not your app's client ID, you should not be decoding it programmatically. For the 5 types of JWTs mentioned in this tutorial, here's a breakdown of their audience (aud) and issuers (iss):
| JWT Scenario | Audience (aud) | Issuer (iss) |
|---|---|---|
| Launch Token | Authorization server | Authorization server |
| Authorization Code | Authorization server | Authorization server |
| Access Token | Authorization server | Authorization server |
| Openid Connect ID Token | The app's client_id | Authorization server |
| Client Assertion | Authorization server | The app's client_id |
Trusting an OAuth 2.0 Token
A common question that developers ask is how an app can "trust" an OAuth 2.0 token without cryptographically verifying it. Our answer is that your app should never trust a token by itself and should rely on the authorization server to verify a given token. When redeeming an authorization code for an access token, your app can trust that if the request succeeded that the authorization code was valid, and you can then create a session in your application. The only exception is an openid connect id_token, which is designed to be verified by the client application.
How you handle the authorization code is the most important step in an OAuth 2.0 flow. See our best practice for using this step to secure your application.
Refresh Tokens and Persistent Access Periods
The time during which a client can use refresh tokens to get new access is known as the persistent access period. In patient-facing contexts, it can be set by the patient through MyChart. In non-patient-facing contexts, the duration will be set by the refresh token itself. Specifically, the start of the period is set to the time the token is provisioned and the end of the period is set to the token's expiration date-time.
In many situations, only one access token will want to be requested with the original refresh token and the persistent access period just defines when the that refresh token can do so. However, a client will often need access over a longer period of time. In these situations, a single refresh token won't be an efficient solution as a new authorization request will have to be made after the token is used or the period ends. There are two workflows for getting an extended persistent access period by utilizing multiple refresh tokens: rolling refresh tokens and indefinite access.
Rolling Refresh Persistent Access Periods
In this workflow, multiple refresh tokens are used to have the persistent access period last as long as a single refresh token could. A first refresh token is provisioned and the persistent access period is set as normal (i.e., start of period = time of provisioning and end of period = token expiration date-time). This first refresh token can then be used in another access token request that specifies to return a refresh token. The refresh token granted from this access token request will be generated normally except for the fact that its expiration date-time will be set to the same as the first refresh token. All subsequent refresh tokens in the workflow will also have this same expiration date-time.
This means that the persistent access period of a rolling refresh workflow is defined by the first refresh token and all subsequent refresh tokens 'fall within' that period. The below diagram gives a visual representation of the persistent access period during a rolling refresh token workflow.
For patient-facing apps, the length of the persistent access period for a rolling refresh will be set by each patient during the OAuth 2.0 flow. They can choose from a variety of options (e.g., 1 hours, 1 day, 1 week, …) configured by the customer.
To enable rolling refresh access for non-patient-facing apps, check that your customers have properly configured their external client record.

Indefinite Persistent Access Periods
In this workflow, the persistent access period lasts indefinitely. It does so by using consecutive refresh tokens like in rolling refresh workflows. The notable difference is that, here, new refresh tokens have an expiration date-time greater than the one before it. In the rolling refresh workflow, this is always set to that of the first token. Since the persistent access period end date-time is set by the token's expiration, continually setting new refresh tokens to expire in the future will make the persistent access period last until no more refresh tokens are requested.
To enable indefinite access for patient-facing apps, instruct your customers to follow these configuration steps. Note that this only gives patients the option of indefinite access. Each patient still chooses their max access period.
- Navigate to Login and Access Configuration in MyChart.
- Navigate to OAuth Access Duration Configuration.
- Specify 'Indefinite' in the Global Max OAuth Access Duration field.
To enable indefinite access for non-patient-facing apps, check that your customers have properly configured their external client records.

Limit Use of Localhost URIs
Launched applications must register a list of URLs that Epic will use as an allowlist during OAuth 2.0. Epic will only deliver authorization codes to a URL that is listed on the corresponding app.
As a security best practice, apps should not include localhost/loopback URIs in this list. An exception is for Native applications which are designed to use localhost for the redirect, such as certain libraries available from the AppAuth group. An alternative available for native apps are platform specific link associations, discussed in our Considerations for Native Apps below.
If your developers wish to use localhost URIs for testing in our sandboxes, we recommend creating a second test application that will never be activated in customer environments and listing your localhost URLs there.
Considerations for Native Apps
Additional security considerations must be taken into account when launching a native app to sufficiently protect the authorization code from malicious apps running on the same device. There are a few options for how to implement this additional layer of security:
- Platform-specific link association: Android, iOS, Windows, and other platforms have introduced a method by which a native app can claim an HTTPS redirect URL, demonstrate ownership of that URL, and instruct the OS to invoke the app when that specific HTTPS URL is navigated to. Apple's iOS calls this feature "Universal Links"; Android, "App Links"; Windows, "App URI Handlers". This association of an HTTPS URL to native app is platform-specific and only available on some platforms.
- Proof Key for Code Exchange (PKCE): This is a standardized, cross-platform technique for public clients to mitigate the threat of authorization code interception. However, it requires additional support from the authorization server and app. PKCE is described in IETF RFC 7636 and supported starting in the August 2019 version of Epic. Note that the Epic implementation of this standard uses the S256 code_challenge_method. The "plain" method is not supported.
Starting in the August 2019 version of Epic, the Epic implementation of OAuth 2.0 supports PKCE and Epic recommends using PKCE for native mobile app integrations. For earlier versions or in cases where PKCE cannot be used, Epic recommends the use of Universal Links/App Links in lieu of custom redirect URL protocol schemes.
Subspace Security Considerations
This section applies to certain applications with a user type of "Backend Systems". If your application does not fit this criterion, you can skip this section. You can also skip this section if your Backend application does not use Subspace APIs; in which case you should remove the "Subspace" functionality and un-check the "Can Register Dynamic Clients" checkbox.
Beginning March 2, 2023, Epic no longer supports registering new client IDs with the following combination of settings:
User type of Backend Systems
Uses OAuth 2.0
Functionality: Subspace
Registers Dynamic Clients
Functionality: Incoming Web Services
The combination of settings 1-4 has historically been used for integration with Epic's Subspace Communication Framework. In this approach your application registers workstation-specific private keys to authorize Subspace API calls.
As a security best practice, for integrations using the above settings, instead it is recommended to authenticate the Incoming Web Services (Setting 5) using the OAuth 2.0 token obtained from a SMART on FHIR app launch or configuring your integration to use a multi-context application.
When a workstation-specific private key is allowed to authorize web service calls, a user may be able to bypass user-specific authentication and authorization checks within the web services themselves. This risk is mitigated in virtualized environments where the workstation (and the private key) is controlled by administrators. These security implications do not apply to Subspace APIs as Subspace APIs provide access to the Epic database only after the user has authenticated against Epic.
As a security best practice, rather than using the combination of settings above, an application that needs all these features (particularly web services) can do one of the following:
SMART App Launch
We recommend following the FHIRcast specification's guidance, which says to use the SMART App Launch to secure communication. One reason to use the SMART App Launch for Subspace integrations is that the launch provides user-specific security. The token provided by the launch is designed for end-users to use directly and provides the flexibility for you to call web services from any portion of your infrastructure.
Per the FHIRcast specification, the hub needs to launch your application before you can use Subspace APIs. Practically, this means your end users need to launch your application from Epic to begin their workflow. Epic's "User Toolbar" launch approach provides the ability for the user to launch your application before opening any patient and provides your application with authorization to view multiple patients' charts without re-launching. This requires coordination with the Epic Community Member to show the launch button to end users and requires instructing end users to start their workflow in this way.
By default, launched Subspace applications will receive 1 hour of API authorization per launch. If your application requires longer workflows, we offer the following options:
-
Epic offers a Dynamic Client Registration (DCR) workflow where you can register a temporary and in-memory private key to extend your application's access. Epic will revoke the key's access after a period of inactivity, so you should request a new access token before the most recent one expires. After the end user closes your application, you should delete the private key and Epic will revoke its access due to inactivity.
Note this workflow differs from the "Backend System" DCR workflow above, in that tokens issued to the client are tied to the user who launched the application. In this way, Epic can conduct user-specific security checks when your application calls web services.
-
(Not recommended) Epic Community Members can extend the default duration of your access tokens to any value, for example 4 hours.
Multi-Context Application
In this approach, your application handles the burden of authenticating the end-user and mediating their access to the Epic database. This can only be done securely by using server-side controls; safeguards put in place in a client-application (example: a native desktop app) are not sufficient, as they could potentially be bypassed by an end user.
An existing "Backend System" Subspace integration can achieve this with the following:
-
Created a new client ID with the following settings:
-
User type of Backend Systems
-
Uses OAuth 2.0
-
Feature: Incoming API
-
Select your required Web Services
-
-
Conduct Backend OAuth 2.0 as you did with your existing app, but skip the DCR step
-
Follow our security best practices for Backend applications, which solve the user-authentication issues above
SMART Scopes
SMART scopes are returned in the scope parameter of the OAuth 2.0 token endpoint response and determine which resources an application has permission to access and what actions the application is permitted to take. The scopes provided are based on the scopes that your app requested in your authorize request as well as the incoming APIs you have selected on your app page.
As of the August 2024 version of Epic, both SMART v1 and SMART v2 scope formatting are supported. Prior to the August 2024 version, only SMART v1 scopes are supported.
The actions defined by SMART v1 scopes are .read and .write. SMART v2 scopes use CRUDS syntax and actions include: .c – create, .r – read, .u – update, .d – delete, and .s – search.
For example, the Observation.Create resource corresponds to either:
- SMART v1: {user-type}/Observation.write
- SMART v2: {user-type}/Observation.c
Which version should you select?
If your app uses SMART v1 scopes or if your app does not use SMART scopes at all, you should select SMART v1.
If your app uses SMART v2 scopes, you should select SMART v2.
Note: Prior to the August 2024 version of Epic, SMART v1 scope formatting will be returned regardless of the SMART Scope Version selected on your app page. If your app uses SMART scopes and your customer is on a version of Epic earlier than August 2024, you must support SMART v1 scopes.
Non-OAuth 2.0 Authentication
Epic supports forms of authentication in addition to OAuth 2.0. Only use these forms of authentication if OAuth 2.0 is not an option.HTTP Basic Authentication
HTTP Basic Authentication requires that Epic community members provision a username and password that your application will provide to the web server to authenticate every request.
Epic supports HTTP Basic Authentication via a system-level user record created within Epic's database. You may hear this referred to as an EMP record. You will need to work with an organization's Epic user security team to have a username and password provided to you.
When calling Epic's web services with HTTP Basic Authentication the username must be provided as follows: emp$<username>. Replace <username> with the username provided by the organization during implementation of your application.
Base64 encode your application's credentials and pass them in the HTTP Authorization header. For example, if you've been given a system-level username/password combination that is username/Pa$$w0rd1, the Authorization header would have a value of ZW1wJHVzZXJuYW1lOlBhJCR3MHJkMQ== (the base64 encoded version of emp$username:Pa$$w0rd1):
GET http://localhost:8888/website HTTP/1.1
Host: localhost:8888
Proxy-Connection: keep-alive
Authorization: Basic ZW1wJHVzZXJuYW1lOlBhJCR3MHJkMQ==
Storing HTTP Basic Authentication Values
The username and password you use to authenticate your web service requests are extremely sensitive since they can be used to pull PHI out of an Epic organization's system. The credentials should always be encrypted and should not be stored directly within your client's code. You should make sure that access to decrypt the credentials should be limited to only the users that need access to it. For example, if a service account submits the web service requests, only that service account should be able to decrypt the credentials.
Client Certificates and SAML tokens
Epic also supports the use of Client Certificates and SAML tokens as an authentication mechanism for server-to-server web service requests. We do not prefer these methods because both require web server administrators to maintain a trusted certificate for authentication. As certificates expire or servers need to be moved around, this puts an additional burden on system administrators.
Additional Required Headers
When you use OAuth 2.0 authentication, Epic can automatically gather important information about the client making a web service request. When you use a non-OAuth 2.0 authentication mechanism, we require that this additional information be passed in an HTTP header.
Epic-Client-ID
This is the client ID you were given upon your app's creation on the Epic on FHIR site. This is always required when calling Epic's web services if your app doesn't use OAuth 2.0 authentication.
GET http://localhost:8888/website HTTP/1.1
Host: localhost:8888
Proxy-Connection: keep-alive
Authorization: Basic ZW1wJHVzZXJuYW1lOlBhJCR3MHJkMQ==
Epic-Client-ID: 0000-0000-0000-0000-0000
Epic-User-ID and Epic-User-IDType
This is required for auditing requests to FHIR resources. The Epic-User-ID corresponds to an EMP (Epic User) account that an organization creates for your application. This might be required depending on the web services you are calling. The Epic-User-IDType is almost always EXTERNAL.
GET http://localhost:8888/website HTTP/1.1
Host: localhost:8888
Proxy-Connection: keep-alive
Authorization: Basic ZW1wJHVzZXJuYW1lOlBhJCR3MHJkMQ==
Epic-Client-ID: 0000-0000-0000-0000-0000
Epic-User-ID: username
Epic-User-IDType: EXTERNAL
Epic as a Backend OAuth 2.0 Client
Epic as Backend Client Using OAuth 2.0 Client Credentials Grant
Updated: February 23, 2026
High Level Technical Summary
Epic's web API client supports the client_credentials OAuth 2.0 grant type, per RFC 6749. A JSON Web Key Set Url (JKU), specific to a given health system, is pre-registered with the external authorization server in exchange for a client id. When calling a web API, the Epic client signs a JSON Web Token (JWT) with a private key to obtain an access token with a client_assertion_type of urn:ietf:params:oauth:client-assertion-type:jwt-bearer per RFC 7515 and RFC 7523.
The authorization server retrieves a list of public keys from the pre-registered JSON Web Key Set Url (JKU). The returned key set contains one to many public keys, each with a key identifier (kid). The JWT used to authenticate to the authorization server identifies the kid of the public key corresponding to the private key used to sign the JWT.
Key Rotation
JWK Set URLs streamline implementation and make key rotation feasible. Epic's web API client's keys can be automatically or manually rotated. Once a new key-pair is generated, the previous key-pair is no longer used to sign credentials. The previous key-pair remains accessible from the JKU for a short window of time.
Registration
Each health system using Epic software should manually register for their own client id with the authorization server and will provide their own JKU.
Additionally, the resource server hosting the APIs accessed by Epic's web API client registers a client id with Epic, which is used to audit outgoing API calls.
Signing Algorithms
Epic's web API client supports the following signing algorithms:
- RSASSA-PKCS1-v1_5 using SHA-256 [RS256]
- RSASSA-PKCS1-v1_5 using SHA-384 [RS384]
- RSASSA-PKCS1-v1_5 using SHA-512 [RS512]
- ECDSA using P-256 and SHA-256 [ES256]
- ECDSA using P-384 and SHA-384 [ES384]
- ECDSA using P-512 and SHA-512 [ES512]
Starting in August 2025, if you use an RSA algorithm, you have the following options for the RSA key's bit length:
- 2048 bit
- 3072 bit
- 4096 bit
- 8192 bit
Examples
Example Token Request
POST https://as.example.com/oauth2/token
Content-Type: application/x-www-form-urlencoded

grant_type=client_credentials&client_id=<URL encoded client id from authorization server>&client_assertion_type=urn%3Aietf%3Aparams%3Aoauth%3Aclient-assertion-type%3Ajwt-bearer&client_assertion=eyJhbGciOiJFUzM4NCIsImprdSI6Imh0dHBzOi8vdmVuZG9yc2VydmljZXMuZXBpYy5jb20vaW50ZXJjb25uZWN0LWFtY3VycHJkLW9hdXRoL29hdXRoMi9rZXlzLzIvRTNEOUE5MkNGNTE2QkNEMTVGMjNCMjU0RkNCNTVBNjMiLCJraWQiOiJwLzVwWUo0SjNQVU9MeGhRb0NqZk5KRkNtOE01aTJicVN0bjcvODRGT1B3PSIsInR5cCI6IkpXVCJ9.eyJhdWQiOiJodHRwczovL2VuOWYzMWU1d2kzeG1mcS5tLnBpcGVkcmVhbS5uZXQiLCJleHAiOjE2OTIwMjY2NTAsImlhdCI6MTY5MjAyNjUzMCwiaXNzIjoiYjcwNjUyOTYtY2M0OC00YWE0LWI2NWMtNzI4YzYzODNmZWMwIiwianRpIjoiZGYzZTkwNGYtNzY4YS00ODhlLTllY2EtNWRkNzA2N2NhNWRjIiwibmJmIjoxNjkyMDI2NDcwLCJzdWIiOiJiNzA2NTI5Ni1jYzQ4LTRhYTQtYjY1Yy03MjhjNjM4M2ZlYzAifQ.yJdbzVcDIZotiudVvlzgoJF3wWJ5ZSCh4es9Ro7OtnIV8FgeXCnF1QiVOU9Aj2Uth9SYLyXgc09VgHJ9pgzG6CZVWJRDs0uZJAHPq7TBhvLmpr9bYvqHFKC1qpAvw22a
Example Token Response
HTTP/1.1 200 OK
Content-Type: application/json; charset=utf-8

{
    "access_token": ******,
    "token_type": "Bearer",
    "expires_in": 3600,
    "scope": "..."
}
Example JWT
(Also see in jwt.io).
{
    "alg": "ES384",
    "jku": "https://vendorservices.epic.com/interconnect-amcurprd-oauth/oauth2/keys/2/E3D9A92CF516BCD15F23B254FCB55A63",
    "kid": "p/5pYJ4J3PUOLxhQoCjfNJFCm8M5i2bqStn7/84FOPw=",
    "typ": "JWT"
}
.
{
    "aud": "https://en9f31e5wi3xmfq.m.pipedream.net",
    "exp": 1692026650,
    "iat": 1692026530,
    "iss": "b7065296-cc48-4aa4-b65c-728c6383fec0",
    "jti": "df3e904f-768a-488e-9eca-5dd7067ca5dc",
    "nbf": 1692026470,
    "sub": "b7065296-cc48-4aa4-b65c-728c6383fec0"
}
Example JKU Request
GET https://app.example.com/oauth2/keys/2/480786374A752C71B56B83471AAFEDFFExample JKU Response
HTTP/1.1 200 OK
Cache-Control: public, must-revalidate, max-age=3300,no-store
Content-Length: 258
Content-Type: application/json; charset=utf-8
Access-Control-Allow-Credentials: true
Access-Control-Allow-Headers: origin, authorization, accept, content-type, x-requested-with, prefer, Epic-User-ID, Epic-User-IDType, Epic-Client-ID, soapaction, Epic-MyChartUser-ID, Epic-MyChartUser-IDType
Access-Control-Allow-Methods: GET, HEAD, POST, PUT, DELETE, TRACE, OPTIONS
Access-Control-Allow-Origin: *

{
    "keys": [{
        "kty": "EC",
        "kid": "iTqXXI0zbAnJCKDaobfhkM1f-6rMSpTfyZMRp_2tKI8",
        "crv": "P-521",
        "x": "C1uWSXj2czCDwMTLWV5BFmwxdM6PX9p-Pk9Yf9rIf374m5XP1U8q79dBhLSIuaoj",
        "y": "svOT39UUcPJROSD1FqYLued0rXiooIii1D3jaW6pmGVJFhodzC31cy5sfOYotrzF",
        "alg": "ES512",
        "use": "sig"
    },
    {
        "kty": "EC",
        "crv": "P-521",
        "x": "AUbOrsnOvzbJUmtX75Y4gAK9R5xwlRYn_u1SD1FiN6qkR82Nn0fUB_Am07fTQDCY9tXGIC3U-zu0OaWEHIuXRU1s",
        "y": "ANBHM0k9mOY_Rpq8N7rr-UE7NQfZ4OhIMvB1vhbELskVHzqo-sdoP39kppS105uKRopnGc7oHyZY8xjkO-REMw5L",
        "use": "sig",
        "alg": "ES512",
        "kid": "EwWsxS6/Fedwvbx2qTE3qx++7h9N6bA4Q0RbRNg2bkA="
    }]
}
Reference Documentation
Standards Documentation
- RFC5246, The Transport Layer Security Protocol, V1.2
- RFC6749, The OAuth 2.0 Authorization Framework
- RFC7515, JSON Web Signature
- RFC7517, JSON Web Key
- RFC7518, JSON Web Algorithms
- RFC7519, JSON Web Token (JWT)
- RFC7521, Assertion Framework for OAuth 2.0 Client Authentication and Authorization Grants
- RFC7523, JSON Web Token (JWT) Profile for OAuth 2.0 Client Authentication and Authorization Grants
Designing an Efficient Application
App developers have a responsibility to create apps that perform well at scale and do not create an excessive or unexpected load on a customer's system. Be mindful that high API volumes from your app could have a negative outcome for a customer's users.
Performance issues in a customer's production environment are often caused by web service applications generating either (1) extremely high query volumes or (2) moderate volumes of resource-intensive queries.
To avoid these issues, follow our recommended practices below.
Recommended Practices
Your app should be stable and predictable and should not negatively impact operations for users or healthcare organizations. Follow the best practices below to develop an application that runs efficiently.
For apps launched from Hyperspace, aim for an average initial load response time of under 1.5 seconds.
This is a best practice Epic applications also follow. Delays beyond 1.5 seconds will be noticeable to end users and may result in a poor user experience. If your app reads a large amount of data from Epic upon launching the app, this could result in a slower response time. Where appropriate, consider either requesting data ahead of the app launch or queuing data to be loaded after the app is made responsive to the end user so the user is not waiting for the app to load.
Use the right tool for your use case.
Epic offers many different technologies that can be used to exchange data and integrate products. Depending on your use case, certain types of technologies may be more efficient than others. Consider the examples below and keep in mind when you need the data your app pulls from Epic and how frequently you need to pull data.
Event-driven Interfaces
One of the best tools available to you for keeping systems in sync in real time is event-driven interfaces, most commonly HL7v2 interfaces. HL7v2 interfaces are open industry-standard technology that cover a range of data types and triggers that are built for system-to-system integrations where two systems need to stay in-sync about particular types of data over time. Compared to continuously polling APIs, interfaces significantly reduce load on the operational database as the work is only being done at the time of the event.
Example: Your app needs to maintain a list of currently admitted patients. You may use the Outgoing Patient Administration HL7v2 interface to receive updates when a patient is admitted or discharged.
CDS Hooks
For clinical decision support apps, consider CDS Hooks as a way to get a notification of a user workflow and the ability to respond with CDS content in real time. Similar to event-driven interfaces, CDS Hooks allows your app to only pull data at the time of a particular event (ex. placing a specific order) when your app is able to make an actionable suggestion to the end user.
Note that CDS Hooks should only be used to display an actionable alert to the end user. It is not intended to be used exclusively as a notification framework. If your app only needs a notification, see Event-driven Interfaces above.
Example: Your app evaluates medication orders and recommends more appropriate options and dosages. You may use CDS Hooks to trigger an alert when certain medication orders are placed.
RESTful APIs
RESTful APIs, such as FHIR APIs, are very useful for pulling specific data points about individual patients in real time. Apps that launch from Epic with patient context commonly use FHIR APIs to retrieve various types of information about the current patient, including demographics, diagnoses, current medications, and more.
Example: Your app launches from Epic and needs to retrieve information about the current patient’s wounds. You might get the patient’s FHIR ID through a SMART on FHIR launch and then use Observation.Search (LDA-W) to query for that patient’s active wounds in real time when the app is launched.
Only pull the data you need
You should avoid pulling extraneous data wherever possible, as this can put unnecessary strain on your customer’s system. Use search parameters to filter your search to only the necessary data. For example, if you are using FHIR Search APIs, you can use the date and time parameters to avoid pulling extra data. Use discrete APIs rather than CDA documents since they provide targeted data sets that are more performant for the consuming and producing systems.
Native vs. Post-Filter Search Parameters
R4 FHIR APIs may support both native and post-filter search parameters. Native search parameters narrow down the search performed by Epic, therefore reducing the performance impact on a customer system. Post-filter parameters, however, are applied to search results after the initial search has been performed using the native search parameters. Post-filter parameters reduce the work required by your application, but do not reduce the load on the customer system.
You should generally avoid making Search queries without any native filtering parameters. Many patient charts contain a large amount of data spanning over a long period of time. Consider whether your app will make use of all of the data returned, and if not, filter your search results to a more specific data set. For example, if you only need clinical notes from the patient’s most recent encounter, don’t request all clinical notes for that patient. Instead, filter on the encounter identifier.
Bundle related API calls together
If you’re using FHIR APIs, you can decrease the number of API calls needed while still getting all the data you need by bundling related Search API calls into one API call using the _include parameter. This parameter allows you to ask for related resources to be included in the response bundle. For example, when searching for a patient’s lab results using DiagnosticReport.Search (Results), you can include the associated Observations in the same response, removing the need to perform subsequent Observation.Read API calls.
Avoid API polling
API polling is a practice in which an app constantly or repeatedly queries an API, looking for new data. When apps are designed to poll for information updates, this requires significant resources and degrades performance of the Epic system. There is also the chance that data might be stale by the time it is needed for a workflow and would require additional queries anyway. While use cases for API polling do exist in limited forms, the practice is inherently wasteful. This is because an app does not know when changes have been made to the requested data.
Event-driven technologies can be a way to avoid API polling. Rather than continually calling FHIR APIs to pull the same data points—which may or may not have changed—you can receive updates as they are made to the patient chart.
Cache relatively static data
Your app might require some data that doesn’t change often. For this data, consider taking a snapshot of the data and update or refresh as needed. Many FHIR resources, such as Location and Practitioner, do not change frequently, which means your app can store that data and avoid pulling those resources every time they are referenced. For resources that support date filtering, you may be able to cache older clinical data that is not likely to change, such as encounters that have been closed for an extended period of time. Consider how frequently you want to update each resource in your app’s database to minimize unnecessary API calls.
Set appropriate expectations with customers
Each customer should understand the data you are requesting from their system and at what frequency. Both you and your customer should understand the expected volume of data being exchanged. For example, if your app makes 100 API calls per patient per day, the total number of API calls per day could vary greatly depending on the size of the customer organization. Make sure your customers understand the impact that your app will have on their system so they can evaluate whether any infrastructure changes are required. Customers can work with their Epic Server Systems TS to make this evaluation.
Include programmatic guardrails to limit the number of API calls made
Add programmatic caps on the volume of API calls made in a given time range that would be outside the bounds of expected usage. Alternatively, implement monitoring or alerting mechanisms to proactively identify issues that could impact the customer’s system. Your customers will have different system resources and levels of comfort with different levels of system impact that APIs can cause. Make sure your app has the ability to decrease the frequency of API calls if the customer's system can't handle updates as frequently as you've initially designed.
Stagger API calls
There may be situations where you cannot avoid pulling a very large amount of data. If your app requires a lot of data to be pulled at regular intervals, consider staggering your API calls to minimize your impact on the customer system. For example, rather than making 1,000 API calls at once to pull data for 1,000 different patients, you might split those API calls into groups of 50 or 100 and spread them out over a longer period of time. Coordinate with each customer to schedule your API calls outside of their peak hours.
Test in each customer’s non-production environment
Regardless of the technologies you are using or the amount of data you are requesting, it is important to conduct realistic non-production testing. While test data in a customer’s non-production environments will likely be more limited than production data, you should aim to replicate a production workflow as closely as possible in terms of volume and frequency. This will allow you and your customer to address any issues prior to going live and avoid disrupting end user workflows.
Design Strategies to Increase Patient Data Sharing
Application Design Strategies to Increase Patient Data Sharing
This resource outlines our recommended practices to increase the success rate of patient data sharing for patient mediated applications that connect with Epic. We analyzed data from a large set of applications using patient-facing external (i.e., standalone) launches of OAuth 2.0. We found that patients are more likely to share their health data when their user experience is simple, guided, and the use of their data is transparent. While that may sound intuitive and individual application results vary, consistent trends emerged among the applications with the highest patient data-sharing success rates. One application that followed each of our recommended best practices boasted a 90.9% success rate with over 11,000 OAuth flow attempts.
Definitions
Let’s get on the same page. Some terms used throughout this resource are defined below.
Success Rate (%): The percentage of OAuth flow attempts that complete end-to-end.
Formula: Success Rate = OAuth Flow Successes ÷ OAuth Flow Attempts × 100
OAuth Flow Attempt (Interactions): When an authorization code is requested. This occurs when a user launches a connection request to a hospital system from the application and is directed to the MyChart login.
OAuth Flow Success (Grants): When the user completes the entire OAuth flow and an access token is granted. This includes entering MyChart login credentials and approving access to health data.
Best Practices
Explain why data access is needed before MyChart login
Applications that included a pre-login disclosure were associated with a 1.85x higher median success rate compared to applications that did not. Effective disclosures explained how the patient’s data would be used and what data would be accessed. Implement this into your application by creating a pop-up or notice that a user must view before being redirected to the MyChart login.
-
 Data security
-
 Duration of data use
-
 Deletion of data
-
 Expected workflow
-
 Features granted by sharing data
-
 Privacy protections (e.g., HIPAA, GDPR)
Example pre-login disclosure:
Complete the Data Use Questionnaire
Applications that completed the Data Use Questionnaire had a 1.40x higher success rate compared to those that did not, regardless of their answers. The Data Use Questionnaire can be accessed at the bottom of an app’s build page and can only be filled out once per application. Completing the Data Use Questionnaire increases transparency and builds user trust in your application.

Allow users to opt-in or out of data sharing and delete stored health data
Applications that requested permission to share the user’s health data and gave users the option to delete stored data were associated with a 1.36x higher success rate compared to applications that did not. Giving users more control over their health data strengthens their confidence in your application.
Other Trends Observed
API Usage
While we recommend only using APIs required for the core functionality of your application, the number of APIs an application uses was shown to have little to no impact on success rate. While using more APIs generally means accessing more categories of patient data, patients can select which information they want to share from the requested list of information.
Application Modality
Success rate varied greatly by application modality (website, mobile app, web-and-mobile). Web-only applications had the highest success rate: 1.70x higher than mobile-only applications and 2.20x higher than web-and-mobile applications. We recommend maintaining consistency in content across both modalities, while designing the user experience to suit the platform.

Requesting a Listing on Showroom
Connection Hub
A listing in Connection Hub on Showroom is available to any application or software product in Production use with at least one Epic customer using mature, repeatable technologies to exchange data. While the listing offers the added benefit of publicly sharing information about your product, a listing is not required for you to connect your software to organizations using Epic. You can facilitate downloads of your application at no cost by providing customers with the associated client IDs.
Eligibility
Review the Connection Hub Listing Terms. By proceeding to request a listing, among other terms, you are attesting that all information you submit is accurate and that your product has a live, active connection to an Epic system using safe, repeatable technologies (e.g., industry standard APIs or interfaces). You also agree to pay the annual, non-refundable Connection Hub listing fee of $500 per product per year.
Listing Request Steps
The steps below assume that you have already logged in to your user account. If you do not yet have an Epic on FHIR account, complete registration by clicking "Sign Up" on the top right corner of the website.
- An app record is required to represent your connection to Epic. If your organization already has an app record on the website in a Production Ready status, proceed to step 2. If you need more information on creating your app, see our App Creation and Request Process document. We recommend completing all available fields.
- HL7 or Interfaces-only apps: Your application may already by live with Epic customers and using technologies to exchange data (e.g., HL7 interfaces) without ever having created an app record. In this case, we recommend only selecting the "Backend Systems" user type. Additionally, in the Description field, briefly explain the technologies your app uses to exchange data.
- Select the app you want to list from your Build Apps page and scroll to the bottom to click the "Request Connection Hub Listing" button.
- Review and accept the Connection Hub Terms of Use.
- Within 15 days, your organization's point of contact should hear back about payment for the listing fee before finalizing your listing.
Toolbox
Within Showroom, Toolbox is a designation for products that use established integration technology in select categories to meet Epic defined recommended connection practices for that area. It's an inclusive program where many vendors who make a product in an eligible category can participate. The selected categories, the design requirements, and products in the categories will be evaluated annually to maintain focus on the most impactful and innovative areas for our customers.
Request a Blueprint and Evaluation
You may request the Blueprint for a Toolbox category by submitting an Technology Guidance Form on open.epic.com. Select "I need to request something not listed here" and describe your product in as much detail as possible.
Participation in Toolbox is at Epic’s discretion and requesting Toolbox services requires enrollment in Vendor Services. If you decide to proceed, you will share information about your existing or planned product with Epic to determine the next steps. Apps in a Toolbox-eligible category developed to meet the corresponding Blueprint must complete Toolbox Readiness to receive Toolbox designation on Showroom.
Toolbox Categories
The selection of Toolbox categories is based on a number of criteria including but not limited to: interest from customers; technical feasibility; potential of additional services creating positive outcomes for customers and their patients; and availability of Epic resources to provide services, among others. Epic regularly evaluates categories for Toolbox eligibility.
The list below represents the current Toolbox categories.
| Category Name | Category Definition |
| Alert Manager | Alert Communicator is included in EpicCare Inpatient and requires a third-party Alert Manager. Alert Managers ingest alerts from a variety of devices, such as inpatient vitals monitors, and determine who should get notified for each alert. They then send Epic’s Alert Communicator a standardized PCD-06 message indicating the alert recipient, and the relevant alert details. We then display it to the appropriate user(s) as a toast notification in Hyperspace or a push notification in Haiku and Rover. They also handle escalation in scenarios where the original recipient does not respond in an appropriate amount of time. |
| Ambient Voice Recognition | Ambient Voice Recognition (AVR) apps integrate with Epic’s Ambient Voice Recognition Module. Clinicians record their clinical encounters from beginning to end in Haiku or Rover, verbalizing their evaluative process throughout. When they finish recording, the audio is processed by a third-party ambient listening vendor. The vendor processes the conversation and converts it into clinical content. The documentation is then sent to Hyperspace for the clinician to review and finalize. With integration in this area, clinicians can expect to spend less time documenting, provide more attention to patients during visits, and have reduced after-hours time. |
| Anesthesia Infusion Injectable Hardware | Anesthesia infusion injectable hardware integrations support a hardware device that manages manual IV bolus injections by identifying medication and concentration, performing allergy checks, measuring doses, and automatically documenting the process in real-time in Epic's Anesthesia application. This integration enhances workflow efficiency and accuracy, increasing clinician focus on patient care and reducing manual documentation. |
| Automated Dispensing System | Automated Dispensing Systems (ADS) manage and include computerized devices that store, dispense, and track medications at the place of service. ADS commonly receive patient and order information to determine what medications are available for dispensing and send dispense information back to Epic when medications are removed from the ADS. |
| Bayesian Medication Dosing Decision Support | A third-party decision support system used to provide personalized medication dosing recommendations. These products launch from Hyperspace using SMART on FHIR, pull patient and medication information, and provide the end user with optimized medication dosing recommendations. Bayesian analysis is commonly used for medications with narrow therapeutic windows or medications requiring precise dosing based on patient factors. This Toolbox category will no longer be offered in 2027. If you have questions or are interested in this category, reach out to vendorservices@epic.com. |
| Bedside Dining | Bedside Dining applications present patients dining menus and options to place dining orders within MyChart Bedside. |
| Bedside TV Hardware | To provide a TV-centric experience in hospitals, vendors need to support hardware-level features such as deploying and app/OS updating, making Bedside TV the main screen, and facilitating seamless video calls using in-room cameras. |
| Clinical Documentation Improvement | This category consists of two subcategories: NoteReader CDI: NoteReader CDI is a tool used to help clinicians write complete, accurate, and specific clinical documentation. It works with a third-party Computer-Assisted Physician Documentation (CAPD) engine to suggest documentation improvements, called queries or nudges, to clinicians when they are writing a note. These nudges prompt clinicians to address potential issues in their documentation, which can help reduce denied claims and ensure accurate reimbursement for the care provided. Today, NoteReader CDI only supports the inpatient context. Outpatient Risk Adjustment CDI: Outpatient Risk Adjustment CDI is a system that supports clinical documentation improvement (CDI) processes for outpatient encounters by automating chart review, evidence gathering, and clarification management. This functionality integrates risk adjustment recommendations from third-party systems directly into Epic's pre-visit and point-of-care workflows, facilitating comprehensive HCC reviews in a singular decision support tool. CDI staff can review suggestions during pre-visit workflows and tee them up for providers to review during point-of-care workflows, without needing to navigate to other systems or disparate decision support advisories. Supplemental data explaining the insights and evidence will be displayed to end users, and providers' actions will be sent back to the third-party systems, creating a feedback loop with vendors that was not previously available. |
Clinical Knowledge Set | The Clinical Knowledge Set integration is based on the HL7 Infobutton standard, which allows clinicians to retrieve targeted information provided by third parties, specific to the context of the patient or clinical workflow. Rather than searching third party knowledge base, searches are performed automatically based off elements of the patient's chart like diagnoses or orders. |
| Community Resource Network (CRN) | Community Resource Network integrations support closed loop referrals from Epic community members to other organizations on the health grid, like post-acute facilities, community resources, DME suppliers, and more. Case Managers can find availability for their patients nearing discharge, and send information via vendors to post-acute facilities who can accept or decline placement based on the patients’ needs and history, as well as capacity and provider availability. Similarly, clinicians who identify Social Drivers of Health impacting patients can refer them to community organizations who can help address patients’ needs, all without leaving their workflows within Epic. |
| Contact Center Productivity Tools | Contact Center Productivity apps enable Computer Telephony Integration (CTI), allowing Epic users to make and receive telephone calls in Hyperspace. Incoming calls bring the user to the activity in Epic that matches the purpose of the call and with the caller identified. Outgoing calls allow the user to initiate a call in the phone system to a selected phone number with a single click. |
| Collaborative Care Plan Content | Collaborative Care Plans (CCPs) are used by care managers to track and evaluate progress toward resolving problems related to a patient's long- or short-term condition. Vendors provide importable care plans that can replace or augment care plans that customers may already have built. CCP is our recommended tool for almost all outpatient disciplines including Behavioral Health, Rehab, and Care Coordination. |
| Digital Pathology | Digital Pathology is an integration between Beaker (Epic's laboratory application) and a 3rd party Image Management System (IMS) to allow pathologists to gain access via a hyperlink to high-resolution, digitized images of case slides for examination and interpretation. The hyperlink can be set up as one link for the overall case with all the associated slide images (Case-level) and/or as multiple links to the individual slide images (Slide-level). | ECG Management System | Electrocardiogram (ECG) management systems store and interpret waveforms produced from an ECG machine, associate the waveform with an order for a patient, and file the data back to Epic. ECG management systems differ from point-of-care (PC-based) ECG and waveform visualization solutions in their ability to store data to a server and provide comprehensive workflow and interpretation support. |
| Embedded Payment Processor | The embedded payment processor integration (often referred to as the external payment page or EPP) allows MyChart websites, Welcome kiosks and tablets, and/or Hyperspace users to collect credit card and bank account payments in real time, while helping comply with standards to safely handle payment information. This is done by embedding a gateway’s URL as a payment page in Epic. The gateway’s website handles the collection of the payment directly and posts non-sensitive transaction information back to Epic. |
| Encoder | Encoder integrations involve using a third-party system to determine and file diagnosis, procedure, and DRG codes based on clinical documentation. Coders or CDS users launch from Epic into the encoder, which interfaces with Epic to ensure accurate coding and data storage. Encoders can integrate for facility coding workflows and/or for Clinical Documentation Improvement (CDI) workflows. |
| Endoscope Data Capture | Endoscope data capture integrations allow vendors to gather data from a scope, format it, and then send it downstream. Currently, Epic is focused on image data, though that will expand to video, event, and other data in the future. This data is used throughout Lumens workflows, e.g., documenting findings or writing a procedure note. |
| End-User Authentication | End-User Authentication includes two subcategories, Reauthentication and Login and Session Management. Reauthentication applications verify the identity of end-users before performing certain actions within Epic’s applications such as Hyperspace, Haiku, Canto, or Rover. Login and Session Management applications provide secure and efficient mechanisms for users to access Epic’s applications such as Hyperspace, Haiku, Canto, or Rover. |
| Fully Autonomous Coding | Fully Autonomous Coding applications utilize AI and machine learning to assign billing codes to patient charges or accounts. Fully Autonomous Coding apps receive patient information, clinical documentation, result and charge details from various outgoing interfaces and APIs. Without user intervention, the Fully Autonomous Coding app processes this information, updated charges are sent back to the EHR via an incoming financial transactions (DFT) interface and filed to Professional Billing or Hospital Billing. If the flow cannot be completed autonomously, feedback should be sent to Epic allowing the coder to complete the review in Epic. |
| Hemodynamics System | Hemodynamic Monitoring Systems are used in Cardiac Cath Labs, Cardiac EP Labs, and some Interventional Radiology Labs to monitor patients during invasive procedures. These systems monitor the patient’s vitals and pressures associated with specific cardiac structures. Epic’s procedure log is used in conjunction with the existing hemodynamic monitoring system, and the hemodynamic system writes relevant data into Epic’s procedure log to keep all the data integrated with the patient’s chart in Epic. |
| Histocompatibility Laboratory Information System | These integrations support transplant programs by performing critical tests that ensure compatibility between organ or tissue donors and recipients and sharing test results with health systems. A health system will place an order for specimen, accension, or laboratory test which will then be performed by the lab. The lab then sends these results via HL7 interface to the health system. Any health system performing Solid Organ or Blood Marrow transplants will use Human Leukocyte Antigen (HLA) crossmatch labs tests. |
| Home Dialysis | Home dialysis machines are used by patients to administer hemodialysis and peritoneal dialysis at home. These machines also collect clinical data such as vitals that are written to device-entered or patient-entered flowsheets in Epic, maintaining continuity of the patient’s chart throughout treatment. |
| Hospital Utilization Review Creation | Hospital Utilization Review Creation apps provide guidelines for treatment of various medical conditions and the associated reimbursement. Apps in this category integrate with the Utilization Review activity (Clinical Case Management). Utilization managers launch the application and document a patient’s symptoms, events, and treatments to see if the patient meets sufficient criteria for admission or discharge and what level of care is needed in the hospital. Afterwards, the app will send the criteria and notes added by the case manager into the Utilization Review activity in Epic. |
| Identity Verification | The Identity Verification parent category includes Identity Verification for EpicCare Link and MyChart. It involves connecting reusable identity platforms to streamline account creation and recovery for both applications. For EpicCare Link, identity platforms let users assert their identity during New Account Request submission, replacing manual applicant review. For MyChart, the same specification integrates with identity platforms during self-signup, letting users assert their identity regardless of account status or existing patient record, and assists with account recovery when traditional 2FA methods fail. |
| Imaging Appropriate Use Criteria | Imaging Appropriate Use Criteria (AUC) apps provide decision support for appropriateness of imaging procedures given clinical indications. When imaging orders are placed in Epic, AUC apps are notified and given some clinical context to determine the appropriateness of the order. The decision support outcome may file directly in an Epic OurPractice (OPA, formerly BPA) response, while other times, the app’s UI is shown to request additional information. |
| Infusion Pumps | Bi-directional infusion pump integration allows clinicians to send order details from Epic to auto-program the pump, and then receive documentation information from the pump, such as rate changes and volumes, to file into the patient’s chart. |
| Inpatient Care Plan Content | Inpatient Care Plans can be imported to create the templates, problems, goals, and interventions that will be used to manage and coordinate care for patients. |
| Inpatient Virtual Care | Inpatient Virtual Care products are in-room cameras used to monitor admitted patients virtually, enabling and supporting virtual nursing, continuous remote monitoring, and teleconsult workflows for admitted patients. The clinician-facing video feed from these cameras can be viewed via an external web application or embedded within Epic Monitor. The patient-facing video feed can be viewed via an external web application or embedded within MyChart Bedside TV. These products may use computer vision-based detection on the in-room video feed to monitor patients for fall risk or other adverse events. |
| Medication Ordering Decision Support | A third-party decision support system used to suggest medication changes. These products launch from Hyperspace using CDS Hooks to pull medication order information and provide the end user with medication ordering recommendations. The ordering decision support provided should augment the customer's existing medication warning configuration by evaluating patient-specific information to provide a more tailored warning. |
| MyChart Care Companion Care Plan Content | Apps that create signed XML documents used to import MyChart Care Companion care plans into customer environments. These care plans deliver notifications, analyze data provided by patients and connected devices, and orchestrate changes to the plan and escalations as needed to help patients, their caregivers, and care managers stay on top of a patient's care. A care plan comprises modules of patient-assigned tasks, which are delivered to patients as periodic reminders. These tasks could be reading education materials, responding to questionnaires, performing periodic symptom check-ins, or measuring weight, height, or blood pressure for example. |
| Nursing Quality Metrics | The Quality Program reporting infrastructure is intended to facilitate the flow of data used to calculate Nursing Sensitive Indicators (NSIs). Vendors use Kit APIs to pull data from Epic and use the data to calculate NSIs for their customers. This functionality is available to customers using Epic’s Bugsy application. |
| Oncology Clinical Pathways Decision Support | A third-party decision support system used to suggest oncology treatment protocols. These products launch from Beacon’s Treatment Plan navigator, embedded within Hyperspace, and post the user’s selected oncology protocol back to Epic. |
| Outbound Emergency Medical Services Transportation Ordering | Emergency Medical Services (EMS) Transportation Ordering applications enable hospital staff to order EMS-based transportation services for patients requiring additional medical care during transportation, commonly between medical facilities, by integrating Epic with Computer Aided Dispatch (CAD) systems. These integrations center around outbound transportation from the ordering location. Companies offering these applications may provide transportation services themselves or facilitate integration with transportation services employed directly by the hospital system. |
| Outpatient Pharmacy Patient Locker | This Toolbox category will no longer be offered in 2027. If you have questions or are interested in this category, reach out to vendorservices@epic.com. The Patient Locker integration for Outpatient Pharmacy is for third-party systems that store pre-filled prescriptions in a locker for patient pick-up. Pharmacists/technicians complete their usual workflow to fill prescribed medications, but rather than waiting for patients to come to the pharmacy and pick up the prescription in person the medication is stored in a patient locker. Once patients know their prescription is ready to be picked up they travel to the locker and the system is able to collect necessary patient identification, dispense the correct medication, and offer counseling services if required. |
| Outpatient Pharmacy Will-Call | This Toolbox category will no longer be offered in 2027. If you have questions or are interested in this category, reach out to vendorservices@epic.com. The Will-Call integration for Outpatient Pharmacy is for third-party systems that improve the organization of prescribed fills waiting to be picked up. When the prescriptions are filled, they are stored in bags, bins, etc. such that an indicator (e.g., a light) can call attention to the prescription location. This system allows pharmacists, technicians, or other users to easily find the prescription a patient at the counter has come to pick up. |
| Patient Feedback & Insights | Patient Feedback & Insight applications help organizations use Epic to manage and improve patient experience. These applications analyze patient satisfaction surveys administered through MyChart to generate patient insights, give positive recognition to providers, generate customer relationship management tasks for patients whose survey responses require follow-up, and import provider ratings and reviews into MyChart Provider Finder. |
| Payer Medical Necessity Guideline Creation | Payer Medical Necessity Guideline Creation apps provide care guidelines for treatment of various medical conditions for authorization review. Apps in this category integrate with the Guideline Review activity (Tapestry Utilization Management). |
| Payment Device Integrations | The Payment Device Integration allows payments to be collected in real time. This is handled by outgoing requests sent to your endpoint during a payment workflow. The first request checks whether the device is initialized while the second request is needed for a payment transaction response. The payment is processed outside of Epic and through the payment processor. |
| Point-of-care Middleware Integrations | Point-of-care Middleware Integrations are middleware that connect lab hardware to Epic to facilitate receiving results from point-of-care devices into Beaker. |
| Printing Output Management Integrations | Output Management applications integrate with Epic Print Services (EPS) to collect the jobs exiting from the service that are bound for physical printer devices, which would normally be done through Windows print queues |
| Procedural Consent Content Import | A clinical consents content vendor provides consent content such as procedure-specific risks, benefits and alternatives that is imported into customer environments. The content can then be pulled into consents created in Epic by clinical staff, spanning many clinical workflows and specialties. |
| Radiation Therapy Treatment Management System | A radiation therapy Treatment Management System (TMS) is a central hub for patients’ radiotherapy treatment plans and manages sending those plans to treatment modalities (e.g., linear accelerators and brachytherapy systems) and receiving and storing records of those treatments. A TMS can focus on plan management, safety, and tracking, leaving other tasks like scheduling, note-taking, and charging to the EHR. This Blueprint describes the recommended integration between a TMS and Epic for smooth workflows between the two systems. |
| Real Time Location Systems | A Real-Time Location System (RTLS) is used within the healthcare industry to provide real-time visibility into where patients, staff, and assets are located within their facilities. RTLS uses a tag that gets assigned to the entity (patient/staff/asset) they want to locate and a sensory network that’s deployed within the facility to determine location of the tag. Epic integrates with RTLS leveraging an HL7v3 interface to communicate incoming patient, staff, and medical device locations, and tag associations. In Epic, the RTLS data is used to provide visibility and automate workflows. |
| Real Time Prescription Benefit | An integrated real time prescription benefit (RTPB) application uses the native RTPB interface to provide accurate patient-level cost estimates and alternatives to providers at the point of ordering. Using information provided by the interface, RTPB applications offer: more accurate prior authorization information and automatic prior authorization status adjustments, out of pocket costs for the patient before signing orders, potential medication alternatives and their costs, and up front coverage alerts such as step therapy requirements. |
| Remote Patient Monitoring with Devices | RPM with devices allows providers to monitor and manage their patients’ chronic conditions. Devices that are distributed to a patient gather patient-generated health data such as blood pressure, heart rate, or weight. Data is sent back to Epic from the device. These products require patients to be explicitly enrolled in an RPM episode in Epic. Clinicians review the data in Hyperspace and take appropriate follow-up actions. |
| Remote Interpretation over Telehealth Invitations | Clinicians or staff members can send an invitation to a remote audio or video interpreter for a specified language from within their standard workspace for a telehealth visit. The remote interpreter will join on-demand via the health system’s video visit platform to conduct audio or video remote interpretation between the patient and the treatment team. A detailed log of events will be audited in the customer’s environment. |
| Shipping Management System | This Toolbox category definition is Under Construction with expected future renovations. A Shipping Management System vendor provides software that integrates with Epic to manage package shipments. The system receives data such as prescription or supply shipment details from Epic, and returns information including tracking numbers, expected delivery dates, and shipping labels. This integration streamlines the shipping process by embedding package management directly within Epic workflows. |
| Staff Duress | This integration will enhance staff safety by enabling third-party panic button devices to send location-aware staff duress alerts into Epic using FHIR-based APIs. When triggered, the integration with Epic will identify the user and their location which will then be used within Epic to notify designated security response and informational groups through Epic’s Push Notification framework. Critical and informational push notifications will support timely response and coordination, with responders able to acknowledge or decline alerts from within Epic. Other users stay in the loop with informational notifications. |
| Standard Lab Middleware Integrations | Standard Lab Middleware Integrations are middleware that connect lab hardware to Epic to facilitate receiving results from lab instruments into Beaker. |
| Translation of Patient Communications | This Toolbox category definition is Under Construction with expected future renovations. Language-to-language translation of MyChart messages, discharge instructions, and other text communication with patients to support quick turnarounds of translation and communication in a patient’s preferred language. |
| Total Parenteral Nutrition Compounding | Total Parenteral Nutrition (TPN) Compounding is the process of preparing sterile solutions for patients to receive intravenously. This process is conducted via TPN compounding machines (compounders), which are computerized medical devices that receive ingredient level information and compound precise amounts of each component. TPNs can be compounded in-house or offsite by a third-party compounding service. |
| Vitals Gateway and Middleware Device Integration | Vendors in this category receive vitals data from devices like bedside monitors or anesthesia carts. Vendors support either a Spot Check Vitals integration, a Continuous Vitals integration, or both. Spot Check Vitals devices receive discrete data that is validated on the device and then sent to EpicCare Inpatient Clinical Documentation. Continuous Vitals devices receive a constant stream of data which is then sent to EpicCare Inpatient Clinical Documentation or Epic’s Anesthesia application. |
| Waveform Visualization | Waveform visualization apps display waveform data in near real time via a web and/or mobile app that launches from Epic. |
| Wayfinding | Wayfinding applications using a patient’s appointment information, such as encounter department, to help users navigate healthcare organizations. |
Workshop
Workshop features products from developers who are working together with Epic to bring new, innovative technology and ideas to healthcare. Workshop participation is offered by Epic to a few vendors in specific categories to pilot and mature technology that will later be made more broadly available.
Rev Cyclers Program
The Rev Cyclers Program is intended to help customers and vendors optimize their use of Epic software to improve their revenue cycle outcomes. Vendors receive customer-level access to Epic tools, materials, and other benefits.
The vendors we choose to invite to the Rev Cyclers Program are driven by various criteria including customer feedback, scope of revenue cycle outsourcing work, and more. This is a new program. As such, we are iterating with a couple early adopters and plan to expand our group of vendors at a later time. If you have any questions about the program, please reach out to us at ConsultantInquiries@epic.com.
Please note that vendors can work with our customers regardless of if they participate in the program. For additional information on ways to interoperate with Epic customers, please visit open.epic where you can find specifications for hundreds of FHIR APIs and other resources to exchange data with members of the Epic community. Additionally, you can reach out to our Consultant Relations team if you have any questions on acquiring system access to support our customers.
Troubleshooting
Web App and Web Service Troubleshooting
Timing Changes to Your Application
The FHIR Developer Sandbox may take up to 1 hour to sync changes you make to technical settings for your app, such as endpoint URIs and selected APIs.
Epic customers receive licenses of applications automatically on a rolling 12-hour cycle. Each customer maintains their own instance of Epic, so each environment they maintain is likely to have a unique client record sync cycle. Coordinate with customers and keep this sync cycle so that your app is licensed to their Non-Production and Production environments in time to accommodate testing and live use.
Contents
OAuth 2.0 Errors
There are two types of OAuth 2.0 apps, launched apps and backend apps. Backend apps interact with only Epic's /token endpoint, while launched apps interact with the /token AND /authorize endpoints. We've broken out the error messages below by endpoint:
Authorize Endpoint
"Something went wrong trying to authorize the client. Please try logging in again."
-
Check that that redirect URI in your request matches one of the redirect URIs registered on the app. This includes the following:
- If you've edited your app's URIs, wait for the client sync before testing
- URIs are case sensitive
- URIs must be exact matches. For instance "/" will not match "/index.html", even though browsers treat them the same
- Check that the client ID in the request matches the client ID of the app, and that the response_type is code.
- If you have a backend app encountering this error code, make sure the URL you're hitting ends in "/token" instead of "/authorize".
- Make sure you're including a proper "aud" parameter in the request.
- If using a POST request, make sure your body is of Content-Type: application/x-www-form-urlencoded instead of application/json, and make sure your request data is in the body instead of the query string (vice versa for GET requests).
"invalid_launch_token"
- The client ID in the FDI must match the client ID of the app. Confirm the client ID in the app on Epic on FHIR make sure the client record exists in the Epic Community Member's Epic instance and that they have used that client ID in the integration. Make sure your app record and the authorization code in your request match exactly.
- If you are redeeming a launch token at the wrong Epic instance (example: production vs non-production) this can occur.
404 or 500 error
- Request URL might be too long. Shorten your state parameter.
I'm being asked to log in, but I'm launching from Epic/the Hyperspace Simulator
- If you're launching from Epic (EHR launch) and still being asked to log in, have the app request the "launch" scope.
Token Endpoint
400 error:
- "invalid_request" - Formatting of the HTTP Request can cause this issue. Try out the following:
- Use the POST verb, not GET
-
Content-Type should be "application/x-www-form-urlencoded".
- Do not send JSON, for example.
-
Content should be in the body of the request, not the querystring
- There should be no "?" after "/token"
- "invalid_client" - Your client authentication may be invalid. Try the following:
- For apps using JWT authentication, refer to the linked JWT Auth Troubleshooting resource below.
- If you're still having issues, try re-uploading your client authentication (client secret or public key) and waiting for the sync.
400 error: "unauthorized_client"
- If using a Backend OAuth 2.0 integration, there is required community member setup that will cause this error if not completed. This step is auto-completed when testing in the FHIR sandbox.
API Call Errors
This section assumes your app has obtained an access token and is having issues making API calls using it. If you have not received an access token yet, refer to the OAuth 2.0 errors section above.
401 errors
- 400 usually means you had the right security, but the data in your request was incorrect somehow.
- Check that you're putting data in the right place (body vs querystring).
-
Look for error messages in the response body to assist. Here is a common
one:
- NO-PATIENT-FOUND - When searching using an ID such as MRN, the ID Type in Epic needs to have a descriptor. Make sure the descriptor (I IIT 600) is populated for the target ID Type, and distribute to the app for searching.
- It's helpful if your app is able to log the response body, since Epic returns detailed error messages for most APIs.
403 errors
- For these errors, Epic identified who the client and user were, but denied access.
-
If the issue is with the client, we generally don't return
a response body, just 403 Forbidden
- In this case, check the API you are calling is attached to your client ID. Wait for the client to sync before testing any changes
-
For scope errors, the WWW-Authenticate HTTP Response header should say
this:
- Bearer error="insufficient_scope", error_description="The access token provided is valid, but is not authorized for this service"
-
If the issue is with the user, we generally return an error message
describing why, such as:
-
"The authenticated user is not authorized to view the requested data" is
common for FHIR calls. In this case, try the following:
- When testing in the FHIR Developer Sandbox or a customer environment, changes made to the list of selected APIs on your app on the website may take up to 1 hour to sync with the Sandbox and 12 hours to sync with an Epic organization's Epic instance.
- Make sure you are handling access tokens correctly. If you mistakenly use one person's access token on another person's behalf, you'll see this error.
- Organizations set up user security checks that also apply to access tokens. These security checks, if failed, produce this error.
- If using a backend services app, these security checks are applied to the background user configured for your client ID. Otherwise, they are applied to the user who authenticated into your app.
-
"The authenticated user is not authorized to view the requested data" is
common for FHIR calls. In this case, try the following:
Hyperspace/MyChart Embedding Errors
Many EHR Launched apps attempt to embed in Epic workflows, and rely on Epic build to do so. Below are common issues you might see when configuring one of these launches.
Attempted to embed in Hyperspace, but the window popped out to a new browser:
- Check the FDI record has the correct launch type.
- There are 2 types of FDIs and 2 types of launch activities, they need to match to respect launch settings:
- PACS FDIs - Need RIS_PACS_REDIRECTOR
- Web FDIs - Need MR_CLINKB_* (Active Guidelines)
Hyperspace launch displays a green/white spinning circle indefinitely (AGL spinner).
- Confirm that all domains in the login workflow are added to the Epic Browser Allowlist.
- Confirm that the workspace build points at the right FDI. Consider Active Guidelines debug mode to troubleshoot (shows URL navigated to).
App launches externally in MyChart mobile when launchtype specifies embedded launch.
- Confirm that all the app domains are allowlisted in the MyChart Mobile FDI record.
Web Page Errors
OAuth involves several web servers taking control of a browser in a sequence/handshake. The following errors could come from EITHER the Interconnect/Authorization server or the third-party app's server when they are trying to display HTML.
This content cannot be displayed in a frame.
- This could be hiding an OAuth 2.0 error, or an accidental login page.
- Interconnect cannot be iframed, and is trying to show an error page or login page.
- Will appear in trace logs, OR you can pop out the launch with FDI settings for "external window" workspace type.
- Refer to these sections above for scenarios where Interconnect returns HTML:
- "Something went wrong trying to authorize the client. Please try logging in again."
- "I'm being asked to login, but I'm launching from Epic"
- Otherwise, the third-party app is likely blocking the iframe.
- The app needs to adjust the X-Frame-Options response header. The website can omit the "X-Frame-Options” header or set it to "ALLOW-FROM https://domain”. The domain should be that of the Hyperspace web server for the organization.
Content was blocked because it was not signed by a valid security certificate.
- Accompanied by pink background
- Implies a web site's certificate is invalid
- Check the third-party server and Interconnect server for expired or invalid certificates.
This page can't be displayed
- Error normally calls out the domain/server being requested
- One cause is the browser being unable to resolve the website's IP address. Make sure the website's domain is publicly available, or at least available from the Hyperspace server for provider-facing embedded launches
- If you can resolve the IP address, another cause is the server/website hanging up during the TLS handshake. Try using SSL Labs to diagnose why the server is hanging up. "Handshake Simulation" is especially useful since it calls out compatability with IE-11 and various windows versions
FHIR Tutorial
FHIR makes it easy to quickly get patient data from a clinical system, and to connect together queries to obtain a wide variety of related healthcare information. The tutorial below includes a walkthrough introduction to FHIR data and sample patient and clinical information - everything you need to turn up the heat on your first FHIR app!
Let's begin with a few examples using jQuery — in a larger application, you might build your own framework, or use an existing one, to interact with FHIR, but FHIR is easy enough to use without any special libraries. This tutorial assumes you are passing a form of authorization covered in one of our authentication guides. It is generally assumed that in production environments FHIR APIs will use OAuth 2.0; however, it's important to note FHIR APIs do support HTTP Basic Authentication.
Interacting with the API
To get started, let's define the FHIR server base URL. This is a constant address for a server where all FHIR API endpoints for a given FHIR version live. In a SMART on FHIR launch, this is specified with the iss parameter. We'll store this variable as a separate entity, so we can reference it across our queries:
var baseUrl = "https://fhir.epic.com/interconnect-fhir-oauth/api/FHIR/R4"
You can expect the bold part of the above URL to be different for each unique instance of Epic you integrate with.
Finding Patients via Demographic Data
With the base URL defined, we can start building queries. Because we're interacting with patient data, there's an obvious place to get started: finding the patient whose data we are interested in. Epic's FHIR support provides two methods for applications to find and interact with patients:
- The Epic application can provide a patient to you as part of the application launch context, determined from the Epic workflow or the patient selection activity. This method can apply to both clinician and patient-facing workflows.
- Our Patient API provides a way to match on a single high-confidence patient using demographic information such as patient name, birthdate, address, and other identifying information. We use this method when your application is independent from Epic.
var patientMatchString = "/Patient/$match"
We can use jQuery's $.ajax() function to send patient demographic data to the server using an HTTP POST request. It takes a parameter describing the URL, the data to send to the server, and a callback for doing something with the data once the API responds. In our case, let's just log the data to the console so we can inspect it before developing code that works with it:
$.ajax({
  url: baseUrl + patientMatchString,
  type: "POST",
  contentType:"application/json; charset=utf-8",
  dataType: "json",
  data: dataToSend,
  success: function(data) { console.log(data); }
});
The complete request URL at this point will read:
"https://fhir.epic.com/interconnect-fhir-oauth/api/FHIR/R4/Patient/$match"
The dataToSend will be a FHIR Parameters resource. In this case, there are two parameters:
- The “resource” parameter, which is a partial Patient resource with demographic information about the patient you want to find.
- The “onlyCertainMatches” parameter, which is set to true, indicating that the server should only return single high-confidence matches based on your demographic information.
{
  "resourceType": "Parameters",
  "id": "example",
  "parameter": [
    {
      "name": "resource",
      "resource": {
        "resourceType": "Patient",
        "identifier": [
            {
                "use": "usual",
                "type": {
                    "text": "EPI"
                },
                "system": "urn:oid:1.2.840.114350.1.1",
                "value": "27475"
            }
        ],
        "name": [
          {
            "family": "Smith",
            "given": [
              "John"
            ]
          }
        ],
        "birthDate": "1906-03-04"
      }
    },
    {
      "name": "count",
      "valueInteger": "1"
    },
    {
      "name": "onlyCertainMatches",
      "valueBoolean": "true"
    }
  ]
}
If you execute the above request, you'll see the following full Patient resource response in your console:
{
    "resourceType": "Bundle",
    "type": "searchset",
    "total": 1,
    "link": [
        {
            "relation": "self",
            "url": "https://fhir.epic.com/interconnect-fhir-oauth/api/FHIR/R4/Patient/$match"
        }
    ],
    "entry": [
        {
            "link": [
                {
                    "relation": "self",
                    "url": "https://fhir.epic.com/interconnect-fhir-oauth/api/FHIR/R4/Patient/ecBjL8PUhljoHWMtwx63UhA3"
                }
            ],
            "fullUrl": "https://fhir.epic.com/interconnect-fhir-oauth/api/FHIR/R4/Patient/ecBjL8PUhljoHWMtwx63UhA3",
            "resource": {
                "resourceType": "Patient",
                "id": "ecBjL8PUhljoHWMtwx63UhA3",
                "extension": [
                    {
                        "valueCodeableConcept": {
                            "coding": [
                                {
                                    "system": "urn:oid:1.2.840.114350.1.13.5325.1.7.10.698084.130.768080.39128",
                                    "code": "male",
                                    "display": "male"
                                }
                            ]
                        },
                        "url": "http://open.epic.com/FHIR/StructureDefinition/extension/legal-sex"
                    },
                    {
                        "valueCodeableConcept": {
                            "coding": [
                                {
                                    "system": "urn:oid:1.2.840.114350.1.13.5325.1.7.10.698084.130.768080.35144",
                                    "code": "male",
                                    "display": "male"
                                }
                            ]
                        },
                        "url": "http://open.epic.com/FHIR/StructureDefinition/extension/sex-for-clinical-use"
                    },
                    {
                        "extension": [
                            {
                                "valueCoding": {
                                    "system": "http://terminology.hl7.org/CodeSystem/v3-NullFlavor",
                                    "code": "UNK",
                                    "display": "Unknown"
                                },
                                "url": "ombCategory"
                            },
                            {
                                "valueString": "Unknown",
                                "url": "text"
                            }
                        ],
                        "url": "http://hl7.org/fhir/us/core/StructureDefinition/us-core-race"
                    },
                    {
                        "extension": [
                            {
                                "valueString": "Unknown",
                                "url": "text"
                            }
                        ],
                        "url": "http://hl7.org/fhir/us/core/StructureDefinition/us-core-ethnicity"
                    },
                    {
                        "valueCode": "248153007",
                        "url": "http://hl7.org/fhir/us/core/StructureDefinition/us-core-sex"
                    },
                    {
                        "valueCodeableConcept": {
                            "coding": [
                                {
                                    "system": "http://loinc.org",
                                    "code": "LA29518-0",
                                    "display": "he/him/his/his/himself"
                                }
                            ]
                        },
                        "url": "http://open.epic.com/FHIR/StructureDefinition/extension/calculated-pronouns-to-use-for-text"
                    }
                ],
                "identifier": [
                    {
                        "use": "usual",
                        "type": {
                            "text": "CEID"
                        },
                        "system": "urn:oid:1.2.840.114350.1.13.5325.1.7.3.688884.100",
                        "value": "YA5WT9X7ZMB69TB"
                    },
                    {
                        "use": "usual",
                        "type": {
                            "text": "EPI"
                        },
                        "system": "urn:oid:1.2.840.114350.1.1",
                        "value": "27475"
                    },
                    {
                        "use": "usual",
                        "system": "urn:oid:2.16.840.1.113883.4.1",
                        "_value": {
                            "extension": [
                                {
                                    "valueString": "xxx-xx-3745",
                                    "url": "http://hl7.org/fhir/StructureDefinition/rendered-value"
                                }
                            ]
                        }
                    }
                ],
                "active": true,
                "name": [
                    {
                        "use": "official",
                        "text": "John Smith",
                        "family": "Smith",
                        "given": [
                            "John"
                        ]
                    },
                    {
                        "use": "usual",
                        "text": "John Smith",
                        "family": "Smith",
                        "given": [
                            "John"
                        ]
                    }
                ],
                "gender": "male",
                "birthDate": "1906-03-04",
                "deceasedBoolean": false,
                "managingOrganization": {
                    "reference": "Organization/ePUQySFaW.ofXm2GhaXRMDA3",
                    "display": "Epic Facility"
                }
            },
            "search": {
                "extension": [
                    {
                        "valueCode": "certain",
                        "url": "http://hl7.org/fhir/StructureDefinition/match-grade"
                    }
                ],
                "mode": "match",
                "score": 1
            }
        }
    ]
}
Let's pick out a couple of key elements to learn more about:
- The
entry[n].fullUrlelement points to the permanent location of a unique patient. If we make a request to this absolute URL, we can directly access the Patient resource for that patient. - The
entry[n].resource.idcontains the FHIR ID of the resource. This ID is assigned by the server responsible for storing the resource. Storing this FHIR ID can be useful if you want to save off a list of recently used patients, for example. - The
entry[0].resourceelement contains all of the actual data about John Smith. Within this object, you'll find information about John such as his address, phone number, and birth date.
Ideally, you provide enough demographic information in your initial request for the API to return the correct patient. If we were building a more complex app, we might need to handle other scenarios gracefully, such as when no patients are found.
The following response is an example of what to expect if a single high-confidence patient match is not found. Note the text contained within the OperationOutcome resource:
{
    "resourceType": "OperationOutcome",
    "issue": [
        {
            "severity": "fatal",
            "code": "processing",
            "details": {
                "coding": [
                    {
                        "system": "urn:oid:1.2.840.114350.1.13.5325.1.7.2.657369",
                        "code": "59013",
                        "display": "The matching operation found one or more possible matches, but did not find a certain match."
                    }
                ],
                "text": "The matching operation found one or more possible matches, but did not find a certain match."
            },
            "location": [
                "/f:patient"
            ],
            "expression": [
                "patient"
            ]
        }
    ]
}
That's a quick overview of the Patient $match endpoint, but if you're interested in learning more about our Patient.$match API, you can read more here. Let's continue by saving off John's FHIR ID so we can refer to it later:
var patientId = data.entry[0].resource.id;
Interlude: Relative Resource URLs (R4 and Later)
There are several versions of the FHIR standard. We generally recommend using Epic’s latest R4 FHIR resources, as we did in the example above, but you might also need to use DSTU2 resources or STU3 resources in some cases.
For R4 and later versions of FHIR, Epic uses relative URLs for all referenced FHIR resources included in a query response. STU3 and earlier versions use absolute URLs. For example, if we look back at the sample response from our Patient query above, if that query was an STU3 version Patient query, instead of returning a relative reference URL for the managingOrganization:
"managingOrganization": {
    "reference": "Organization/ePUQySFaW.ofXm2GhaXRMDA3",
    "display": "Epic Facility"
}
An STU3 resource would return an absolute URL instead:
"managingOrganization": {
    "reference": "https://fhir.epic.com/interconnect-fhir-oauth/api/FHIR/STU3/Organization/ePUQySFaW.ofXm2GhaXRMDA3",
    "display": "Epic Facility"
}
This distinction is important to keep in mind, particularly if you’re working with some FHIR resources that use the DSTU2 or STU3 standard, and other resources that use the R4 standard. Make sure to append the baseURL to the front of the relative URL when querying referenced FHIR resources.
Searching for Clinical Data by Patient ID
We've found our patient, and we have some demographics that we could parse and display to an end user. But how do we get access to clinical information about that patient? To retrieve this data, we need to use another endpoint within our API, along with the patient ID we saved off above.
Let's start with a simple query — retrieving a patient's allergies. The AllergyIntolerance endpoint exposes exactly that, and provides a search endpoint to find allergies by Patient ID. We can construct a query that provides John's FHIR ID to grab all the active allergies recorded in our system:
var allergySearchString = "/AllergyIntolerance?patient=" + patientId;
We can use jQuery’s $.getJSON() function to call into the URL and retrieve our data in JSON format. We will also log the response bode to the console as a simple means to view the data.
$.getJSON(baseUrl + allergySearchString, function(data,error) { console.log(data); });
Executing the above request returns the following:
{
    "resourceType": "Bundle",
    "type": "searchset",
    "total": 1,
    "link": [
        {
            "relation": "self",
            "url": "https://fhir.epic.com/interconnect-fhir-oauth/api/FHIR/R4/AllergyIntolerance?patient=ecBjL8PUhljoHWMtwx63UhA3"
        }
    ],
    "entry": [
        {
            "link": [
                {
                    "relation": "self",
                    "url": "https://fhir.epic.com/interconnect-fhir-oauth/api/FHIR/R4/AllergyIntolerance/efnBJhT6lf969qC4prH5jVqor3vnmeJyvRfMzJX9-yZ43"
                }
            ],
            "fullUrl": "https://fhir.epic.com/interconnect-fhir-oauth/api/FHIR/R4/AllergyIntolerance/efnBJhT6lf969qC4prH5jVqor3vnmeJyvRfMzJX9-yZ43",
            "resource": {
                "resourceType": "AllergyIntolerance",
                "id": "efnBJhT6lf969qC4prH5jVqor3vnmeJyvRfMzJX9-yZ43",
                "clinicalStatus": {
                    "coding": [
                        {
                            "system": "http://terminology.hl7.org/CodeSystem/allergyintolerance-clinical",
                            "version": "4.0.0",
                            "code": "active",
                            "display": "Active"
                        }
                    ],
                    "text": "Active"
                },
                "verificationStatus": {
                    "coding": [
                        {
                            "system": "http://terminology.hl7.org/CodeSystem/allergyintolerance-verification",
                            "version": "4.0.0",
                            "code": "confirmed",
                            "display": "Confirmed"
                        }
                    ],
                    "text": "Confirmed"
                },
                "category": [
                    "medication"
                ],
                "criticality": "high",
                "code": {
                    "coding": [
                        {
                            "system": "urn:oid:2.16.840.1.113883.3.26.1.5",
                            "code": "N0000005840",
                            "display": "PENICILLINS"
                        }
                    ],
                    "text": "PENICILLINS"
                },
                "patient": {
                    "reference": "Patient/ecBjL8PUhljoHWMtwx63UhA3",
                    "display": "Smith, John"
                },
                "onsetDateTime": "2024-08-27",
                "recordedDate": "2024-08-27T20:34:34Z",
                "reaction": [
                    {
                        "manifestation": [
                            {
                                "coding": [
                                    {
                                        "system": "http://snomed.info/sct",
                                        "code": "201272008",
                                        "display": "(URTICARIA NOS) OR (HIVES)"
                                    }
                                ],
                                "text": "Hives"
                            }
                        ],
                        "description": "Hives"
                    }
                ]
            },
            "search": {
                "mode": "match"
            }
        }
    ]
}
Looking at the response, there are a couple of key elements to highlight to help us understand the allergy information:
- The
totalelement lets you know the number of resources returned for a query. In this case, it lets us know how many allergies our system has documented for John Smith. - The
entry[n].fullUrlelement points to the permanent location of a unique AllergyIntolerance resource. If we make a request to this URL, we will always get back data for this specific AllergyIntolerance for the patient. The FHIR ID for this resource can also be retrieved directly fromentry[n].resource.id. This might be useful for future reference to check whether the patient has developed additional reactions to this allergy. - The
entry[n].resource.patientelement describes the patient the allergy relates to. This allows us to confirm the association between allergy and patient and shows how FHIR works by linking these smaller resources to paint a larger picture. In this case, the element in each allergy entry points to our patient, John. - The
entry[n].resource.codeelement describes the allergen that causes the allergy. This element has a text element, to make it easy to read, as well as coded values, to associate and develop clinical rules against. In this example response, we can see that John is allergic to Penicillin. - The
entry[n].resource.reactionelement describes the allergic reactions of the patient documented in the system. - The
entry[n].resource.onsetDateTimeelement tells you when the allergy first started happening. - The
entry[n].resource.reaction[n].manifestationelement tells you what kind of reaction occurred. For example, John's allergy to Penicillin gives him hives.
That's a lot of information with a simple query, and it demonstrates how quickly we can build up and associate the different endpoints available on our API.
Wrap Up
Nice work! You made it to the end of our tutorial, and you understand how to find patients, and start working with their data. There's even more to discover in our documentation, like additional data types, and more complex searches.
Advanced Topics
In this section we'll cover a few advanced topics that may come up in your implementation of FHIR.
Searching from Patient Context in Coordination with OAuth 2.0
For patient-facing applications using OAuth 2.0 authorization, including the patient or subject search parameter(s) is optional when making requests for the patient on whose behalf authorization to the system was granted. This is true for STU3 and R4 versions of FHIR resources.
Including the patient or subject ID in the request is still recommended and encouraged. Requests can be made with these parameters so long as the FHIR ID matches the patient whose data is being requested with the access token.
Content negotiation in FHIR
Epic’s FHIR server defaults to using XML for FHIR resources, but many apps may prefer sending and receiving JSON instead. FHIR allows both XML and JSON MIME-types and specifies how a client can request one or the other. Per the FHIR spec and in Epic’s FHIR server, a client can specify XML or JSON through either the _format query parameter or by specifying the MIME-type in an HTTP header. A client should use the Accept HTTP header to specify the MIME-type of the content that it wishes to receive from the server and the Content-Type HTTP header to specify the MIME-type of the content that it is sending in the body of its request, for example, as part of a create or update; the Content-Type HTTP header will also be considered for requests in which another method (_format query parameter, or Accept HTTP header) is not provided.
Epic's FHIR server processes the the available options in the following hierarchy:
- _format query parameter
- Accept HTTP Header
- Content-Type HTTP Header
- Server Default: XML
Epic supports all of the following MIME-types for FHIR interactions:
- application/fhir+json
- application/json+fhir
- application/xml+fhir
- application/fhir+xml
- application/json
- application/xml
- text/xml
In addition to the MIME-types listed above, the _format query parameter supports:
- xml
- json
Retrieving Additional ID Types with Patient and Practitioner Resources
You can also use FHIR search APIs such as Patient.Search and Practitioner.Search to get FHIR IDs for other FHIR versions and a list of other identifiers given one type of identifier. For Patient.Search, use the following format:
<base url>/R4/Patient?identifier=<ID Type>|<ID>
Where ID Type can be one of the following: CID, CSN, External, ExternalKey, FHIR, FHIR STU3, Internal, Name, NationalID, CEID, MyChartLogin, <any IIT identifier>
The resulting identifiers are identical to those returned by GetPatientIdentifiers.
For practitioners, you can use the Practitioner.Search endpoint to retrieve a list of practitioner identifiers. Use the following format:
<base url>/R4/Practitioner?identifier=<ID Type>|<ID>
Where ID Type can be one of the following: CID, External, FHIR, Internal, NPI, CSN.
Constraining ID Length to 64 Characters in the R4 Version of FHIR
For historical reasons, some of Epic’s FHIR resources have identifiers that are longer than 64 characters. For example, Medication resource IDs sometimes exceed this length. New clients can be configured to respect the 64-character ID-length limit described in the HL7 FHIR standard for all STU3 and R4 version FHIR resources that are part of the USCDI data classes. To avoid disrupting existing integrations or new integrations that rely on historical data, this configuration is not enabled by default. You can set your client to observe the 64-character identifier length limit for USCDI resources by changing the FHIR ID Generation Scheme setting on the Build Apps page. To change this setting on an active app, you will need to contact your Epic representative. See the App Default FHIR Version Tutorial for more information.
This document explains the ways in which the date and datetime parameters can be configured during a search with a FHIR resource. The general format for dates and times is yyyy-mm-ddThh:mm:ss[Z|(+|-)hh:mm], an example being 2019-05-20T08:00:00Z which corresponds to May 20th 2019 at 8:00 AM UTC.
FHIR Search Using HTTP POST
In some cases, you might want to perform a search interaction using an HTTP POST body. In rare scenarios, the query string might be too long and a POST body could make more sense. This method is supported for all versions of FHIR.
For example, a search query like this:
GET <base url>/api/FHIR/<version>/<resource>?param1=val1¶m2=val2...Can be executed using a POST using this format:
POST <base url>/api/FHIR/<version>/<resource>/_search Content-Type: application/x-www-form-urlencodedIf both query string parameters and a POST body are provided to the _search endpoint, the POST body is ignored.
param1=val1¶m2=val2...
Starting in the February 2026 version of Epic, query string parameters, except for _format, are ignored by the _search endpoint.
Date/Time Information
Prefixes
Epic supports a subset of HL7-defined prefixes that can be added to a date or datetime parameter to modify the way in which searching occurs. If you choose to omit a prefix, the default behavior will be the same as that of an "equal" prefix, such that the search will include a results for which the specified value is within range.
Refer to the Prefix Considerations section below for additional caveats about Epic's date searching behavior.
| Prefix | Prefix Meaning | Example Search | Example Comparisons |
|---|---|---|---|
| eq | equal | =eq2013-01-14 | 2013-01-14T00:00 matches |
| 2013-01-14T10:00 matches | |||
| 2013-01-15T00:00 does not match - it's not in the range | |||
| lt | less than | =lt2013-01-14T10:00 | 2013-01-14 matches, because it includes the part of 14-Jan 2013 before 10am |
| le | less than or equal to | =le2013-03-14 | "from 21-Jan 2013 onwards" is included because that period may include times before 14-Mar 2013 |
| gt | greater than | =gt2013-01-14T10:00 | 2013-01-14 matches, because it includes the part of 14-Jan 2013 after 10am |
| ge | greater than or equal to | =ge2013-03-14 | "from 21-Jan 2013 onwards" is included because that period may include times after 14-Mar 2013 |
| sa | starts after | =sa2013-03-14 | "from 15-Mar 2013 onwards" is included because that period starts after 14-Mar 2013 |
| "from 21-Jan 2013 onwards" is not included because that period starts before 14-Mar 2013 | |||
| "before and including 21-Jan 2013" is not included because that period starts (and ends) before 14-Mar 2013 | |||
| eb | ends before | =eb2013-03-14 | "from 15-Mar 2013 onwards" is not included because that period starts after 14-Mar 2013 |
| "from 21-Jan 2013 onwards" is not included because that period starts before 14-Mar 2013, but does not end before it | |||
| "before and including 21-Jan 2013" is included because that period ends before 14-Mar 2013 |
Prefix Considerations
There are a few unique things to note about Epic's implementation of date search prefixes:- In some FHIR APIs, the date parameter supports fuzzy date searching, meaning that the search will also return values with dates close to but outside of the specified date or date range. If you need strict date searching, we suggest that you do additional validation on the date values returned in the response.
- The
saandebprefixes behave differently than defined by HL7:sabehaves identically togtin Epic. In other words,sawill match a period even if only part of that period occurs after the specified date or datetime.ebbehaves identically toltin Epic. In other words,ebwill match a period even if only part of that period occurs before the specified date or datetime.
- Epic does not support the
neorapdate search prefixes.
Date Parameters
Level of Precision
Searching by a date or time will do a search based on the level of precision you enter.
Search by year:
date=yyyy
Ex: date=2019
This will search for values with a date that occurred in 2019. This encompasses a range from January 1st, 2019 00:00:00 to December 31st, 2019 23:59:59.
Search by year and month:
date=yyyy-mm
Ex: date=2019-05
This will search for values with a date that occurred in May 2019. This encompasses a range from May 1st, 2019 00:00:00 to May 31st, 2019 23:59:59.
Search by year, month, and day:
date=yyyy-mm-dd
Ex: date=2019-05-15
This will search for values with a date of May 15th, 2019.
Date Ranges
Search on or near a specific date:
date=yyyy-mm-dd
Ex: date=2019-05-15
This will search for values with a date of May 15th, 2019.
Search starting at a specific date:
date=ge yyyy-mm-dd
Ex: date=ge2019-05-10
This will search for values with a date on or after May 10th, 2019.
Search ending at a specific date:
date=le yyyy-mm-dd
Ex: date=le2019-05-20
This will search for values with a date on or before May 20th, 2019.
Search starting and ending at a specific date:
date=ge yyyy-mm-dd&date=le yyyy-mm-dd
Ex: date=ge2019-05-10&date=le2019-05-20
This will search for values with a date on or after May 10th, 2019 and on or before May 20th, 2019.
DateTime (Instant)
Currently in FHIR, most searching is done by Date only, while the response can return a DateTime value which will be in the same format as would be used in a search request.Level of Precision
Search by Hour:
parameter=yyyy-mm-ddThh:mm
Ex: parameter=2019-05-15T12:00
This will search for values with a date of May 15th, 2019 and a time of 12:00 pm local time. If you include an hour value, you must include a minute value.
Search by Hour and Minute:
parameter=yyyy-mm-ddThh:mm
Ex: parameter=2019-05-15T12:30
This will search for values with a date of May 15th, 2019 and a time of 12:30 pm local time.
Search by Hour, Minute, and Second:
parameter=yyyy-mm-ddThh:mm:ss
Ex: parameter=2019-05-15T12:00:30
This will search for values with a date of May 15th, 2019 and a time of 12:00:30 pm local time.
Time Zones
When a time and time offset are specified, the specified timezone will be used. If only a date with no time is specified or a time is specified without a timezone, the timezone defaults to the local timezone.
Specify UTC Time Zone:
parameter=yyyy-mm-ddThh:mm:ssZ
Ex: parameter=2019-05-15T12:30:00Z
This will search for values with a date of May 15th, 2019 and a time of 12:30 pm UTC. This also works with an offset of +00:00 or -00:00.
Specify a non-UTC Time Zone:
parameter=yyyy-mm-ddThh:mm:ss(+/-)hh:mm
Ex: parameter=2019-05-15T12:30:00-05:00
This will search for values with a date of May 15th, 2019 and a time of 12:30 pm EST.
App Default FHIR Version
An app’s FHIR version is selected during the app creation process and can be changed any time prior to activating an app. The FHIR version controls the behavior of different interoperability technologies, including:
- SMART on FHIR: Multiple pieces of the SMART on FHIR authentication workflow
- Authentication: OpenID Connect or Introspect for token inspection and user authentication
- CDS Hooks: Supported hooks and other features
- FHIR ID Generation Scheme: The control of FHIR ID length used in the app
Generally, an app FHIR version of STU3+ is recommended as those versions support functionality that the DSTU2 app FHIR version does not. Regardless of the version you choose though, you should test all relevant behaviors to ensure app compatibility with the selected FHIR version. Note that selecting an app FHIR version does not prevent you from using web services of other FHIR versions.
SMART on FHIR
The app’s FHIR version impacts multiple different behaviors during a SMART on FHIR launch, including:
isselement- JSON payload
iss Element
The value of the iss element sent during Step 1 of a SMART on FHIR launch is determined by the app's FHIR version, where the iss endpoint returned corresponds to the specific endpoint for that FHIR version on the server.
For example, if your app has a FHIR version of STU3 selected, then the server's STU3 FHIR endpoint will be returned as the iss value. In the sandbox, this would correspond to /interconnect-aocurprd-oauth/api/fhir/STU3.
JSON Payload
After successfully exchanging an authorization code for an access token, a JSON payload containing context about the app launch is returned. The JSON payload is impacted by the app FHIR version in the following ways:
- Encounter context is supported only in STU3+ app FHIR versions.
- Patient context returns a Patient FHIR ID of the version that matches the app's FHIR version.
Authentication
Epic offers multiple options for authenticating the user of a SMART app, each of which utilize the app's selected FHIR version to control how information about the authenticated user is returned. These affected methods include:
- OpenID Connect (OIDC)
- Introspect
OpenID Connect (OIDC)
In an OpenID Connect token, the app’s FHIR version determines whether or not the fhirUser claim included. The app’s FHIR version is respected for the sub claim beginning in the STU3 version.
fhirUser Element
When the app version is R4+ a fhirUser element can be returned when the fhirUser scope is included. This element returns an absolute reference to the authenticated user's FHIR ID.
Sub Element
The sub element will respect an app's FHIR version in STU3+ such that the FHIR reference returned in the sub element will match that of the app's FHIR version starting at an app FHIR version of STU3. While apps with a FHIR version of DSTU2 may still return a FHIR reference in the sub element, that reference will utilize an STU3 FHIR ID.
Introspect
Some integrations may utilize the Introspect web service to obtain information about the access token. When no epic_user_id_type parameter is specified in the Introspect request, the sub response element includes an absolute FHIR reference. That FHIR ID’s version will match the app’s specific FHIR version.
CDS Hooks
For a CDS Hooks integration, the app's FHIR version controls the following behaviors:
- Prefetch support
- Resource ID version
- Supported hooks
Prefetch Support
Prefetch is supported only in apps with a FHIR version of STU3 and above. Prefetch is not supported for DSTU2.
Resource ID Version
Some FHIR resources are returned in the CDS Hooks context. The app's FHIR version will determine if the resource IDs returned are DSTU2 or STU3+ FHIR IDs.
Supported Hooks
Some hooks are supported only in specific FHIR versions. For example, an app with a FHIR version of DSTU2 can use only the patient-view hook.
FHIR ID Generation Scheme
A new app’s FHIR version determines whether the FHIR ID Generation Scheme can be set. An app must have a FHIR version of STU3 or greater and use OAuth 2.0 or a FHIR API with a version of STU3 or greater to select one of the following:
- Use Unconstrained FHIR IDs
- Use 64-Character-Limited FHIR IDs for USCDI FHIR Resources
These settings do not have an effect for DSTU2 versions.
For historical reasons, some of Epic’s FHIR resources have identifiers that are longer than 64 characters. For example, Medication resource IDs sometimes exceed this length. Starting in the February 2022 version of Epic, new clients can be configured to respect the 64-character ID-length limit described in the HL7 FHIR standard for all STU3 and R4 version FHIR resources that are part of the USCDI data classes. To avoid disrupting existing integrations or new integrations that rely on historical data, this configuration is not enabled by default. You can set your client to observe the 64-character identifier length limit for USCDI resources by changing the FHIR ID Generation Scheme setting on the Build Apps page. To change this setting on an active app you can submit an email request.
Unconstrained FHIR IDs
Apps default to the unconstrained FHIR ID generation scheme. This means apps may use and may receive FHIR IDs longer than 64 characters.
64-Character-Limited FHIR IDs
The 64-Character-Limited FHIR ID option can be selected to ensure all FHIR IDs will be 64 characters or less for USCDI resources. This length limit will apply to both the production and non-production client IDs for your application. For cases where an ID was generated to be longer than 64 characters most versions of Epic have an alternate ID that represents the same resource but doesn’t exceed the 64-character limit.
ID Types for FHIR APIs
ID Types for APIs
Table of Contents
FHIR API IDs and HL7 OIDs
Epic’s FHIR APIs often use object identifiers (OIDs) to uniquely identify and exchange information about particular entities. An OID is a global, unambiguous identifier for an object. It is formatted as a series of numbers and periods that represent a hierarchy of information. Organizations such as HL7, Epic, and individual healthcare organizations have registered their own unique node in the OID namespace with the International Standards Organization (ISO). Some examples include:
- Epic: 1.2.840.114350
- NPI: 2.16.840.1.113883.4.6
- HL7: 2.16.840.1.113883
OIDs are widely used by a variety of applications. FHIR APIs are only one place where you might see them. For example, HL7v2 messages, HL7v3 messages, and CDA exchanges all involve the use of OID identifiers. HL7 provides a useful site for reviewing existing registered OIDs: https://www.hl7.org/oid/.
Each organization is responsible for managing additional sub-nodes within their registered space. For example, Epic has registered OID 1.2.840.114350, and has assigned the following child OIDs (among many others):
- 1.2.840.114350.1.13.0.1.7.2.657380 – Represents the Interface Specification (AIP) master file in the open.epic sandbox environment
- 1.2.840.114350.1.13.0.1.7.5.737384.0 – Represents the Epic MRN ID type in the open.epic sandbox environment
- 1.2.840.114350.1.72.3.10 – Represents an observation about a patient FYI in Care Everywhere
Epic also issues child OIDs to each unique organization that uses Epic software, so that identifiers can be uniquely distinguished across organizations. When Epic issues a child OID to an organization, we have a specific structure we use. A common pattern is:
1.2.840.114350.1.13.<CID>.<EnvType>.7.<Value>
The pieces of this example OID represent the concepts outlined in the following table:
|
OID Segment |
Meaning |
|
1.2.840.114350 |
Epic’s root OID |
|
.1 |
Indicates that this is an application-type ID |
|
.13 |
The application ID. Some common application IDs include:
|
|
.<CID> |
The unique Epic organization ID |
|
.<EnvType> |
The environment type. 1-Epic refers to Epic environments, such as the open.epic sandboxes. 2-Production and 3-Non-production refer to instances of Epic deployed at healthcare organizations.
|
|
.7 |
Indicates that this OID is intend for use in an HL7-type message |
|
.<Value> |
The value. This varies greatly depending on the concept we are generating an OID for. It might include multiple additional sub-nodes. |
Note that the structure shown above is just one of several that Epic uses. It is included as an illustrative example. OIDs should be treated as opaque identifiers by external applications and systems. However, knowing this common structure can help analysts easily identify issues when troubleshooting.
Identifier Type
Epic uses this term differently than HL7. The distinction is important.
- Within HL7 standards, an identifier type is a categorization of the identifier. For example, “MR” for medical record numbers or “DL” for driver’s license numbers. A given patient might have multiple identifiers with the same type (e.g., multiple medical record numbers).
- Within Epic, identifier types are represented by Identity ID Type (IIT) records. IIT records store metadata about a specific set of identifiers. That metadata includes both the HL7 identifier type, (e.g., “MR”), which is stored in the “HL7 ID Type” field of the IIT record, as well as the HL7 identifier system, which is stored in the “HL7 Root” field of the IIT record. The identifier system is the globally unique namespace identifier for the set of identifiers. See the definition of identifier system below.
Examples
The following example in the HL7v2 message format demonstrates how HL7 identifiers are used:
- Format:
<ID>^^^<HL7 Assigning Authority>^<HL7 Identifier Type> - Example:
1234^^^Example Health System^MR
This example indicates that the identifier 1234 was assigned by Example Health System and is a Medical Record (MR) identifier. This example uses a human-readable “Example Health System” value for the assigning authority, but for integrations internal to an organization, often a short textual mnemonic like “EHSMRN” is used to communicate the assigning authority. However, for cross-organizational exchanges, an OID might be necessary because a short textual mnemonic might not be unique across organizations.
Here is a similar example in a FHIR format:
<identifier>
    <use value="usual"/>
    <type>
        <coding>
            <system value="http://terminology.hl7.org/CodeSystem/v2-0203"/>
            <code value="MR"/>
        </coding>
    </type>
    <system value="urn:oid:1.2.36.146.595.217.0.1"/>
    <value value="1234"/>
    <assigner>
        <display value="Example Health System"/>
    </assigner>
</identifier>
Identifier System
From an HL7 perspective, you might have multiple identifiers with the same type (MR) but with different systems. If two organizations merge, their shared patient population might have two medical record numbers. Both of those identifiers are MR-type identifiers, but they are from different identifier systems. Identifier systems are important because, without qualifying an identifier with an identifier system, you cannot uniquely identify a patient. Ignoring identifier systems can lead to matching to the wrong patient, which can have patient safety implications.
In Epic, the HL7 identifier system is stored in the “HL7 Root” field of the ID Type record. In some cases, if this value is not specified in the IIT record, Epic falls back to using an auto-generated OID that is specific to the current environment. While this value may often follow the structure under Epic's root OID as noted in the table above, healthcare organizations may also register for their own nodes and populate this field on a given ID type with that value.
The meaning of the “HL7 Root” field
HL7 version 3 defined two methods of ensuring identifiers were globally unique: Universally Unique Identifiers (UUIDs), and Object Identifiers (OIDs). Epic software uses the OID method. To communicate unique identifiers, HL7v3 defined an “instance identifier” data type, which had two attributes: a root and an extension. The root attribute contained the root OID of the identifier system, and the extension attribute contained the identifier.
When Epic first developed the ability to store an OID for the identifier system, we created the “HL7 Root” field in Epic IIT records. This was initially created to support HL7 version 3, and the item was named according to the HL7v3 terms, but the use of that item has since evolved to be used by Care Everywhere, HL7v2 and FHIR.
In many integrations, Epic will look first to the “HL7 Root” field for the OID, but if this field is blank, we fall back to an auto-generated OID that is specific to the environment. The auto-generated OID includes a sub-node that indicates the environment type (PRD vs. non-PRD). It also includes a sub-node that identifies the specific healthcare organization. This often works well, as most IIT records are used to represent identifiers generated by that organization. However, this approach won’t work if the IIT record is used to store identifiers you receive from an external organization.
Obtaining OIDs from Customers
Given that specific pieces of an OID are customer / environment specific, you'll need your customers to provide relevant OID values to you. Ask your customer contacts to reference the following Galaxy topic, which will provide them instructions on running our OID Generator utility to pull the needed values. Only customers and Epic have access to the documentation and utility. Simply send them the link.
(Galaxy) Customer-facing OID Generator Utility
Here are examples of common OIDs vendors ask for:
-
OID for an Epic Master File
- E.g If you need to know if an ID from Location.Read is a department, you'll need the OID for the "DEP" master file.
-
OID for a Category List
- E.g The list of possible note types in a customer environment. (For DocumentReference.Search)
-
OID for an Epic Item
- E.g The OID for an Encounter CSN. (For Encounter.Search)
-
OID for an Identity Type record
- E.g Identifying a patient's MRN or other customer-specific ID
Organization-Specific IDs and Value Sets
FHIR APIs can sometimes require organization-specific identifiers or value sets. In these cases, developers and Epic organizations need to work together to coordinate usage of those identifiers or value sets.
- FHIR APIs that use Epic-specific values such as Observation.Create (Vitals) use organization-specific OIDs. FHIR APIs that use standard value sets such as AllergyIntolerance.Search use either an OID or an industry URL as the coding system. For FHIR Create operations, you will need to use the OID or URL format, and the IDs will differ from the identifiers used by non-FHIR Epic APIs such as AddAllergy.
When an API returns data, it often returns multiple IDs that reference the same entity, such as a diagnosis or procedure. Each returned ID uses a different coding system. Therefore, you might be able to retrieve the ICD-10 or industry standard codes when an API returns a particular entity. For example, calling the Condition.Search FHIR API for a patient with hypertension returns both the ICD-10 code and an Epic ID for hypertension.
FHIR APIs typically use shared value sets that are linked in the “system” element, and represent well-defined HL7 standards.
The ValueSet.$expand API can in some cases help determine systems and codes supported by a resource. Epic currently supports ValueSet.$expand for the DocumentReference resource. Additional resources might be supported in future Epic versions.
Sandbox Test Data
This page is not comprehensive of all data that exists in the sandbox. Rather, it is meant to highlight patients that contain some common types of test data.
Sandbox URI - https://fhir.epic.com/interconnect-fhir-oauth/
Note that the Epic on FHIR sandbox is exclusively secured using OAuth 2.0
FHIR Endpoints - See 'FHIR API Endpoints' on open.epic
These test users can be used to authenticate when testing Provider-Facing Standalone OAuth 2.0 workflows with the FHIR sandbox.
|
Name |
User Login |
User Password |
Description |
|---|---|---|---|
|
FHIR, USER |
FHIR |
EpicFhir11! |
User account without linked provider record. This user will not have a PractitionerRole resource. |
|
FHIRTWO, USER |
FHIRTWO |
EpicFhir11! |
User account with linked provider record. This user will have a PractitionerRole resource. |
These are some of the test patients that exist in the Epic on FHIR sandbox. Any test patients with MyChart credentials listed can be used to authenticate when testing Patient-Facing Standalone OAuth 2.0 workflows with the FHIR sandbox.
|
Patient |
Identifiers and Credentials |
Applicable Resources |
|---|---|---|
|
Camila Lopez |
FHIR: erXuFYUfucBZaryVksYEcMg3 External: Z6129 MRN: 203713 MyChart Login Username: fhircamila MyChart Login Password: epicepic1 |
|
|
Derrick Lin |
FHIR: eq081-VQEgP8drUUqCWzHfw3 External: Z6127 MRN: 203711 MyChart Login Username: fhirderrick MyChart Login Password: epicepic1 |
|
|
Desiree Powell |
FHIR: eAB3mDIBBcyUKviyzrxsnAw3 External: Z6130 MRN: 203714 MyChart Login Username: fhirdesiree MyChart Login Password: epicepic1 |
|
|
Elijah Davis |
FHIR: egqBHVfQlt4Bw3XGXoxVxHg3 External: Z6125 MRN: 203709 |
|
|
Linda Ross |
FHIR: eIXesllypH3M9tAA5WdJftQ3 External: Z6128 MRN: 203712 |
|
|
Olivia Roberts |
FHIR: eh2xYHuzl9nkSFVvV3osUHg3 External: Z6131 MRN: 203715 |
|
|
Warren McGinnis |
FHIR: e0w0LEDCYtfckT6N.CkJKCw3 External: Z6126 MRN: 203710 |
|
Below are Group FHIR IDs that can be used to test bulk FHIR calls in the sandbox.
To test bulk FHIR in the sandbox, you MUST select the Kick-off, Status Request, File Request, and Delete Request APIs along with the Search interaction of any APIs for which you want to export data.
For example, if you want to extract demographics and immunizations for patients in the relevant registry, you would add the following scopes to your application:
- Bulk Data Kick-off
- Bulk Data Status Request
- Bulk Data File Request
- Bulk Data Delete Request
- Patient.Search (R4)
- Immunization.Search (R4)
Your client record will automatically be granted access to the test FHIR Group below so long as you include all four bulk FHIR APIs in your registered application's API list.
|
Bulk FHIR Group |
FHIR Group ID |
|---|---|
|
Group consists of test patients in table above. |
e3iabhmS8rsueyz7vaimuiaSmfGvi.QwjVXJANlPOgR83 |
Patient-Facing Apps Using FHIR
FHIR API Response Variations in Patient-Facing Applications
Some FHIR APIs may return different data when the application is used in a patient-facing context. This typically occurs because data that should not be visible to a patient is filtered out of FHIR API responses in patient-facing applications. Some filtering criteria is configurable by the community member such that two community members could filter the same data in different ways. Below are some examples of possible differences in the results returned by a FHIR API in a patient context:
- FHIR APIs will only return results relevant to the authenticated patient. If one patient, Susan, is logged in to the application, the Observation (Labs) API won't return lab results for a patient other than Susan.
- FHIR APIs may not return patient-entered data that has not yet been reviewed and reconciled by a clinician.
- FHIR APIs may return patient friendly names for resources, such as medications. For example, a patient-facing app may return the medication name
pseudoephedrineinstead ofPSEUDOPHEDRINE HCL 30 MG PO TABS. - FHIR APIs may be configured to exclude specific lab results to comply with state and local regulations
Community members may choose to disable this filtering functionality for their Epic instance, resulting in near identical behavior between patient-facing FHIR API responses and the response of apps with other audiences.
Epic recommends that you thoroughly test each API at each Community Member's site prior to a go-live in production to ensure that you understand the behavior of each API for that community member's Epic deployment.
Automatic Client Record Distribution
Enabling Your App to Customer Production Environments
Epic customers receive licenses of applications automatically on a rolling 12-hour cycle. Each customer maintains their own instance of Epic, so each environment they maintain is likely to have a unique client record sync cycle. When enabling your app, keep in mind that it may take up to 12 hours before a successful authentication can occur. Refer to our Troubleshooting Tutorial for additional information on common OAuth 2.0 errors.
Automatic Client ID Distribution: USCDI Apps
Client IDs for USCDI apps will automatically download to a community member's Epic instances when all of the following conditions are met:
- The application:
- In Epic August 2024 and later:
- Uses only USCDI v3 FHIR APIs, which are documented in the appendix below †
- In Epic May 2024 and earlier:
- Uses only USCDI v1 FHIR APIs, which are documented in the appendix below †
- Only reads data from Epic
- Is patient-facing
- Does not use refresh tokens OR uses refresh tokens and has a client credential uploaded by the vendor for that community member
- Selects "Enable Auto-download" and "USCDI v1" or "USCDI v3" on the app creation page
- Is marked "Ready for Production" and was marked ready after Sept. 3rd, 2020
- Apps can be saved for sandbox use to test with our Epic on FHIR environment prior to marking the app "Ready for Production"
- The Community Member:
- Is marked to use USCDI APIs in their open.epic licensing agreement
- Has not disabled auto-download functionality
Automatic Client ID Distribution: CMS Payer Apps
Client IDs for apps meant to meet CMS payer requirements will automatically download to a community member's Epic instances when all of the following conditions are met:
- The application:
- Uses only ExplanationOfBenefit (of any supported version) and/or QuestionnaireResponse.Read (Prior Auth) and/or any FHIR APIs (of any supported version) from the list in the appendix below †
- Only reads data from Epic
- Selects "Enable Auto-download" and "CMS Patient Access API" on the app creation page
- Is patient-facing
- Uses OAuth 2.0
- Is marked "Ready for Production"
- Apps can be saved for sandbox use to test with our Epic on FHIR environment prior to marking the app "Ready for Production"
- The Community Member:
- Is marked to use CMS Payer APIs in their open.epic licensing agreement
- Has not disabled auto-download functionality
Automatic Client ID Distribution: TEFCA™ IAS via FHIR Apps
Client IDs for TEFCA IAS via FHIR apps will automatically download to a community member's Epic instances when all of the following conditions are met:
- The application:
- Is patient-facing
- Has completed registration with Epic Nexus
- Has completed testing with Epic Nexus
- Has an active entry in the Production RCE (TEFCA) Directory
- The Community Member:
- Is live on TEFCA and IAS via FHIR
- Has not disabled auto-download functionality
For more information see Epic Nexus's Approach to Individual Access Services in TEFCA via FHIR.
Manual Client ID Distribution
Any applications that do not meet all of the above criteria will need to be manually downloaded to the community member's Epic instances. Steps to do so can be found in the App Creation and Request Process guide.
Appendix
† The following FHIR APIs qualify for USCDI v1 auto-distribution.
- AllergyIntolerance.Read (DSTU2)
- AllergyIntolerance.Read (R4)
- AllergyIntolerance.Read (STU3)
- AllergyIntolerance.Search (DSTU2)
- AllergyIntolerance.Search (R4)
- AllergyIntolerance.Search (STU3)
- Binary.Read (Clinical Notes) (R4)
- Binary.Read (Clinical Notes) (STU3)
- Binary.Read (Generated CCDA) (DSTU2)
- Binary.Read (Generated CCDA) (R4)
- Binary.Read (Labs) (R4)
- Binary.Search (Clinical Notes) (R4)
- Binary.Search (Generated CCDA) (R4)
- Binary.Search (Labs) (R4)
- CarePlan.Read (Encounter-Level) (DSTU2)
- CarePlan.Read (Encounter-Level) (R4)
- CarePlan.Read (Longitudinal) (DSTU2)
- CarePlan.Read (Longitudinal) (R4)
- CarePlan.Search (Encounter-Level) (DSTU2)
- CarePlan.Search (Encounter-Level) (R4)
- CarePlan.Search (Longitudinal) (DSTU2)
- CarePlan.Search (Longitudinal) (R4)
- CareTeam.Read (Longitudinal) (R4)
- CareTeam.Search (Longitudinal) (R4)
- Condition.Read (Care Plan Problem) (R4)
- Condition.Read (Encounter Diagnosis, Problems) (STU3)
- Condition.Read (Health Concern) (R4)
- Condition.Read (Problems) (DSTU2)
- Condition.Read (Problems) (R4)
- Condition.Search (Care Plan Problem) (R4)
- Condition.Search (Encounter Diagnosis, Problems) (STU3)
- Condition.Search (Health Concern) (R4)
- Condition.Search (Problems) (DSTU2)
- Condition.Search (Problems) (R4)
- Device.Read (Implants and External Devices) (STU3)
- Device.Read (Implants) (DSTU2)
- Device.Read (Implants) (R4)
- Device.Search (Implants and External Devices) (STU3)
- Device.Search (Implants) (DSTU2)
- Device.Search (Implants) (R4)
- DiagnosticReport.Read (Results) (DSTU2)
- DiagnosticReport.Read (Results) (R4)
- DiagnosticReport.Read (Results) (STU3)
- DiagnosticReport.Search (Results) (DSTU2)
- DiagnosticReport.Search (Results) (R4)
- DiagnosticReport.Search (Results) (STU3)
- DocumentReference.Read (Clinical Notes) (R4)
- DocumentReference.Read (Clinical Notes) (STU3)
- DocumentReference.Read (Generated CCDA) (DSTU2)
- DocumentReference.Read (Generated CCDA) (R4)
- DocumentReference.Read (Labs) (R4)
- DocumentReference.Search (Clinical Notes) (R4)
- DocumentReference.Search (Clinical Notes) (STU3)
- DocumentReference.Search (Generated CCDA) (DSTU2)
- DocumentReference.Search (Generated CCDA) (R4)
- DocumentReference.Search (Labs) (R4)
- Encounter.Read (Patient Chart) (R4)
- Encounter.Read (STU3)
- Encounter.Search (Patient Chart) (R4)
- Encounter.Search (STU3)
- Goal.Read (Care Plan) (R4)
- Goal.Read (Care Plan) (STU3)
- Goal.Read (Patient) (DSTU2)
- Goal.Read (Patient) (R4)
- Goal.Read (Patient) (STU3)
- Goal.Search (Care Plan) (R4)
- Goal.Search (Care Plan) (STU3)
- Goal.Search (Patient) (DSTU2)
- Goal.Search (Patient) (R4)
- Goal.Search (Patient) (STU3)
- Immunization.Read (DSTU2)
- Immunization.Read (R4)
- Immunization.Read (STU3)
- Immunization.Search (DSTU2)
- Immunization.Search (R4)
- Immunization.Search (STU3)
- Introspect
- Location.Read (R4)
- Location.Read (STU3)
- Location.Search (R4)
- Medication.Read (DSTU2)
- Medication.Read (R4)
- Medication.Read (STU3)
- Medication.Search (DSTU2)
- Medication.Search (R4)
- MedicationOrder.Read (DSTU2)
- MedicationOrder.Search (DSTU2)
- MedicationRequest.Read (Orders) (R4)
- MedicationRequest.Read (Orders) (STU3)
- MedicationRequest.Search (Orders) (R4)
- MedicationRequest.Search (Orders) (STU3)
- MedicationStatement.Read (DSTU2)
- MedicationStatement.Read (STU3)
- MedicationStatement.Search (DSTU2)
- MedicationStatement.Search (STU3)
- Observation.Read (Labs) (DSTU2)
- Observation.Read (Labs) (R4)
- Observation.Read (Labs) (STU3)
- Observation.Read (Social History) (DSTU2)
- Observation.Read (Social History) (R4)
- Observation.Read (Social History) (STU3)
- Observation.Read (Vitals) (DSTU2)
- Observation.Read (Vitals) (R4)
- Observation.Read (Vitals) (STU3)
- Observation.Search (Labs) (DSTU2)
- Observation.Search (Labs) (R4)
- Observation.Search (Labs) (STU3)
- Observation.Search (Social History) (DSTU2)
- Observation.Search (Social History) (R4)
- Observation.Search (Social History) (STU3)
- Observation.Search (Vitals) (DSTU2)
- Observation.Search (Vitals) (R4)
- Observation.Search (Vitals) (STU3)
- Organization.Read (R4)
- Organization.Read (STU3)
- Organization.Search (R4)
- Patient.Read (DSTU2)
- Patient.Read (R4)
- Patient.Read (STU3)
- Patient.Search (DSTU2)
- Patient.Search (R4)
- Patient.Search (STU3)
- Practitioner.Read (DSTU2)
- Practitioner.Read (R4)
- Practitioner.Read (STU3)
- Practitioner.Search
- Practitioner.Search (DSTU2)
- Practitioner.Search (R4)
- Practitioner.Search (STU3)
- PractitionerRole.Read (R4)
- PractitionerRole.Read (STU3)
- PractitionerRole.Search (R4)
- PractitionerRole.Search (STU3)
- Procedure.Read (Orders) (DSTU2)
- Procedure.Read (Orders) (R4)
- Procedure.Read (Orders, Surgeries) (STU3)
- Procedure.Read (Surgeries) (R4)
- Procedure.Search (Orders) (DSTU2)
- Procedure.Search (Orders) (R4)
- Procedure.Search (Orders, Surgeries) (STU3)
- Procedure.Search (Surgeries) (R4)
- Provenance.Read (R4)
- RelatedPerson.Read (Proxy) (R4)
- RelatedPerson.Search (Proxy) (R4)
In addition to the USCDI v1 FHIR APIs above, the following FHIR APIs qualify for USCDI v3 auto-distribution.
- Binary.Read (Study) (R4)
- Binary.Search (Study) (R4)
- Condition.Read (Encounter Diagnosis) (R4)
- Condition.Search (Encounter Diagnosis) (R4)
- Coverage.Read (R4)
- Coverage.Read (STU3)
- Coverage.Search (R4)
- Coverage.Search (STU3)
- Media.Read (Study) (R4)
- Media.Search (Study) (R4)
- MedicationDispense.Read (Fill Status) (R4)
- MedicationDispense.Search (Fill Status) (R4)
- Observation.Read (Assessments) (R4)
- Observation.Read (SDOH Assessments) (R4)
- Observation.Read (SmartData Elements) (R4)
- Observation.Read (Study Finding) (R4)
- Observation.Search (Assessments) (R4)
- Observation.Search (SDOH Assessments) (R4)
- Observation.Search (SmartData Elements) (R4)
- Observation.Search (Study Finding) (R4)
- Procedure.Read (SDOH Intervention) (R4)
- Procedure.Search (SDOH Intervention) (R4)
- RelatedPerson.Read (Friends and Family) (R4)
- RelatedPerson.Search (Friends and Family) (R4)
- ServiceRequest.Read (Community Resource) (R4)
- ServiceRequest.Read (Order Procedure) (R4)
- ServiceRequest.Search (Community Resource) (R4)
- ServiceRequest.Search (Order Procedure) (R4)
- Specimen.Read (R4)
- Specimen.Read (STU3)
- Specimen.Search (R4)
- Specimen.Search (STU3)
- AllergyIntolerance.Read (Outside Record) (R4)
- AllergyIntolerance.Search (Outside Record) (R4)
- Binary.Read (Outside Record Clinical Notes) (R4)
- Binary.Search (Outside Record Clinical Notes) (R4)
- CarePlan.Read (Outside Record) (R4)
- CarePlan.Search (Outside Record) (R4)
- CareTeam.Read (Outside Record) (R4)
- CareTeam.Search (Outside Record) (R4)
- Condition.Read (Outside Record Encounter Diagnosis) (R4)
- Condition.Search (Outside Record Encounter Diagnosis) (R4)
- Condition.Read (Outside Record Health Concern) (R4)
- Condition.Search (Outside Record Health Concern) (R4)
- Condition.Read (Outside Record Problems) (R4)
- Condition.Search (Outside Record Problems) (R4)
- Coverage.Read (Outside Record) (R4)
- Coverage.Search (Outside Record) (R4)
- Device.Read (Outside Record) (R4)
- Device.Search (Outside Record) (R4)
- DiagnosticReport.Read (Outside Record Results) (R4)
- DiagnosticReport.Search (Outside Record Results) (R4)
- DocumentReference.Read (Outside Record Clinical Notes) (R4)
- DocumentReference.Search (Outside Record Clinical Notes) (R4)
- Encounter.Read (Outside Record) (R4)
- Encounter.Search (Outside Record) (R4)
- Goal.Read (Outside Record) (R4)
- Goal.Search (Outside Record) (R4)
- Immunization.Read (Outside Record) (R4)
- Immunization.Search (Outside Record) (R4)
- Location.Read (Outside Record) (R4)
- Location.Search (Outside Record) (R4)
- Medication.Read (Outside Record) (R4)
- Medication.Search (Outside Record) (R4)
- MedicationDispense.Read (Outside Record) (R4)
- MedicationDispense.Search (Outside Record) (R4)
- MedicationRequest.Read (Outside Record) (R4)
- MedicationRequest.Search (Outside Record) (R4)
- Observation.Read (Outside Record Activities of Daily Living) (R4)
- Observation.Search (Outside Record Activities of Daily Living) (R4)
- Observation.Read (Outside Record Occupation) (R4)
- Observation.Search (Outside Record Occupation) (R4)
- Observation.Read (Outside Record Pregnancy Status) (R4)
- Observation.Search (Outside Record Pregnancy Status) (R4)
- Observation.Read (Outside Record Results) (R4)
- Observation.Search (Outside Record Results) (R4)
- Observation.Read (Outside Record Screening Assessment) (R4)
- Observation.Search (Outside Record Screening Assessment) (R4)
- Observation.Read (Outside Record SDOH Assessment) (R4)
- Observation.Search (Outside Record SDOH Assessment) (R4)
- Observation.Read (Outside Record Sexual Orientation) (R4)
- Observation.Search (Outside Record Sexual Orientation) (R4)
- Observation.Read (Outside Record Smoking Status) (R4)
- Observation.Search (Outside Record Smoking Status) (R4)
- Observation.Read (Outside Record Vital Sign) (R4)
- Observation.Search (Outside Record Vital Sign) (R4)
- PractitionerRole.Read (Outside Record) (R4)
- PractitionerRole.Search (Outside Record) (R4)
- Procedure.Read (Outside Record) (R4)
- Procedure.Search (Outside Record) (R4)
- Specimen.Read (Outside Record) (R4)
- Specimen.Search (Outside Record) (R4)
Search Parameters
FHIR Search Parameters
Contents
Overview
This document describes general considerations for using FHIR search parameters, including the two categories of search parameters that Epic makes available across FHIR resources. It also explains which common (for example “underscore”) FHIR search parameters are currently supported for use across all Epic FHIR resources, what those common parameters do, and Epic’s recommendations for using them.
General Considerations
Epic supports many search parameters defined by the FHIR standard. These search parameters use two different types of logic to retrieve results and can be categorized as either native search parameters or post-filter search parameters. Refer to Epic’s documentation for individual FHIR resources to see which parameters are native search parameters and which are post-filter search parameters.
Native Search Parameters
Native search parameters are parameters that Epic supports with built-in database logic or indexing. To give one example, the patient parameter is a native search parameter available in all patient-centric Epic FHIR resources. All parameters released in the February 2024 version and earlier are native search parameters, and we plan to continue to provide support for and release new native search parameters in the future.
Post-Filter Search Parameters
Post-filter search parameters are available starting in the May 2024 version of Epic. Epic supports post-filter search parameters only for the R4 version of FHIR. Epic supports post-filtering so that your integration doesn’t have to. This gives you the flexibility to search and filter on the widest variety of parameters possible within the bounds of the HL7 FHIR specification.
When a FHIR query includes post-filter search parameters, Epic first performs a search using native search parameters and converts those results to the FHIR format. Then, the results are further reduced based on the post-filter search parameters that were supplied in the query. As a result, the performance cost of using post-filter search parameters is directly proportional to how many resources match to the native search parameters in a request. For example, if a theoretical patient has 5000 lab results, but only one of those lab results matches to a post-filter search parameter value in your query, the Epic database has to first retrieve all 5000 lab results before it can filter them down to the single result that is ultimately returned to your application.
"Unsupported" Post-Filter Search Parameters
Some post-filter parameters are marked as “Unsupported” in Epic documentation. This means that Epic does not currently support any of the corresponding response element(s) that the search parameter is meant to query for, so using the parameter will always cause all results to be filtered out of the response.
Common FHIR Parameters
Common FHIR search parameters, which include a variety of underscore-prefixed parameters, can modify how results are returned in a Search API’s response. See the table below for the common search parameters that are supported by Epic and the versions in which they are supported.
| Parameter | Supported in DSTU2? | Supported in STU3? | Supported in R4? |
| _id | Yes | Yes | Yes |
| _count | Yes, for the Observation resource only | Yes | Yes |
| _include | No | Yes | Yes |
| _revInclude | No | No | Yes |
| _lastUpdated | No | No | No |
_id Parameter
The _id parameter is used to indicate a FHIR ID, allowing read-type functionality in a search FHIR API.
So why would you want to use _id in a search API instead of a read API? Well, what if you wanted to perform a read with a FHIR search parameter? The _id parameter allows you to do just that by using FHIR search parameters while still reading data about a single resource.
Examples:
GET https://hostname/instance/api/FHIR/STU3/Patient?_id=eYg3-1aJmCMq-umIIq2Njxw3&_include=Patient:generalPractitioner:Practitioner
_count Parameter
The _count parameter is used to limit the number of results returned by a search request. Once the number of results specified has been reached, the URL to the next page of results will be generated and included in the response. This URL contains a session ID which returns the next group of _count results. This is useful for resources that could return a large number of results (such as Observation), as using _count can minimize the demand on the server. _count can be set to any number from 1 to 999.
Important note on resources that return many results:
If your search returns more than 1000 results, the search will automatically be broken into pages with 1000 results each, regardless of whether or not you use the _count parameter. This means that your app needs to support this functionality to ensure that you receive all applicable data associated with the API request.
The API response when paging behaves differently depending on what FHIR version you are on, as described below.
STU3 and Later FHIR Versions
This section summarizes the steps to use _count functionality.
Iterate over the Bundle.link array and look for the link.relation parameter. If there is a link where link.relation is "next", use the request in link.url to obtain the next page of resources. Continue until there is no longer a link.url with a link.relation of "next", indicating you are on the final page.
There will be a second URL in link.url with a link.relation of "self" on every page. In STU3 paging, the self link will contain a session ID that points to the current page of results. In R4 paging, the self link will include the valid search parameters that were used in the original request.
STU3 Sample Request
GET https://apporchard.epic.com/interconnect-aocurprd-username/api/FHIR/STU3/Observation?patient=e63wRTbPfr1p8UW81d8Seiw3&category=vital-signs&_count=10
STU3 Sample Response
{
   "resourceType": "Bundle",
    "type": "searchset",
    "total": 10,
    "link": [
        {
            "relation": "next",
            "url": "https://apporchard.epic.com/interconnect-aocurprd-oauth/api/FHIR/STU3/Observation?sessionID=16-BAF392808B2B11EA92E00050568B7BE6"
        },
        {
            "relation": "self",
            "url": "https://apporchard.epic.com/interconnect-aocurprd-oauth/api/FHIR/STU3/Observation?sessionID=16-854D71651G6711EA92E00050568B7BE6"
        }
...{response continues}
R4 Sample Request
GET https://apporchard.epic.com/interconnect-aocurprd-oauth/api/FHIR/R4/Observation?patient=e63wRTbPfr1p8UW81d8Seiw3&category=vital-signs&_count=10
R4 Sample Response
{
    "resourceType": "Bundle",
    "type": "searchset",
    "total": 10,
    "link": [
        {
            "relation": "next",
            "url": "https://apporchard.epic.com/interconnect-aocurprd-oauth/api/FHIR/R4/Observation?sessionID=16-BAF392808B2B11EA92E00050568B7BE6"
        },
        {
            "relation": "self",
            "url": "https://apporchard.epic.com/interconnect-aocurprd-oauth/api/FHIR/R4/Observation?patient=e63wRTbPfr1p8UW81d8Seiw3&category=vital-signs&_count=10"
        }
...{response continues}
DSTU2 FHIR Versions
Similar to the STU3 version, there will be a link.relation parameter which tells you the relationship of the URL in the API response relative to the API URL in the current request. The link.relation parameters that can be returned are:
- self: a url to the same page of results as your current page
- previous: a url to the previous page of results relative to your current page
- next: a url to the next page of results relative to your current page
The first page of results will only return relations of “self” and “next” while the last page of results will only return relations of “self” and “previous”. If a page only returns the “self” parameter, this indicates that only one page of results exists. Omitting a page number and session ID defaults to displaying the first page of results. In the DSTU2 version, paging functionality only exists for the Observation resource.
- Perform a Search with the FHIR Observation resource, and include the parameter “_count=<# of resources to return>” in the URL. This will control the number of resources returned in a single API call.
GET https://apporchard.epic.com/interconnect-aocurprd-username/api/FHIR/DSTU2/Observation?patient=e63wRTbPfr1p8UW81d8Seiw3&category=vital-signs&_count=10
- The beginning of the first response will look similar to that shown below. The “self” relation contains a URL that points to the current page of results. The “next” relation contains a URL that points to the page of results following the current page. If the first page contains all results, only the “self” relation will appear.
{
    "resourceType": "Bundle",
    "type": "searchset",
    "link": [
        {
            "relation": "self",
            "url": "https://apporchard.epic.com/interconnect-aocurprd-oauth/api/FHIR/DSTU2/Observation?patient=e63wRTbPfr1p8UW81d8Seiw3&category=vital-signs&_count=10"
        },
        {
            "relation": "next",
            "url": "https://apporchard.epic.com/interconnect-aocurprd-oauth/api/FHIR/DSTU2/Observation?patient=e63wRTbPfr1p8UW81d8Seiw3&category=vital-signs&_count=10&session=989750&start=2"
        }
...{response continues}
- As long as there are more than two pages, the response will contain three URLs now, “self”, “next”, and “previous”. As a counterpart to the “next” relation, the “previous” relation indicates a URL that points to the page of results preceding the current page of results in the response.
{
    "resourceType": "Bundle",
    "type": "searchset",
    "link": [
        {
            "relation": "self",
            "url": "https://apporchard.epic.com/interconnect-aocurprd-oauth/api/FHIR/DSTU2/Observation?patient=e63wRTbPfr1p8UW81d8Seiw3&category=vital-signs&_count=10&session=989750&start=2"
        },
        {
            "relation": "next",
            "url": "https://apporchard.epic.com/interconnect-aocurprd-oauth/api/FHIR/DSTU2/Observation?patient=e63wRTbPfr1p8UW81d8Seiw3&category=vital-signs&_count=10&session=989750&start=3"
        },
        {
            "relation": "previous",
            "url": "https://apporchard.epic.com/interconnect-aocurprd-oauth/api/FHIR/DSTU2/Observation?patient=e63wRTbPfr1p8UW81d8Seiw3&category=vital-signs&_count=10&session=989750&start=1"
        }
...{response continues}
- When you reach the last page of results, the response will look something like that shown below. There will still be a “self” and “previous” relation, but no “next” relation as there are no additional pages to display.
{
    "resourceType": "Bundle",
    "type": "searchset",
    "link": [
        {
            "relation": "self",
            "url": "https://apporchard.epic.com/interconnect-aocurprd-oauth/api/FHIR/DSTU2/Observation?patient=e63wRTbPfr1p8UW81d8Seiw3&category=vital-signs&_count=10&session=989750&start=3"
        },
        {
            "relation": "previous",
            "url": "https://apporchard.epic.com/interconnect-aocurprd-oauth/api/FHIR/DSTU2/Observation?patient=e63wRTbPfr1p8UW81d8Seiw3&category=vital-signs&_count=10&session=989750&start=2"
        }
...{response continues}
_include Parameter
The _include parameter is used to return resources related to the initial search result. Any other resource included as a reference can be returned in the response bundle. This reduces the number of requests needed to see information. For example, when searching for a patient's encounters, you can include the encounter providers as well.
In the February 2021 version of Epic and prior versions, included references are returned immediately following the associated search result. Starting in the May 2021 version of Epic for R4 FHIR resources, included resource references from all search results are at the end of the response bundle rather than after each individual search result, and each unique referenced resource instance is included only once in the bundle. Consumers of FHIR search results should be able to accept both bundle formats until a future version when we expect all resources to eventually transition to the latter format.
Epic supports the _include parameter primarily for FHIR search interactions. In addition, it is supported for particular operation types, like Appointment.$find.
If you want to return multiple referenced resources, this can be accomplished by repeating the _include criteria. A single _include parameter should not include multiple values. Instead, the parameter is repeated for each different include criteria.
For this parameter to work, the Search response must include a reference to another FHIR resource.
General format: _include = [resource you’re searching]:[name of reference element you want included]:[type of resource if element can refer to multiple (optional)]
- [resource you’re searching] – this is the initial API you are calling
- Ex: When calling Observation.Search, you are searching the Observation resource.
- [name of reference element you want included] – one of the response parameters for that API that has a type of “Reference”
- [type of resource if element can refer to multiple] – when the second parameter could refer to multiple resources, the third parameter specifies which resource to include
Examples:
- Immunization.Search
- Parameter in response: Practitioner.actor (Reference)
- From this, the second parameter would be “actor”
_include=Immunization:actor:Practitioner- Note: there is only one actor for Immunizations so the third parameter is optional (
_include=Immunization:actorwould also work here)
- Patient.Search
- Parameter in response: generalPractitioner (Reference (Practitioner))
- From this, the second parameter would be “generalPractitioner”
_include=Patient:generalPractitioner:Practitioner
- Appointment $find (STU3)
- Parameters in response: Participant.actor (Reference(Patient|Practitioner|Location))
- From this, the second parameter would be "actor" just like in the first example
- Unlike the first example, you need to specify a third parameter as there are three potential actors referenced. Any of the following examples are valid here:
_include=Appointment:actor:Patient_include=Appointment:actor:Practitioner_include=Appointment:actor:Location
- Observation.Search
- Parameters in response:
- performer (Reference (Practitioner))
- subject (Reference (Patient))
- To include both resources, the _include criteria is used multiple times
_include=Observation:performer:Practitioner&_include=Observation:subject:Patient
- Parameters in response:
_revInclude Parameter
The _revInclude parameter (reverse include) is used to return a particular resource, along with other resources that refer to that resource. For this parameter to return results, the FHIR resource specified in the search response must be referenced by the resource specified in the _revInclude parameter. Epic's implementation of the _revInclude parameter supports returning Provenance and AuditEvent data.
Provenance
Epic supports the _revInclude parameter to fetch provenance data for search interactions with resources that are part of the U.S Core Data for Interoperability starting in Epic version February 2020. Support for all other resources begins in August 2023.Parameter format: _revInclude=Provenance:target
The response will have the following format:
| Element | Type | Cardinality | Description |
| target | Reference (resource) | 1..* | The resource this provenance supports |
| recorded | Instant | 1..1 | Timestamp that the activity was recorded/updated |
| agent | Backbone Element | 1..* | Actor involved |
| agent.type | CodeableConcept | 0..1 | How the agent participated |
| agent.who | Reference (Practitioner | Patient | Organization) | 1..1 | Who participated |
| agent.onBehalfOf | Reference (Organization) | 0..1 | Who the agent is representing. |
Examples:
Sample Request
https://www.example.org/api/FHIR/R4/DocumentReference?_id=eiuHBlNpiGxJwXRUWVqHjN9QaKO0ODrkAJrvUByRLuMc3&_revInclude=Provenance:target
Sample Response
{
    "link": [{
        "relation": "self",
        "url": "https://www.example.org/api/FHIR/R4/Provenance/eC7YEH-XJufbPDHTDFWShEk2b9Ki98xTRyLbhFXwQ6sfcjhyfmeem2nFqdxZYHcS0FhROyzJUToN.o1UE0DQeXQ3"
    }],
    "fullUrl": "https://www.example.org/api/FHIR/R4/Provenance/eC7YEH-XJufbPDHTDFWShEk2b9Ki98xTRyLbhFXwQ6sfcjhyfmeem2nFqdxZYHcS0FhROyzJUToN.o1UE0DQeXQ3",
    "resource": {
        "resourceType": "Provenance",
        "id": "eC7YEH-XJufbPDHTDFWShEk2b9Ki98xTRyLbhFXwQ6sfcjhyfmeem2nFqdxZYHcS0FhROyzJUToN.o1UE0DQeXQ3",
        "target": [{"reference": "DocumentReference/eiuHBlNpiGxJwXRUWVqHjN9QaKO0ODrkAJrvUByRLuMc3"}],
        "recorded": "2020-06-23T07:33:12Z",
        "agent": [{
            "type": {
                "coding": [{
                    "system": "http://terminology.hl7.org/CodeSystem/provenance-participant-type",
                    "code": "author",
                    "display": "Author"
                }],
                "text": "Author"
            },
            "who": {
                "reference": "Practitioner/eIOnxJsdFcfgJ4iy716I3MA3",
                "display": "Starter Provider, MD"
            },
            "onBehalfOf": {"display": "Example Organization"}
        },
        {
            "type": {
                "coding": [{
                    "system": "http://terminology.hl7.org/CodeSystem/provenance-participant-type",
                    "code": "transmitter",
                    "display": "Transmitter"
                }],
                "text": "Transmitter"
            },
            "who": {
                "display": "Example Organization"
            }
        }]
    },
    "search": {"mode": "include"}
}
AuditEvent
Epic currently supports using this parameter to fetch audit event data for search interactions with select FHIR resources starting in Epic version May 2021. AuditEvent returns audit event information for a specific resource instance. Examples of audited events include edits to an order or the signing of a note. AuditEvent is supported only for a subset of FHIR version R4 resources.
Parameter format: _revInclude=AuditEvent:entity
The response will have the following format:
| Element | Type | Cardinality | Description |
|
type |
Coding |
1..1 |
Type or identifier of the event |
|
recorded |
Instant |
1..1 |
Time when the event was recorded |
|
agent |
BackboneElement |
1..* |
Actors involved in the event |
|
agent.role |
CodeableConcept |
0..* |
Agent role in the event |
|
agent.who |
Reference (PractitionerRole | Practitioner | Organization | Device | Patient | RelatedPerson)
|
0..1 |
Identifier of who participated |
|
agent.requestor |
Boolean |
1..1 |
Whether the user is the initiator |
|
source |
BackboneElement |
1..1 |
The audit event reporter |
|
source.observer |
Reference (PractitionerRole | Practitioner | Organization | Device | Patient | RelatedPerson) |
1..1 |
The identity of the source detecting the event |
|
entity |
BackboneElement |
0..* |
Data or objects used |
|
entity.what |
Reference (Any) |
0..1 |
Specific instance of the resource |
|
entity.detail |
BackboneElement |
0..* |
Additional information about the entity |
|
entity.detail.type |
String |
1..1 |
Name of the property that changed |
|
String |
1..1 |
Property value |
|
|
entity.detail extension (audit-event-detail-state) |
Extension |
0..1 |
Indicates whether the value in entity.detail.valueString is the value before or after the audited event |
Examples:
Sample Request
https://www.example.org/api/FHIR/R4/MedicationRequest?_id=eiuHBlNpiGxJwXRUWVqHjN9QaKO0ODrkAJrvUByRLuMc3&_revInclude=AuditEvent:entity
Sample Response
{
"link": [{
"relation": "self",
"url": https://www.example.org/api/FHIR/R4/AuditEvent/erLtgh1AreI5Y0dE6YVZxVzXV3FaxnhsMWrsnBmt-JUcxF7D14JKfYlolngfGblRgIoJNa8UzOyGJ38eJBF3aKn94wMPR9m6M.LWkVmDWuRxpwYKzNEloKILbZHuXeidD3
}],
"fullUrl": https://www.example.org/api/FHIR/R4/AuditEvent/erLtgh1AreI5Y0dE6YVZxVzXV3FaxnhsMWrsnBmt-JUcxF7D14JKfYlolngfGblRgIoJNa8UzOyGJ38eJBF3aKn94wMPR9m6M.LWkVmDWuRxpwYKzNEloKILbZHuXeidD3,
"resource": {
"resourceType": "AuditEvent",
"id": "erLtgh1AreI5Y0dE6YVZxVzXV3FaxnhsMWrsnBmt-JUcxF7D14JKfYlolngfGblRgIoJNa8UzOyGJ38eJBF3aKn94wMPR9m6M.LWkVmDWuRxpwYKzNEloKILbZHuXeidD3",
"type": {
"system": "http://open.epic.com/FHIR/StructureDefinition/audit-event-type",
"code": "Modify Order",
                    "display": "Modify Order"
},
"recorded": "2020-12-09T21:00:03Z",
"agent": [{
       "role": [{
              "coding": [{
                     "system": "http://open.epic.com/FHIR/StructureDefinition/audit-event-agent-role",
                     "code": "Ordering Provider",
                     "display": "Ordering Provider"
              }]
       }],
"who": {
"reference": "Practitioner/eEISPNvH1RKgu1t69j6Bx2g3",
                           "display": "Starter Provider, MD"
                     },
                     "requestor": true
              }],
              "source": {
                     "observer": {"display": "Example Organization"}
              },
              "entity": [{
                     "what": {"reference": "MedicationRequest/eiuHBlNpiGxJwXRUWVqHjN9QaKO0ODrkAJrvUByRLuMc3"},
                     "detail": [{
                                  "type": "Comment",
                                  "valueString": "Order Modified"
                           },
                           {
                                  "type": "Administration instructions",
                                  "valueString": "Administration Instructions edited"
                           }
              }]
       }
       "search": {"mode": "include"}
}
FHIR Bulk Data Access Tutorial
FHIR Bulk Data Access Tutorial
Contents
- Background
- Important Considerations for Using Bulk Data
- Epic's Implementation of the Bulk Data Standard
- Using the Bulk Data APIs
Background
The FHIR Bulk Data Access specification, also known as Flat FHIR, gives healthcare organizations the ability to provide external clients with large amounts of data for a population of patients formatted as FHIR resources.
Important Considerations for Using Bulk Data
The bulk data API is powerful, and because it uses the FHIR standard, you might find it easier to export and process data from bulk data if you are already familiar with that standard. However, there are important things to take into consideration before deciding to use bulk data. As always, carefully consider your use case to determine whether bulk data is the best solution.
Technical Constraints
Bulk data runs on an organization's operational database, so it is important to consider performance. Bulk data exports large amounts of data for large groups of patients, which takes more time to complete the larger the data set or patient population. Responses are not instantaneous, so use cases of bulk data should not rely on immediate responses. Later in this tutorial, we will cover how to set up requests to help minimize this wait time.
Additionally, bulk data requests are not incremental. The API collects all data for the requested patients and resources before it starts returning any data. You cannot retrieve any results until all results are ready.
Once a request has kicked off, you have a window of fourteen days for the search to complete and to download the result files. After two weeks the data is deleted. Once the data is deleted, it is no longer accessible using the bulk data access APIs.
When to Use Bulk Data
As with any data exchange, form should follow function. While having all of this data formatted as FHIR resources might be exciting or sound easier to work with, the data won't be useful if bulk data's technical capabilities don't align with your use case. Consider your exchange paradigm and workflow needs first, then see if bulk data meets those requirements. If it does - great! If it doesn't, explore other options to interoperate with Epic on open.epic. Below are examples of use cases that fit bulk data and some that don't.
Good Use Cases for Bulk Data
- A one-time load of data in preparation for continuous data exchange using other methods
- Monthly loads of a targeted set of data (for example, patient demographics and allergies)
- Weekly export of a dynamic group of patients (for example, all patients discharged in the last week with a certain diagnosis)
- Weekly loads of small patient populations (less than one hundred), such as for registry submissions
Poor Use Cases for Bulk Data
- Data synchronization with data warehouses or other databases
- Periodic loads of large amounts of clinical data
- Incremental data loads
Best Practices
Epic has several recommendations that can help you have the best experience with bulk data APIs.
- Use the
_typeand_typeFilterparameters whenever possible to improve response time and minimize storage requirements. - For groups of under one hundred patients, check the request status every ten minutes, or use exponential backoff. For groups of over one hundred patients, check the status every thirty minutes, or use exponential backoff. More information on exponential backoff can be found in the bulk data export specification.
- After retrieving all of the resource file content, use the FHIR Bulk Data Delete Request API to allow the server to clean up the data from your request.
Epic's Implementation of the Bulk Data Standard
The implementation guide for Bulk Data Access is on HL7's website. Epic supports the 1.0.1 version of the specification for R4 FHIR resources. We have also incorporated some features from the 1.1.0 version to provide additional functionality. Epic supports only the Group Export operation. We do not support _since or other bulk data operations at this time.
Using the Bulk Data APIs
Now that you have determined that bulk data is an appropriate solution for your use case, let’s go through how to use the APIs. This diagram shows the typical flow of the bulk data APIs.
Client Configuration and Authorization
External clients must be authorized to use the bulk data APIs: Bulk Data Kick-off, Bulk Data Status Request, Bulk Data File Request, and Bulk Data Delete Request. Additionally, they must be authorized for the R4 search API for each resource they want to request, for example, AllergyIntolerance.Search (R4). The healthcare organization you're integrating with also needs to authorize your client to access the specific groups of patients. Work with that organization to enable a group that is appropriate for your use case.
This tutorial assumes you are passing a form of authorization covered in one of our authentication guides. It is generally assumed that in production environments FHIR APIs will use OAuth 2.0; however, it's important to note FHIR APIs do support HTTP Basic Authentication.
Kicking Off the Bulk Data Request
To begin, you need the base URL of the organization you want to integrate with, as previously described in the FHIR Tutorial. Let's say this is our base URL:
https://fhir.epic.com/interconnect-fhir-oauth/api/FHIR/R4
Bulk data uses the Group resource for the export operation. Contact the organization you are integrating with to discuss what group of patients to use for your integration and to get the FHIR ID for that group.
Use the Group FHIR ID to call the group export operation:
https://fhir.epic.com/interconnect-fhir-oauth/api/FHIR/R4/Group/eIscQb2HmqkT.aPxBKDR1mIj3721CpVk1suC7rlu3yX83/$export
The request above returns results for a default set of R4 resources in the ndjson format. The default set includes the resources in the U.S. Core Data for Interoperability (USCDI) data classes, resources from the patient compartment of the bulk data access specification, and additional supporting resources outside of the patient compartment. Starting in the November 2021 version of Epic (and in the August 2021 version with a special update), Provenance is also in the default set of resources.
Epic also supports the following parameters for the group export operation:
_typeincludeAssociatedData_typeFilter(starting in the November 2023 version of Epic)
_type Parameter
The _type parameter accepts a comma-delimited list of FHIR resource types. When used, bulk data returns only the resource types specified in the parameter. Epic recommends using this parameter whenever possible because limiting the scope of the request to only the resources you need decreases both response times and the amount of data stored.
The _type parameter is also the only way to retrieve Binary resources. Binary files can become very large in this workflow, so Binary resources are not returned by default. Certain very large Binary files cannot be retrieved by bulk data operations at all. If a Binary file is not returned, you can still get the ID from the resource that it's associated with, for example, from the DocumentReference.content.attachment.url element, and perform a separate Binary.Read request for the content. If the resource cannot be returned, an OperationOutcome with the resource type and FHIR ID is included in the OperationOutcome response file.
For resources where Epic doesn't support a search by Patient ID (for example, Medication), a resource that has search by Patient ID and references the resource of interest (for example, MedicationRequest) should be included. For example, you could use the _type parameter to limit the request to include only Patient, MedicationRequest, and Medication resources as follows:
https://fhir.epic.com/interconnect-fhir-oauth/api/FHIR/R4/Group/eIscQb2HmqkT.aPxBKDR1mIj3721CpVk1suC7rlu3yX83/$export?_type=patient,medicationrequest,medication
includeAssociatedData Parameter
The includeAssociatedData parameter can be set to "LatestProvenanceResources" to include the Provenance resource associated with each resource instance included in the bulk data files.
https://fhir.epic.com/interconnect-fhir-oauth/api/FHIR/R4/Group/eIscQb2HmqkT.aPxBKDR1mIj3721CpVk1suC7rlu3yX83/$export?includeAssociatedData=LatestProvenanceResources
_typeFilter Parameter
The _typeFilter parameter accepts a comma-delimited list of FHIR resource search queries. This is used to filter the results of the bulk data export so you can retrieve only the data you need. To use _typeFilter for a specific resource type, that resource must be included in the _type parameter. You cannot use _typeFilter without also using _type. Query strings for multiple resources can be included in _typeFilter.
Query strings in the _typeFilter parameter use the same search parameters as the R4 search APIs, and are formatted in much the same way. The general format is “_typeFilter=Resource%3Fparameter%3Dvalue\,value%26parameter%3Dvalue.” The standard query string reserved characters (question mark, equals sign, and ampersand) must be URL encoded within _typeFilter and commas must be backslash escaped.
Here is an example of a simple query string in _typeFilter. This would limit the MedicationRequest resources returned in the bulk data export to those with a category of “inpatient.”
https://vendorservices.epic.com/interconnect-amcurprd-oauth/api/FHIR/R4/Group/eIscQb2HmqkT.aPxBKDR1mIj3721CpVk1suC7rlu3yX83/$export?_type=MedicationRequest&_typeFilter=MedicationRequest%3Fcategory%3Dinpatient
This is an example of a more complex use of _typeFilter. This would limit the Observation resources returned to vital signs from 2023 and laboratory results from 2022 onwards, and the Condition resources returned to active problems on the problem list.
https://vendorservices.epic.com/interconnect-amcurprd-oauth/api/FHIR/R4/Group/eIscQb2HmqkT.aPxBKDR1mIj3721CpVk1suC7rlu3yX83/$export?_type=Observation,Condition&_typeFilter=Observation%3Fcategory%3Dvital-signs%26date%3D2023,Observation%3Fcategory%3Dlaboratory%26date%3Dge2022,Condition%3Fcategory%3Dproblem-list-item%26clinical-status%3Factive
When you use _typeFilter, we recommend following these best practices:
- Avoid using multiple query strings that would have overlapping results. For example, including “Observation%3Fcategory%3Dlaboratory” and “Observation%3Fcategory%3Dlaboratory\,vital-signs” in the same request.
- When possible, simplify _typeFilter values into a single query string. For example, rather than “_typeFilter=MedicationRequest%3Fstatus%3Dactive,MedicationRequest%3Fstatus%3Don-hold” use “_typeFilter=MedicationRequest%3Fstatus%3Dactive\,on-hold”
- Test your query strings with the respective resources in a search request to ensure they return the results you expect before using the query strings in _typeFilter.
Note that the following are not supported by _typeFilter:
- Searching by patient, subject, or _id
- Query strings with search result parameters, such as _count, _include, or _revInclude
- Query strings for the Patient resource
- Query strings for resources that don't contain patient information
- Applying the search query strings to resources included by reference
- Payer-to-Payer API Clients
Requirements and Restrictions
When you have compiled all components of the request URL, you can submit the GET request to kick-off the bulk data workflow. Note that by default, a client can request a specific group of patients only once in a twenty-four-hour period. If you need to request bulk data more frequently, work with the Epic organization you're integrating with to configure an appropriate request window.
Your request must include the following headers:
- Accept: application/fhir+json
- Prefer: respond-async
Checking the Status of the Request
After kicking off the bulk data request, use the status API to track the progress of the request. Note that the same client and user that made the kickoff request must make the status request. In the response headers of the kick-off request, the value of the “Content-Location” header is the status URL for this bulk data request. Each bulk data request has a unique identifier used to request the status of a specific bulk data request.
https://fhir.epic.com/interconnect-fhir-oauth/api/FHIR/BulkRequest/B0F84FB8D37411EB92726C04221B350C
If the bulk data request has not finished processing, the response body is empty. An approximate measure of progress is available in the "X-Progress" response header. The value of this header is "Searched X of Y patients" where "Y" is the number of patients in the group and "X" is the number of patients processed so far. This is only an approximate measure of progress because there is additional processing required after all patients have been searched, so it's possible for the header to be set to "Searched 100 of 100 patients" with no response body returned.
Epic recommends pinging for the request status every ten minutes for groups with a hundred or fewer patients, every thirty minutes for groups over a hundred, or using exponential backoff as described in the bulk data export specification.
After the request is completed, the status API returns the URLs for the resource files. For more information on the structure of the response, reference the API details.
{
    "transactionTime": "2021-06-23T16:39:52Z",
    "request": "https://fhir.epic.com/interconnect-fhir-oauth/api/FHIR/R4/Group/eIscQb2HmqkT.aPxBKDR1mIj3721CpVk1suC7rlu3yX83/$export?_type=patient,encounter,condition",
    "requiresAccessToken": true,
    "output": [
        {
            "type": "Patient",
            "url": "https://fhir.epic.com/interconnect-fhir-oauth/api/FHIR/BulkRequest/9ED3042CD44111EB84F2D2068206269D/e19upATM-PTKGZuHsy04IUQ3"
        },
        {
            "type": "Condition",
            "url": "https://fhir.epic.com/interconnect-fhir-oauth/api/FHIR/BulkRequest/9ED3042CD44111EB84F2D2068206269D/e8D8N1JwB3qCiHJkmeV.98w3"
        }
    ],
    "error": [
        {
            "type": "OperationOutcome",
            "url": "https://fhir.epic.com/interconnect-fhir-oauth/api/FHIR/BulkRequest/9ED3042CD44111EB84F2D2068206269D/eKbGgVw9pUn6xIiB8kZ756w3"
        }
    ]
}
Viewing Resource Files
Bulk data generates a separate file for each resource type. The "output" elements in the status API response lists each resource type and the corresponding file request URL. If a single resource has a very large number of results, the data is split into multiple files, all linked in the response. There is a maximum of three thousand resource instances per file, but the actual number of resource instances in a given file varies based on the size of the resource instances included in the file. To view a file, you'll use the file request API. The file URLs for this API are found in the file manifest from the status API. Note that the same client and user that made the kickoff request must make the file request.
https://fhir.epic.com/interconnect-fhir-oauth/api/FHIR/BulkRequest/9ED3042CD44111EB84F2D2068206269D/e19upATM-PTKGZuHsy04IUQ3
The format of the bulk data files is ndjson. The ndjson format is similar to JSON, but is newline-sensitive. Resource instances are included in the bulk data file through a search by Patient ID or through a reference in a previously gathered resource instance. The files do not differentiate by patient, so results for all patients are included in each resource file.
Viewing Request Errors
In addition to the resource files, if there are any request-level errors, the "error" element in the status API response includes the URL for the OperationOutcome file. This file includes only request-level errors. Bulk data does not return resource-level errors.
|
Error Code |
Error Text |
Notes |
|
59130 |
"Some information was not or may not have been returned due to business rules, consent or privacy rules, or access permission constraints." |
This error is logged when a resource is requested that the client is not authorized for. OperationOutcome.issue.diagnostics lists the resource. |
|
59100 |
"Content invalid against the specification or a profile." |
This error is logged when a parameter is included in the request that Epic doesn't support in bulk data. OperationOutcome.issue.diagnostics lists the parameter. |
|
59136 |
"The resource or profile is not supported." |
This error is logged when a resource is requested that Epic doesn't support in bulk data. OperationOutcome.issue.diagnostics lists the resource. |
|
59176 |
"Error Converting FHIR Resource to ndjson. Resource: <resource type> FHIR ID: <resource FHIR ID>" |
This error is logged when a resource instance cannot be included in the resource file because of its size. The resource instance can be requested separately using the resource's read interaction. This error is logged starting in the November 2021 version of Epic and in August 2021 by special update. |
Deleting Requests
If you no longer want to run a request after starting it, or no longer need the data stored, the bulk data delete API is available. This API uses the same URL as the status API, but uses the DELETE HTTP method rather than GET.
DELETE https://fhir.epic.com/interconnect-fhir-oauth/api/FHIR/BulkRequest/B0F84FB8D37411EB92726C04221B350C
If you delete a request before it is completed (the status API hasn’t returned any content), the request does not finish processing and is marked as deleted in the receiving system. The deleted request does not count towards your request per group per client per time period limit.
If you delete a request after it is completed (the status API returns file URLs), the request remains marked as completed in the system, but the data generated by the request is deleted. Deleting the generated data after you've retrieved it can help prevent excessive storage requirements for the server. In this case, the request does count towards the client's request limit. Epic recommends running the delete API after you finish retrieving the data files.
Interfaces (HL7v2)
What is an Interface?
An interface is a mechanism to exchange information from a sending system to a receiving system that contains discrete information about an event that occurred in the sending system. Epic supports a variety of standards-based interfaces including HL7v2, HL7v3, X12, NCPDP, DICOM, and more. By far the most popular standard used by Epic customers and the healthcare industry in general is HL7v2.
Why use an Interface?
Interfaces have been used to exchange healthcare information for decades. Almost all organizations that use Epic have an existing interface team dedicated to implementing and supporting this type of integration. Due to the event-based nature of interfaces, they typically excel at notifying a receiving system of an event that occurred in the sending system. For example, if you want to be notified when something occurs in Epic (such as a provider placing and order), you can implement an outgoing interface. Conversely, incoming interfaces are used to notify Epic of events that occur in your system.
What are some considerations for using an Interface?
Implementing a new interface connection can sometimes involve more work than exposing and calling an API/web service endpoint. The implementation typically involves setting up a connection between the sending and receiving systems, as well as any required application build and mapping.
Which Interfaces Does Epic support and How Do I See the Specs?
open.epic contains a list of standards-based interfaces supported by Epic along with public specifications https://open.epic.com/Interface
Connecting Interfaces with Organizations that use Epic
Interfaces can be connected directly to Epic, or, more commonly, they are routed through an interface engine. Historically, the vast majority of HL7v2 interfaces used MLLP direct socket TCP/IP connections. If your application is connecting from outside of the organization’s network, this type of connection might require additional security considerations like VPNs and adding IPs to an allowlist.
Epic natively supports HL7v2 over HTTP as defined by the HAPI Standard for HL7 over HTTP. Most interface engines support HTTP traffic, but there might be engine-specific considerations like potential licensing fees. When using HL7 over HTTP for Incoming Interface messages (Incoming into Epic), we recommend authenticating your messages with Backend OAuth 2.0. See the Incoming Interfaces section below for more information.
So, when connecting with an organization, consider whether the connection needs to go through an interface engine due to a security requirement by the organization or because using an engine makes the most technical sense for the type of interface.
For example, high volume interfaces that send messages to many receiving systems are almost always sent to the interface engine first and then distributed to each receiving system. An example of this is the Outgoing ADT from Epic interface. Conversely, it’s common for incoming interfaces into Epic to be a unique feed from a sending system and thus have more flexibility regarding whether it needs to go through an interface engine.
Organization-specific considerations
There are many organization-specific configuration options that affect how interfaces behave. When implementing at a specific organization, consider the following:
Identity ID Mapping
Each organization has its own configurable set of ID types depending on the entity in question. Examples can include patient IDs, provider IDs, department IDs, hospital IDs, order IDs, result IDs, and more. How these ID types are configured affects how the ID types appear in an interface message. For example, the ID type for a patient’s MRN in the PID-3 segment is defined in the fourth piece (PID-3.4). At one organization, it might look like “PID|||1234567^^^MRN|”. But at another organization, it might look completely different, such as: “PID|||1234567^^^MEDID|”
Refer to the ID Types for APIs tutorial for additional background on ID types in Epic.
Interface Configurations
Each type of interface is highly configurable to tailor it to certain use cases. There are often dozens or hundreds of configuration options. For example, ORC-2 on an orders interface can contain one of many different order IDs depending on the interface configuration (The internal Epic order ID, accession number, or the external system’s order ID).
Some interfaces are shared between multiple vendors, meaning you may need to conform your implementation to what the organization is already using.
HL7v2 Versions
Interfaces in Epic can be configured to have a set HL7 version they expect to receive (incoming interfaces) or send out (outgoing interfaces) in the MSH-12 - Version ID field. Because many Epic organizations copy prebuilt interfaces from Epic's Foundation System, most of their interfaces will have this value set to a specific version (Ex: 2.3). Epic's interface implementation is version-agnostic; we do not change anything about how we process/interpret interface messages based on what's set in MSH-12 besides checking that the value you provide in incoming messages matches what's set on the interface.
When implementing an interface with an Epic organization, ask their interface analyst what's set in the "Version ID (MSH-12)" field on the interface. For Incoming interfaces, you'll need to provide that value in your MSH-12 field. For outgoing interfaces, your system will need to accept that version value when receiving messages from Epic
Time Zones
The organization’s time zone is often different from your own. The organization might also have multiple physical locations that cross time zones. This time zone difference affects how you use timestamps in your interface messages.
Encounters In Epic
Epic uses encounters as containers for almost all clinical and financial data tied to a patient. Encounters may sometimes be referred to as visits or contacts. Within Epic, encounters are uniquely identified by the Contact Serial Number, or CSN for short. When you file information using an interface, you must always consider how you are resolving this encounter - either by matching or creation on the fly.
Picking the right encounter can impact clinical workflows for Epic end users when reviewing information about the patient and making clinical decisions. Additionally, it can also impact how a patient is billed for care that is provided. Careful consideration of your workflow is needed to make sure you're implementing the safest, most robust solution.
Encounter Matching
The most robust way to match to an encounter in Epic is through the CSN. For some interfaces, other discrete identifiers may be used as an indirect linkage back to the CSN. We strongly recommend that you leverage CSN matching whenever available in your workflow.
If the CSN or other discrete identifiers are not available in your workflow, Epic interfaces often support fuzzy encounter matching. Fuzzy matching leverages data like date range, departments, providers, procedures, and more to identify the most appropriate encounter. What type of data can be leveraged varies from interface to interface.
Encounter Creation
Many Epic interfaces that write data can also support encounter creation in the event that an appropriate encounter does not exist. It is almost always required to first search for an existing encounter prior to creating a new encounter. For example, if your app has already created an encounter today, it should try to re-use that existing encounter for new data instead of creating another one. As mentioned in the Encounter Matching section, encounter fuzzy matching can generally accomplish this task in the absence of a discrete identifier like CSN.
Appointments
Appointments in Epic broadly cover any encounter that has yet to happen. Because appointments can be cancelled, filing clinical data to an appointment can be risky. Each interface may handle filing to appointments slightly differently, so it's important to think through your app's workflow and how appointment cancelation should be handled.
Outgoing Interfaces
When using Outgoing interfaces, provide the customer with the following information:
- A detailed description of your use cases.
- Endpoint information:
- If using HTTPS:
- What is your HTTPS endpoint?
- Do you require any additional authentication to receive our messages?
- Refer to the Outgoing Interface authentication options (HTTP(s) only) section below.
- If using TCP/IP:
- Ask the customer what their sending IP is (in case you need to add it to your allowlist).
- What is your hostname and port to which we should route messages?
Outgoing Interface authentication options (HTTP(s) only)
If using HTTP(s) with outgoing interfaces, and your system requires some additional authentication to receive outgoing interface messages from Epic, we support the following authentication options. For all of these, you’ll need to provide authentication information to the customer.
- Custom HTTP Headers
- We can send out any custom HTTP header with a hardcoded value you provide.
- Example: “api-key: 12345”
- Username & Password
- We can support either Username or Password on their own, or both at the same time.
- X .509 Client Certificates
- Refer to Security Profile Level 3 from the HAPI spec for more information.
- OAuth 2.0 (Starting in the November 2023 version of Epic)
- We support authenticating to your servers with OAuth 2.0 using the client_credentials grant type. We support JWTs or client_secrets as credentials. If you wish to use OAuth 2.0 with your outgoing interface messages, provide your customer the following information:
- The Client ID you want us to use to authenticate to you.
- The Token URL where Epic should initially retrieve access tokens.
- The client authentication type to be used in the token request.
- Client Secret
- You'll want to provide the customer your client secret in a more secure method than email.
- JWT
- Provide the customer your desired signing algorithm. (E.g. SHA-384)
- Any additional scopes we should send with our OAuth 2.0 request.
- For your primary endpoint for receiving messages, provide us with your desired HTTP Method (Eg. GET or POST)
- Client Secret
- We support authenticating to your servers with OAuth 2.0 using the client_credentials grant type. We support JWTs or client_secrets as credentials. If you wish to use OAuth 2.0 with your outgoing interface messages, provide your customer the following information:
Incoming Interfaces
HTTPS endpoints for interfaces will follow the format: {{Customer base URL}}/api/epic/2015/EDI/HTTP/HL7v2/<Interface ID>. The interface ID will be provided by the customer.
To send interface messages via HTTPs, you'll need to create an app with the Backend Systems user type and add HL7v2 as an incoming API. You should authenticate your interface messages with Backend OAuth 2.0. Follow the steps in the Backend OAuth 2.0 specification to create a JWT and obtain an access token. With your HL7 over HTTPS interface message, include an Authorization header set to "Bearer theAccessTokenYouJustObtained"
When testing in customer non-production environments, you should always use an MSH-12 (Processing ID) value of "T" for test. Using "P" for production will fail unless you are in a customer production environment.
When you send an incoming interface message, you might get a basic acknowledgement message that Epic received it. This message does not necessarily indicate that the information in your message filed correctly. Work with your customers to understand their interface error monitoring procedures.
CDS Hooks Tutorial
CDS Hooks Tutorial
Introduction
Clinical Decision Support (CDS) Hooks is an HL7 standard for in-workflow decision support integrations between electronic health record systems and remote, real-time, provider-facing decision support services. This tutorial describes Epic’s support for this standard.
Epic’s support for CDS Hooks is built on a workflow engine and CDS rule engine. Organizations using Epic can configure native CDS alerts by defining the workflow point at which they are triggered, known as the hook, and the criteria to evaluate when they are triggered. These criteria determine whether a CDS alert appears to the clinician and, if it does, what information it contains. Epic’s implementation of CDS Hooks enables native criteria to call a remote CDS Hooks API when evaluating whether to show a CDS alert. In Epic, the native CDS alert is referred to as an OurPractice Advisory (OPA).
Guidance to CDS Developers
CDS Hooks is a powerful integration technology because it directly interacts with clinician workflows. Treat the ability to interact with clinicians carefully. As a CDS developer, you now share responsibility for a positive user experience. Your CDS service must be fast, must avoid alert fatigue, and should improve over time.
Hooks
As of Epic version May 2021, Epic primarily supports three standard hooks built on pre-existing CDS alert workflow triggers. Note that Epic supports many more native workflow triggers than CDS Hooks has standardly defined.
patient-view
The patient-view hook is triggered in two scenarios:- When a patient’s chart is opened. The native Epic trigger is named Open Patient Chart. Epic recommends against firing a CDS Hooks request every time a patient chart is opened because it results in a poor user experience. Instead, work with the health system to use this trigger in combination with more specific, native business criteria in Epic to limit the number of CDS Hooks requests.
- When a native Epic trigger calls a CDS Hooks service that is not standardized by CDS Hooks. For example, Enter Allergy is a native Epic workflow trigger that an organization can configure to show an OPA, including evaluating criteria that calls a CDS Hooks service. Because there is no industry standard hook for the Enter Allergy workflow step, we reuse the patient-view hook. The Epic-specific "com.epic.cdshooks.request.bpa-trigger-action" extension (see below) can be used to differentiate between native Epic triggers.
order-select
Epic supports the order-select hook in workflows when a clinician enters orders for a patient. In addition to the new selection of one or more orders (which triggers the order-select event), the clinician might have already selected other orders that have not yet been signed. The draftOrders JSON object contains a bundle of both the newly selected orders and the previously selected, unsigned orders. The "selections" array of FHIR identifiers identifies which of the unsigned orders from the draftOrders bundle are newly selected. Decision support using this hook should focus on the newly selected orders.
The draftOrders bundle can contain the MedicationRequest, ServiceRequest, or ProcedureRequest resource.
order-sign
The order-sign hook is triggered in Epic as the final step in the ordering process. It occurs after a clinician has clicked the Sign Orders button, but before the system has finalized the order. Decision support from this hook is the final chance for the clinician to revise the order. This hook allows for collection of all unsigned order details to send in the CDS Hooks call as MedicationRequest, ServiceRequest, or ProcedureRequest resources.
CDS Hooks Request
Prefetch
Prefetch can be a valuable method for optimizing the performance of your CDS service. Evaluate whether you can collect the data needed to inform your CDS service using the CDS Hooks prefetch model.
Prefetch within Epic can be configured in your CDS Hooks service’s OurPractice Advisory (LGL) record. Any resource that you’d like to prefetch must be appropriately scoped to your client and match the client’s primary FHIR version. Epic does not support automatically retrieving the contents of a CDS Hooks service's discovery endpoint.
Here is an example of how prefetch might be configured for a CDS service:
| Prefetch Property Name | FHIR Query |
|---|---|
| patient | Patient/{{context.patientId}} |
| medications | MedicationRequest?patient={{context.patientId}}&status=active |
| encounterDx | Condition?patient={{context.patientId}}&encounter={{context.encounterId}}&category=encounter-diagnosis |
| user | {{context.userId}} |
Note that the {{context.patientId}}, {{context.encounterId}}, and {{context.userId}} prefetch tokens are all used here. These IDs are returned by default in the CDS Hooks request context field and are also available to use in constructing contextual read/search FHIR requests that are included in the initial request to the CDS Hooks service. In contrast to the FHIR IDs, which are always sent in the context, the patient prefetch property defined above returns the entire patient resource within the prefetch. For searches, the medications and encounterDx prefetch properties above show how to use prefetch tokens as query parameters when implementing your CDS Hooks service.
The {{context.userId}} prefetch token is unique in that it returns both a FHIR resource name and FHIR resource ID. If the clinician triggering the CDS Hooks request has a provider record in Epic, the request returns "PractitionerRole/
Input Fields for JSON POST Body
|
Field |
Description |
|
hook |
Epic supports the following hooks:
|
|
hookInstance |
A universally unique identifier (UUID) for each hook call. |
|
fhirServer |
The base FHIR URL for the health system. Epic will always provide this. Reach out to the Client Systems Web and Server Systems team or EDI TS for the organization to obtain this. |
|
fhirAuthorization |
A structure holding an OAuth 2.0 bearer access token, which can be used to authenticate to Epic APIs for a short period of time. |
|
context |
The CDS Hooks specification (for example, patient-view) defines the context elements associated with each hook. Epic always sends patientId and userId. |
|
prefetch |
Resources sent in the prefetch are configured by the health system and can include FHIR resources that are already supported by Epic. |
Epic Extensions
|
Extension |
Description |
|
com.epic.cdshooks.request.bpa-trigger-action |
The specific trigger action in Epic that is mapped to the hook. Common values include, but are not limited to:
|
|
com.epic.cdshooks.request.cds-hooks-specification-version |
The CDS hooks specification version used by Epic. |
|
com.epic.cdshooks.request.fhir-version |
The primary FHIR version of the CDS service as specified during OAuth registration. |
|
com.epic.cdshooks.request.criteria-id |
The ID of the OPA criteria record in Epic. This value can be helpful during troubleshooting. |
|
com.epic.cdshooks.request.epic-version |
The version of Epic that the health system is currently using. |
|
com.epic.cdshooks.request.cds-hooks-implementation-version |
The internal version Epic assigns to CDS Hooks implementations. Can be used to determine what features are supported. |
Example HTTP Request
{
"hookInstance": "f399c67c-c703-11ea-af16-460231621f93",
"fhirServer": "https://example.com/interconnect-instance-oauth/api/FHIR/R4",
"hook": "patient-view",
"fhirAuthorization": {
"access_token": "eyJhbGciOiJSUzI1NiIsInR5cCI6IkpXVCJ9.eyJhdWQiOiJ1cm46ZXBpYzpjZWMuY2RlIiwiY2xpZW50X2lkIjoiYWVhYzNkYTctNjQ4MS00NWFmLWFkNDEtNDJlNWU3MDExNDFkIiwiZXBpYy5lY2kiOiJ1cm46ZXBpYzpDdXJyZW50LURldmVsb3BtZW50LUVudmlyb25tZW50IiwiZXBpYy5tZXRhZGF0YSI6Ik4yTDdoSFE3clNxLXdQbkstcVMyZlBTSjY1Q1EzS1ZOVHhhTUlBZGRVTllwemQyOEE0Q2d4ZHA0SVg0NUI5YmE4TVVJdEl1NkEzYjBkYmU1c1ZlY093V1ZZN0tTd2VZb09KZDR5R2hmblcxdk9yOENoX195N2NrT1VtV005cnVhIiwiZXBpYy50b2tlbnR5cGUiOiJhY2Nlc3MiLCJleHAiOjE1OTQ4NjMzMzcsImlhdCI6MTU5NDg2MzAzNywiaXNzIjoidXJuOmVwaWM6Y2VjLmNkZSIsImp0aSI6ImU4MjFhMDA5LTgzNjAtNDRkYy1iZmMwLTEyZmU4ODA3MjQyYSIsIm5iZiI6MTU5NDg2MzAzNywic3ViIjoiZUJxZ0Foc2pVcHF3a3lJWm9LZU1jVUEzIn0.hF2Ir9717QxJ0TgiFXKN1bhRdicgUHEf_0tjZ7qiy2Enzsn7_dW4HaueJqg22vcnrEayLxlW4h6Q6J5He3-U7VXmGBFd5AKXxVLbTQZupN6x4owt5n_N1OJKDu5UVJdlWoq-fBVn2sEyDfvITQ-BK21MWXxGaEcnttJNxS0Mk847JnxBby2oLzAd5NnIbdT733S2nL36ViK_mVnkucLu4vxwVRcaec2zCpvqF8Pn2Crl3yKaPKQbRqc6y12hprdUeB2VxOm3H5KxJQKYnEGTKNCmCy5w3Yaz86KtP9OlX1e3n6Km3TSCtZbj0Gm7QIVyDARAlREPA_XzbgQ3ItJang",
"token_type": "Bearer",
"expires_in": 300,
"scope": "ALLERGYINTOLERANCE.READ ALLERGYINTOLERANCE.SEARCH Observation.Read (Smoking History) Observation.Read (Labs) (R4) Observation.Read (Vitals) Observation.Read (Vitals) (R4) Observation.Search (Labs) (R4) Observation.Search (Smoking History) Observation.Search (Vitals) Observation.Search (Vitals) (R4) Practitioner.Read (R4) Practitioner.Search (DSTU2) PROCEDURE.READ PROCEDURE.SEARCH MedicationRequest.Read (R4) MedicationRequest.Search (R4) CONDITION.READ CONDITION.SEARCH Condition.Read (R4) Condition.Search (R4) PATIENT.READ PATIENT.SEARCH PRACTITIONER.READ PRACTITIONER.SEARCH OBSERVATION.READ OBSERVATION.SEARCH urn:Epic-com:Informatics.2014.Services.Order.AnnotateOrders AllergyIntolerance.Search (R4) AllergyIntolerance.Read (R4) Patient.Read (R4) Patient.Search (R4) Location.Read (R4) Encounter.Read (R4) Encounter.Search (R4) urn:Epic-com:Core.2016.Services.DataUtility.GetImportDataLog Condition.Create (R4) Medication.Read (R4) MEDICATION.READ (DSTU2) MEDICATION.READ MEDICATIONORDER.READ MEDICATIONORDER.READ (DSTU2) MEDICATIONORDER.SEARCH MEDICATION.SEARCH MedicationStatement.Read (R4) MEDICATIONSTATEMENT.READ (DSTU2) MEDICATIONSTATEMENT.READ MEDICATIONSTATEMENT.SEARCH MedicationStatement.Search (R4) Condition.Search (R4) Patient.Read (R4) Practitioner.Read (R4) Patient.Search (R4) Practitioner.Search (R4) Condition.Read (R4) Condition.Create (R4) AllergyIntolerance.Read (R4) AllergyIntolerance.Search (R4) Observation.Read (R4) Observation.Search (R4) Practitioner.Search (R4) PractitionerRole.Search (R4) PractitionerRole.Search (R4) medication medication.create Encounter.Read (R4) Encounter.Search (R4) ProcedureRequest.Read (R4) ProcedureRequest.Search (R4) EPIC.FHIR.R4.SERVICES.MEDICATIONREQUEST.CREATE EPIC.FHIR.R4.SERVICES.MEDICATIONREQUEST.CREATE Condition.Create (Encounter Diagnosis) (R4) Condition.Create (Problems) (R4) EPIC.FHIR.R4.SERVICES.PROCEDUREREQUEST.CREATE EPIC.FHIR.R4.SERVICES.SERVICEREQUEST.CREATE Condition.Read (Encounter Diagnosis) (R4) Condition.Read (Health Concern) (R4) Condition.Read (Problems) (R4) Condition.Search (Encounter Diagnosis) (R4) Condition.Search (Health Concern) (R4) Condition.Search (Problems) (R4) Observation.Read (Core Characteristics) (R4) Observation.Read (Labs) (R4) Observation.Read (LDA-W) (R4) Observation.Read (Obstetric Details) (R4) Observation.Read (Smoking History) (R4) Observation.Read (Vitals) (R4) Observation.Search (Core Characteristics) (R4) Observation.Search (Labs) (R4) Observation.Search (LDA-W) (R4) Observation.Search (Obstetric Details) (R4) Observation.Search (Smoking History) (R4) Observation.Search (Vitals) (R4) MedicationRequest.Read (R4) MedicationRequest.Search (R4) condition.create(diagn Condition.Create Problem (R4) PractitionerRole.Read (R4) PractitionerRole.Read (R4)",
"subject": "aeac3da7-6481-45af-ad41-42e5e701141d"
},
"context": {
"patientId": "eXoGxqgBaJuNkuahMYmiDhg3",
"encounterId": "eFyoeOuWgXtlQmOQzPdkQWwy3s8a49yrUc-LtjwhWT6g3",
"userId": "PractitionerRole/e-QokEGUJIzyynNdkCFrs9w3"
},
"prefetch": {
"-user": {
"resourceType": "PractitionerRole",
"id": "e-QokEGUJIzyynNdkCFrs9w3",
"active": true,
"practitioner": {
"reference": "https://example.com/interconnect-instance-oauth/api/FHIR/R4/Practitioner/eqZb1t82mP4YeBjiLldSFPQ3",
"display": "Family Medicine Physician"
},
"code": [
{
"coding": [
{
"system": "urn:oid:1.2.840.114350.1.13.861.1.7.10.836982.1040",
"code": "1",
"display": "Physician"
}
],
"text": "Physician"
}
],
"specialty": [
{
"coding": [
{
"system": "urn:oid:1.2.840.114350.1.72.1.7.7.10.688867.4160",
"code": "10",
"display": "Cardiology"
}
],
"text": "Cardiology"
},
{
"coding": [
{
"system": "urn:oid:1.2.840.114350.1.72.1.7.7.10.688867.4160",
"code": "5",
"display": "Anesthesiology"
}
],
"text": "Anesthesiology"
},
{
"coding": [
{
"system": "urn:oid:1.2.840.114350.1.72.1.7.7.10.688867.4160",
"code": "15",
"display": "Dermatology"
}
],
"text": "Dermatology"
},
{
"coding": [
{
"system": "urn:oid:1.2.840.114350.1.72.1.7.7.10.688867.4160",
"code": "18",
"display": "Endocrinology"
}
],
"text": "Endocrinology"
}
]
},
"patient": {
"resourceType": "Patient",
"id": "eXoGxqgBaJuNkuahMYmiDhg3",
"extension": [
{
"extension": [
{
"valueCoding": {
"system": "http://hl7.org/fhir/us/core/ValueSet/omb-race-category",
"code": "UNK",
"display": "Unknown"
},
"url": "ombCategory"
},
{
"valueString": "Unknown",
"url": "text"
}
],
"url": "http://hl7.org/fhir/us/core/StructureDefinition/us-core-race"
},
{
"extension": [
{
"valueCoding": {
"system": "http://hl7.org/fhir/us/core/ValueSet/omb-ethnicity-category",
"code": "UNK",
"display": "Unknown"
},
"url": "ombCategory"
},
{
"valueString": "Unknown",
"url": "text"
}
],
"url": "http://hl7.org/fhir/us/core/StructureDefinition/us-core-ethnicity"
},
{
"valueCode": "M",
"url": "http://hl7.org/fhir/us/core/StructureDefinition/us-core-birthsex"
}
],
"identifier": [
{
"use": "usual",
"type": {
"text": "EPI"
},
"system": "urn:oid:1.2.840.114350.1.1",
"value": "113822"
},
{
"use": "usual",
"type": {
"text": "EXTERNAL"
},
"value": "Z16282"
},
{
"use": "usual",
"type": {
"text": "FHIR"
},
"value": "TDjw8.slp7UtBKr3jNvYPsSGUb0qoZMC5OEhD5iu5ticB"
},
{
"use": "usual",
"type": {
"text": "FHIR R4"
},
"value": "eXoGxqgBaJuNkuahMYmiDhg3"
},
{
"use": "usual",
"type": {
"text": "INTERNAL"
},
"value": " Z16282"
},
{
"use": "usual",
"system": "urn:oid:2.16.840.1.113883.4.1"
}
],
"active": true,
"name": [
{
"use": "official",
"text": "Family Medicine Physician",
"family": "Physician",
"given": [
"Family Medicine"
]
},
{
"use": "usual",
"text": "Family Medicine Physician",
"family": "Physician",
"given": [
"Family Medicine"
]
}
],
"gender": "male",
"birthDate": "1981-06-24",
"deceasedBoolean": false,
"managingOrganization": {
"reference": "https://example.com/interconnect-instance-oauth/api/FHIR/R4/Organization/e1aU.Joccsz0IPnyexqMjXw3",
"display": "EXAMPLE ORGANIZATION"
}
},
"conditions": {
"resourceType": "Bundle",
"type": "searchset",
"total": 0,
"link": [
{
"relation": "self",
"url": "https://example.com/interconnect-instance-oauth/api/FHIR/R4/Condition?patient=eXoGxqgBaJuNkuahMYmiDhg3&_include=Condition:patient&_include=Condition:patient:organization"
}
],
"entry": [
{
"resource": {
"resourceType": "OperationOutcome",
"issue": [
{
"severity": "warning",
"code": "processing",
"details": {
"coding": [
{
"system": "urn:oid:1.2.840.114350.1.13.861.1.7.2.657369",
"code": "4101",
"display": "Resource request returns no results."
}
],
"text": "Resource request returns no results."
}
}
]
},
"search": {
"mode": "outcome"
}
}
]
},
"medications": {
"resourceType": "Bundle",
"type": "searchset",
"total": 2,
"link": [
{
"relation": "self",
"url": "https://example.com/interconnect-instance-oauth/api/FHIR/R4/MedicationRequest?patient=eXoGxqgBaJuNkuahMYmiDhg3"
}
],
"entry": [
{
"link": [
{
"relation": "self",
"url": "https://example.com/interconnect-instance-oauth/api/FHIR/R4/MedicationRequest/e4jAeTRRFdgN-QzpjNRbwQkDnp1BQlqrukNdC6BvYzU43"
}
],
"fullUrl": "https://example.com/interconnect-instance-oauth/api/FHIR/R4/MedicationRequest/e4jAeTRRFdgN-QzpjNRbwQkDnp1BQlqrukNdC6BvYzU43",
"resource": {
"resourceType": "MedicationRequest",
"id": "e4jAeTRRFdgN-QzpjNRbwQkDnp1BQlqrukNdC6BvYzU43",
"identifier": [
{
"use": "usual",
"system": "urn:oid:1.2.840.114350.1.13.861.1.7.2.798268",
"value": "1000182255"
}
],
"status": "active",
"intent": "order",
"category": {
"coding": [
{
"system": "http://hl7.org/fhir/medication-request-category",
"code": "inpatient",
"display": "Inpatient"
}
],
"text": "Inpatient"
},
"medicationReference": {
"reference": "https://example.com/interconnect-instance-oauth/api/FHIR/R4/Medication/ehjM3OtjgdW8Bea3jIQgMFVhzPMcMELCBS5v775xzbLetNaOP5vZRG-7BUwFy1hYFzJ7rXwELBf63P6zbB4tI56DXbUTYtEZEWyFIzxmyONE3",
"display": "IBUPROFEN 200 MG PO TABS"
},
"subject": {
"reference": "https://example.com/interconnect-instance-oauth/api/FHIR/R4/Patient/eXoGxqgBaJuNkuahMYmiDhg3",
"display": "Physician, Family Medicine"
},
"authoredOn": "2020-07-06T20:25:56Z",
"recorder": {
"reference": "https://example.com/interconnect-instance-oauth/api/FHIR/R4/Practitioner/eqZb1t82mP4YeBjiLldSFPQ3",
"display": "Family Medicine Physician"
},
"dosageInstruction": [
{
"extension": [
{
"valueQuantity": {
"value": 2,
"unit": "tablet",
"system": "http://unitsofmeasure.org",
"code": "{tbl}"
},
"url": "https://open.epic.com/fhir/extensions/admin-amount"
},
{
"valueQuantity": {
"value": 400,
"unit": "mg",
"system": "http://unitsofmeasure.org",
"code": "mg"
},
"url": "https://open.epic.com/fhir/extensions/ordered-dose"
}
],
"timing": {
"repeat": {
"boundsPeriod": {
"start": "2020-07-06T20:25:32Z"
},
"frequency": 1,
"period": 6,
"periodUnit": "h"
},
"code": {
"text": "Q6H PRN"
}
},
"asNeededBoolean": true,
"route": {
"coding": [
{
"system": "urn:oid:1.2.840.114350.1.13.861.1.7.4.798268.7025",
"code": "15",
"display": "Oral"
},
{
"system": "http://snomed.info/sct",
"code": "260548002",
"display": "Oral"
}
],
"text": "Oral"
},
"doseQuantity": {
"value": 400,
"unit": "mg",
"system": "http://unitsofmeasure.org",
"code": "mg"
}
}
]
},
"search": {
"mode": "match"
}
},
{
"link": [
{
"relation": "self",
"url": "https://example.com/interconnect-instance-oauth/api/FHIR/R4/MedicationRequest/es5s.w.VqTbI-3sTtgDY0f.oJSZ8leYTXykPvcBCZrWQ3"
}
],
"fullUrl": "https://example.com/interconnect-instance-oauth/api/FHIR/R4/MedicationRequest/es5s.w.VqTbI-3sTtgDY0f.oJSZ8leYTXykPvcBCZrWQ3",
"resource": {
"resourceType": "MedicationRequest",
"id": "es5s.w.VqTbI-3sTtgDY0f.oJSZ8leYTXykPvcBCZrWQ3",
"identifier": [
{
"use": "usual",
"system": "urn:oid:1.2.840.114350.1.13.861.1.7.2.798268",
"value": "1000182291"
}
],
"status": "active",
"intent": "order",
"category": {
"coding": [
{
"system": "http://hl7.org/fhir/medication-request-category",
"code": "inpatient",
"display": "Inpatient"
}
],
"text": "Inpatient"
},
"medicationReference": {
"reference": "https://example.com/interconnect-instance-oauth/api/FHIR/R4/Medication/eIBy3xFZsuXmpUpNLdojkXC2jhRNQyq0NyjvMBlrASIS4dl.7I3naftOtzE1KVToZwnuJ5ty7Zonwkhzz9kHIeEYjUV102TvDEv7zaGJFkKQ3",
"display": "MITOMYCIN 40 MG IV SOLR"
},
"subject": {
"reference": "https://example.com/interconnect-instance-oauth/api/FHIR/R4/Patient/eXoGxqgBaJuNkuahMYmiDhg3",
"display": "Physician, Family Medicine"
},
"authoredOn": "2020-07-06T20:40:24Z",
"recorder": {
"reference": "https://example.com/interconnect-instance-oauth/api/FHIR/R4/Practitioner/eqZb1t82mP4YeBjiLldSFPQ3",
"display": "Family Medicine Physician"
},
"dosageInstruction": [
{
"extension": [
{
"valueQuantity": {
"value": 10,
"unit": "mg",
"system": "http://unitsofmeasure.org",
"code": "mg"
},
"url": "https://open.epic.com/fhir/extensions/ordered-dose"
}
],
"timing": {
"repeat": {
"boundsPeriod": {
"start": "2020-07-06T23:00:00Z"
},
"frequency": 2,
"period": 1,
"periodUnit": "d"
},
"code": {
"text": "0900 & 1800"
}
},
"asNeededBoolean": false,
"route": {
"coding": [
{
"system": "urn:oid:1.2.840.114350.1.13.861.1.7.4.798268.7025",
"code": "11",
"display": "Intravenous"
}
],
"text": "Intravenous"
}
}
]
},
"search": {
"mode": "match"
}
}
]
}
},
"extension": {
"com.epic.cdshooks.request.bpa-trigger-action": "18",
"com.epic.cdshooks.request.cds-hooks-specification-version": "1.0",
"com.epic.cdshooks.request.fhir-version": "R4",
"com.epic.cdshooks.request.criteria-id": "2852",
"com.epic.cdshooks.request.epic-version": "9.4",
"com.epic.cdshooks.request.cds-hooks-implementation-version": "1.0",
"com.epic.cdshooks.request.cds-hooks-su-version": "0",
"internal.epic.cdshooks.request.epic-emp-id": "17805"
}
}
CDS Hooks Response
Upon receiving a CDS Hooks request from Epic, a CDS Service should quickly and synchronously respond with a CDS Hooks response. Optionally, the CDS Service may query Epic's FHIR server to learn additional information before responding using the OAuth 2.0 access token provided in the fhirAuthorization attribute in the request.
Upon evaluating the CDS Hooks request (including the relevant information contained in the request, and any data retrieved) according to your app’s business logic, your application responds. This response determines whether content is displayed to end users and what that content should be. Possible types of content include one or more of:
- textual information
- suggested actions to be taken, such as adding diagnoses
- links to your SMART app or other web pages
Suggestion or app launch?
Generally, launching and interacting with an app is more time-consuming and therefore more disruptive to a user's workflow than returning a suggestion. If your CDS recommendations can be fully determined with only the information provided in the CDS Hooks request and other APIs, you should return these suggestions in the CDS Hooks response.
If you are unable to determine recommendations with only the information from the CDS Hooks request and other APIs, a link to launch an app enables additional user interaction. The app launch link is returned in the CDS Hooks response. A card response is a one-time event. CDS Hooks suggestions can only be returned in a CDS Hooks response. An app launched from a CDS Hooks response can't use CDS Hooks APIs.
Generally, the user needs to manually click a link to launch your app. There's nothing forcing the user to do this, and therefore they may not.
Beginning in Aug 23, Epic supports an "auto-launch" feature, such that a CDS Service may inform the EHR in its CDS Hooks response that it's appropriate to auto-launch an app because, for example, there's no other CDS guidance in the card. In the case where the only content in a CDS Hooks' response is an app url, and there's no other cards or native CDS, Epic may auto-launch an app.
Actions
In the CDS Hooks response, a CDS Service can suggest suggestions, which include one or more actions. An action creates or deletes a FHIR resource. For example, a CDS Service can recommend that a problem be added to the current patient’s problem list by returning a FHIR Condition resource and a card.suggestion.action.type of “create”. The list of suggestions supported by Epic are listed in the API library (search for CDS Hooks).
If using the MedicationRequest, ServiceRequest, or ProcedureRequest resources to create an unsigned order in Epic, order overrides are NOT set with information from the service response, even if additional order details are specified. All order details come from the default values defined on the medication record, procedure record, or preference list. To use these CREATE resources to specify a preference list item, specify the system as "urn:com.epic.cdshooks.action.code.system.preference-list-item". The code, assigned while building the preference list, will be the corresponding key used to identifty a particular order on the preference list.
HTTP Response Fields
|
Field |
Description |
|
cards |
An array of cards that provide any of the following:
Work with the health system to map the problem list items, encounter diagnoses, medications, procedures and/or multi-order sets. |
|
systemActions |
Beginning in Feb 24, Epic supports system actions to annotate orders via the ServiceRequest.Update (Unsigned Order) (R4) API. |
Card Attributes
Epic-specific nuances regarding Card attributes:
|
Field |
Description |
|
indicator |
The info, warning, and critical values can be mapped to Epic-specific values by the Epic application team for display. |
|
uuid |
Unique identifier, used for auditing and logging suggestions. This field is optional. However, it is required if you intend to receive feedback. |
|
selectionBehavior |
Only the value "any" is currently supported. |
|
detail |
A CDS Service may return content as mere plain text, as GitHub flavored markdown, or, with an Epic-specific extension, as html. (See "com.epic.cdshooks.card.detail.content-type" extension, below). |
|
source.topic.code |
Epic only supports alpha-numeric strings as the code of source.topic, for example: "Card123" or "869e7c5587e04d0da96a60a84b5b8eac". The value returned in source.topic.code is used for logging and auditing, and is returned to the CDS Service in the feedback request. Maximum Length: 100 Characters Source.topic.code should be a static identifier representing the particular topic of a card. When an end user overrides a given card, their acknowledgment is associated with this identifier. If you want the end user's override to be respected on subsequent requests to your CDS service, the topic identifier should remain static if sending the same card content. |
|
links |
Allows your service to suggest a link to a user for additional information or a SMART app. Allowed links are allow-listed by the health system. |
Suggestion Attributes
Epic-specific nuances regarding Suggestions and Action attributes:
|
Field |
Description |
|
label |
This field is not used, but is required. |
|
uuid |
Unique identifier, used for auditing and logging suggestions. This field is optional. However, it is required if you intend to receive feedback. |
|
isRecommended |
Boolean. When there are multiple suggestions, allows a service to indicate that a specific suggestion is recommended from all the available suggestions on the card. In Epic, this is used to control whether the suggested action is pre-selected or not. |
|
actions |
Epic only supports a single action per suggestion. |
|
actions.type |
For a given resource, confirm the action types supported in the API Library. |
|
actions.description |
This value is the primary content of the OPA. A CDS Service may return content as plain text. |
|
actions.resource |
The FHIR resource provided by the CDS Service representing the action to be suggested to the user. Check the API Library to see what resources (and action types) are supported. |
Codesets for Create APIs
The following table calls out codesets that may be used when specifying a coding for a given Create action.
|
System |
Description |
Resource(s) |
|
urn:com.epic.cdshooks.action.code.system.preference-list-item |
Used to order a specific preference list item. |
MedicationRequest.Create ServiceRequest.Create ProcedureRequest.Create |
|
urn:com.epic.cdshooks.action.code.system.orderset-item |
Used to order a specific SmartSet, OrderSet, or Pathway. |
ServiceRequest.Create ProcedureRequest.Create |
|
urn:com.epic.cdshooks.action.code.system.cms-hcc |
Used to suggest a Visit Diagnosis through a CMS-HCC model. |
Condition.Create |
|
urn:com.epic.cdshooks.action.code.system.hhs-hcc |
Used to suggest a Visit Diagnosis through a HHS-HCC model. |
Condition.Create |
|
urn:oid:2.16.840.1.113883.6.90 |
Used to suggest ICD-10 codes. |
Condition.Create |
|
urn:oid:2.16.840.1.113883.6.69 |
Used to suggest NDC codes. |
MedicationRequest.Create |
|
urn:oid:2.16.840.1.113883.6.88 |
Used to suggest by RxNorm code. |
MedicationRequest.Create |
Link Attributes
|
Attribute |
Description |
|
label |
This field is not used, but is required. |
|
url |
The URL to load. |
|
type |
This field is required, and may either be absolute or smart. |
|
appContext |
This field is optional, and will share information from the CDS card with the subsequently launched SMART app. |
|
autolaunchable |
Supported by Epic beginning in Aug 23, this will autolaunch the SMART app if only one OPA requests an autolaunch at a given time. |
Supported Extensions
|
Extension |
Description |
|
com.epic.cdshooks.card.detail.content-type |
If this is not set, or set to "text/markdown" or "text/markdown; variant=GitHub", Epic will treat it as GitHub Flavored Markdown |
Basic Example HTTP Response with Card
{
  "cards": [
    {
      "summary": "Testing Informational Card",
      "detail": "* Suspected colorectal cancer. \n\n* Please add to patient's diagnoses.\n\nSuspected Bladder cancer. Please add to patient's diagnoses.",
	  "indicator": "critical",
      "source": {
        "topic": {
          "code": "examplecode1"
        }
      },
    },]
}
Example HTTP Response for no decision support needed
{
  "cards": []
}
Example HTTP Response with Links, Override Reasons, and Suggestions
{
   "cards":[
	  {
         "summary":"Example",
         "indicator":"info",
         "extension":{
            "com.epic.cdshooks.card.detail.content-type":"text/html"
         },
         "detail":"Another card to test suggestions",
		 "source": {
			"label": "Clinical Inferences",
			"url": "https://www.example.com/",
			"icon": "file://example/CDSHooks/images/example.png",
			"topic": {
			  "code": "BCSCard2",
			  "system": "card-system",
			  "display": "BCS Card 2"
			}
		  },
		  "links": [
			{
			  "label": "Github",
			  "url": "https://github.com",
			  "type": "absolute"
			},
			{
			  "label": "R4 SMART Example App",
			  "url": "https://example.com/EpicSMARTApp/Default.aspx?appFhirVersion=R4",
			  "type": "smart",
			  "appContext": "%FNAME%-%EXTENSION;74901%-420fe522-193c-11eb-9552-460231621f93~!@#$%^&*()-+{}[]|\\"
			},
		  ],
		  "overrideReasons":[
			{
				"code":"patrefused",
				"system":"http://example.org/cds-services/fhir/CodeSystem/override-reasons",
				"display":"Patient refused"
			},
			{
				"code":"seecomment",
				"system":"http://example123.org/cds-services/fhir/CodeSystem/override-reasons",
			}
		 ],
           "suggestions":[
		   {
               "label":"Arthritis",
			   "uuid": "cf72fe83-1eb9-410c-94aa-04ec98736388",
               "actions":[
                  {
                     "type":"create",
					 "description":"Arthritis",
                     "resource": {
						"resourceType": "Condition",
						"category": [
						  {
							"coding": [
							  {
								"system": "http://terminology.hl7.org/CodeSystem/condition-category",
								"code": "encounter-diagnosis",
								"display": "Encounter diagnosis"
							  }
							],
							"text": "Encounter diagnosis"
						  }
						],
						"code": {
						  "coding": [
							{
							  "system": "urn:com.epic.cdshooks.action.code.system.cms-hcc",
							  "code": "40",
							  "display": "Arthritis"
							}
						  ],
						  "text": "Stomach ache"
						}
					  },
                  }
               ]
            },
			{
               "label":"Stroke",
			   "uuid": "12035ae1-5d60-4f58-b922-882140b98283",
               "actions":[
                  {
                     "type":"create",
					 "description":"Stroke",
                     "resource": {
						"resourceType": "Condition",
						"category": [
						  {
							"coding": [
							  {
								"system": "http://terminology.hl7.org/CodeSystem/condition-category",
								"code": "encounter-diagnosis",
								"display": "Encounter diagnosis"
							  }
							],
							"text": "Encounter diagnosis"
						  }
						],
						"code": {
						  "coding": [
							{
							  "system": "urn:com.epic.cdshooks.action.code.system.cms-hcc",
							  "code": "100",
							  "display": "Stroke"
							}
						  ],
						  "text": "Stroke"
						}
					  },
                  }
               ]
            },
			{
               "label":"Stroke",
			   "uuid": "1a53ba14-a06b-4e82-bbb0-09ae01a75515",
               "actions":[
                  {
                     "type":"create",
                     "description":"Stroke prognosis",
                     "resource": {
						"resourceType": "Condition",
						"category": [
						  {
							"coding": [
							  {
								"system": "http://terminology.hl7.org/CodeSystem/condition-category",
								"code": "problem-list-item",
								"display": "Problem List"
							  }
							],
							"text": "Problem list"
						  }
						],
						"code": {
						  "coding": [
							{
							  "system": "urn:oid:2.16.840.1.113883.6.90",
							  "code": "R10.9"

							},
							{
							  "system": "urn:oid:2.16.840.1.113883.6.96",
							  "code": "271681002"

							}
						  ],
						  "text": "Stomach ache"
						}
					  },
                  }
               ]
            },
			{
			"label":"Diabetes",
			"uuid": "85126ce5-b0a7-4a54-86f4-d7b52426cc58",
            "actions":[
               {
                  "type":"create",
                  "description":"Diabetes Order Set from CDS Hooks",
                  "resource": {
					"resourceType": "ServiceRequest",
					"status": "draft",
					"intent": "proposal",
					"category": [
					  {
					  "coding": [
						{
						  "system": "http://terminology.hl7.org/CodeSystem/medicationrequest-category",
						  "code": "outpatient",
						  "display": "Outpatient"
						}]
					}],
					"code": {
					  "coding": [
					    {
						  "system": "urn:com.epic.cdshooks.action.code.system.orderset-item",
						  "code": "DIABETES"
						}
					  ]
					}
				  },
               },
            ]
         },
			 {
				"label":"Test IP Medication Order",
				"uuid": "b1e0575b-2381-4625-b687-2def804d7c79",
				"actions":[
				   {
					  "type":"create",
					  "description":"Test Medication IP Order",
					  "resource": {
						"resourceType": "MedicationRequest",
						"status": "draft",
						"intent": "proposal",
						"category": [
						{
						  "coding": [
							{
							  "system": "http://terminology.hl7.org/CodeSystem/medicationrequest-category",
							  "code": "inpatient",
							  "display": "Inpatient"
							}
						  ],
						  "text": "Inpatient"
						}
						],
						"medicationCodeableConcept": {
						  "coding": [
							{
							  "system": "urn:oid:2.16.840.1.113883.6.69",
							  "code": "55111-682-01"
							}
						  ],
						  "text": "Test Med Display name"
						}
					  },
				   },
				]
			 },
			 {
				"label":"Test Medication Order from Pref",
				"uuid": "5e0ce5e2-d33a-467c-bfc6-cde8d304e73d",
				"actions":[
				   {
					  "type":"create",
					  "description":"Test Medication Order from Pref",
					  "resource": {
						"resourceType": "MedicationRequest",
						"status": "draft",
						"intent": "proposal",
						"category": [
						{
						  "coding": [
							{
							  "system": "http://terminology.hl7.org/CodeSystem/medicationrequest-category",
							  "code": "inpatient",
							  "display": "Inpatient"
							}
						  ],
						  "text": "Inpatient"
						}
						],
						"medicationCodeableConcept": {
						  "coding": [
							{
							  "system": "urn:com.epic.cdshooks.action.code.system.preference-list-item",
							  "code": "BENAD25"
							}
						  ],
						  "text": "Test Proc Display name"
						}
					  },
				   },
				]
			 },
		 {
            "label":"CBC",
			"uuid": "613b0192-4243-4384-8294-4316dfb726bb",
            "actions":[
               {
                  "type":"create",
                  "description":"CBC from CDS Hooks",
                  "resource": {
					"resourceType": "ServiceRequest",
					"status": "draft",
					"intent": "proposal",
					"category": [
					  {
					  "coding": [
						{
						  "system": "http://terminology.hl7.org/CodeSystem/medicationrequest-category",
						  "code": "outpatient",
						  "display": "Outpatient"
						}]
					}],
					"code": {
					  "coding": [
					    {
						  "system": "urn:com.epic.cdshooks.action.code.system.preference-list-item",
						  "code": "CBC_IP"
						}
					  ],
					  "text": "Test Proc Display name"
					}
				  },
               },
            ]}
		]
      },
]
}
When sending override reasons in your response, configuration must be completed within the CDS Hooks criteria record to map overrideReasons.code to released acknowledgment reasons. overrideReasons.system does not have to be a specific string; it can be any non-empty string.

